
Step-by-step guide for installing the Glassix agent widget via JavaScript or iFrame
The JavaScript SDK is the easiest way to add the Glassix agent widget to your site. This guide walks you through the process from start to finish: whitelisting your domain, getting your install script, adding any widget options, and embedding it on your website.
There is one other way to install the agent widget besides copying and pasting the standard script.
- Custom iframe: embed the widget inside your own iframe element when you need custom behavior. See the iFrame section below.
Overview
Installing the Glassix agent widget involves four steps broadly:
- Whitelist the domain where you plan to embed the widget.
- Copy the generated script from the Agent widget installation screen.
- Add any widget options you need (for example, the widget's width or its position on the page).
- Paste the script onto your website before the closing
</body>tag.
Each part is covered in detail below.
Two things work differently here than on the chat widget:
- Domain whitelisting is required. The agent widget only loads on domains you've added to your allowed list. See Step 1.
userNameis hardcoded in the script. The generated script ships with a single, fixeduserNamevalue, so the widget always signs in as that one agent. To sign different agents in dynamically, override the value with your own JavaScript. See Customizing the Username.The agent widget also doesn't support configurable design or branding options per snippet the way the chat widget does. Size and position are set in the script itself, see the Options page.
Prerequisites
- An active Glassix account with admin access.
- Access to the website where you want the widget to appear (you'll need to edit the page HTML).
If you already have an account, you can jump straight to the JavaScript code on the Agent widget installation screen.
Step 1: Whitelist Your Domain
Before the agent widget loads on your site, you need to add your domain to the list of allowed domains. This is a security measure that prevents the widget from being embedded on unauthorized sites.
This step is specific to the agent widget — it does not exist for the chat widget. If your domain is not whitelisted, the agent widget will not load.
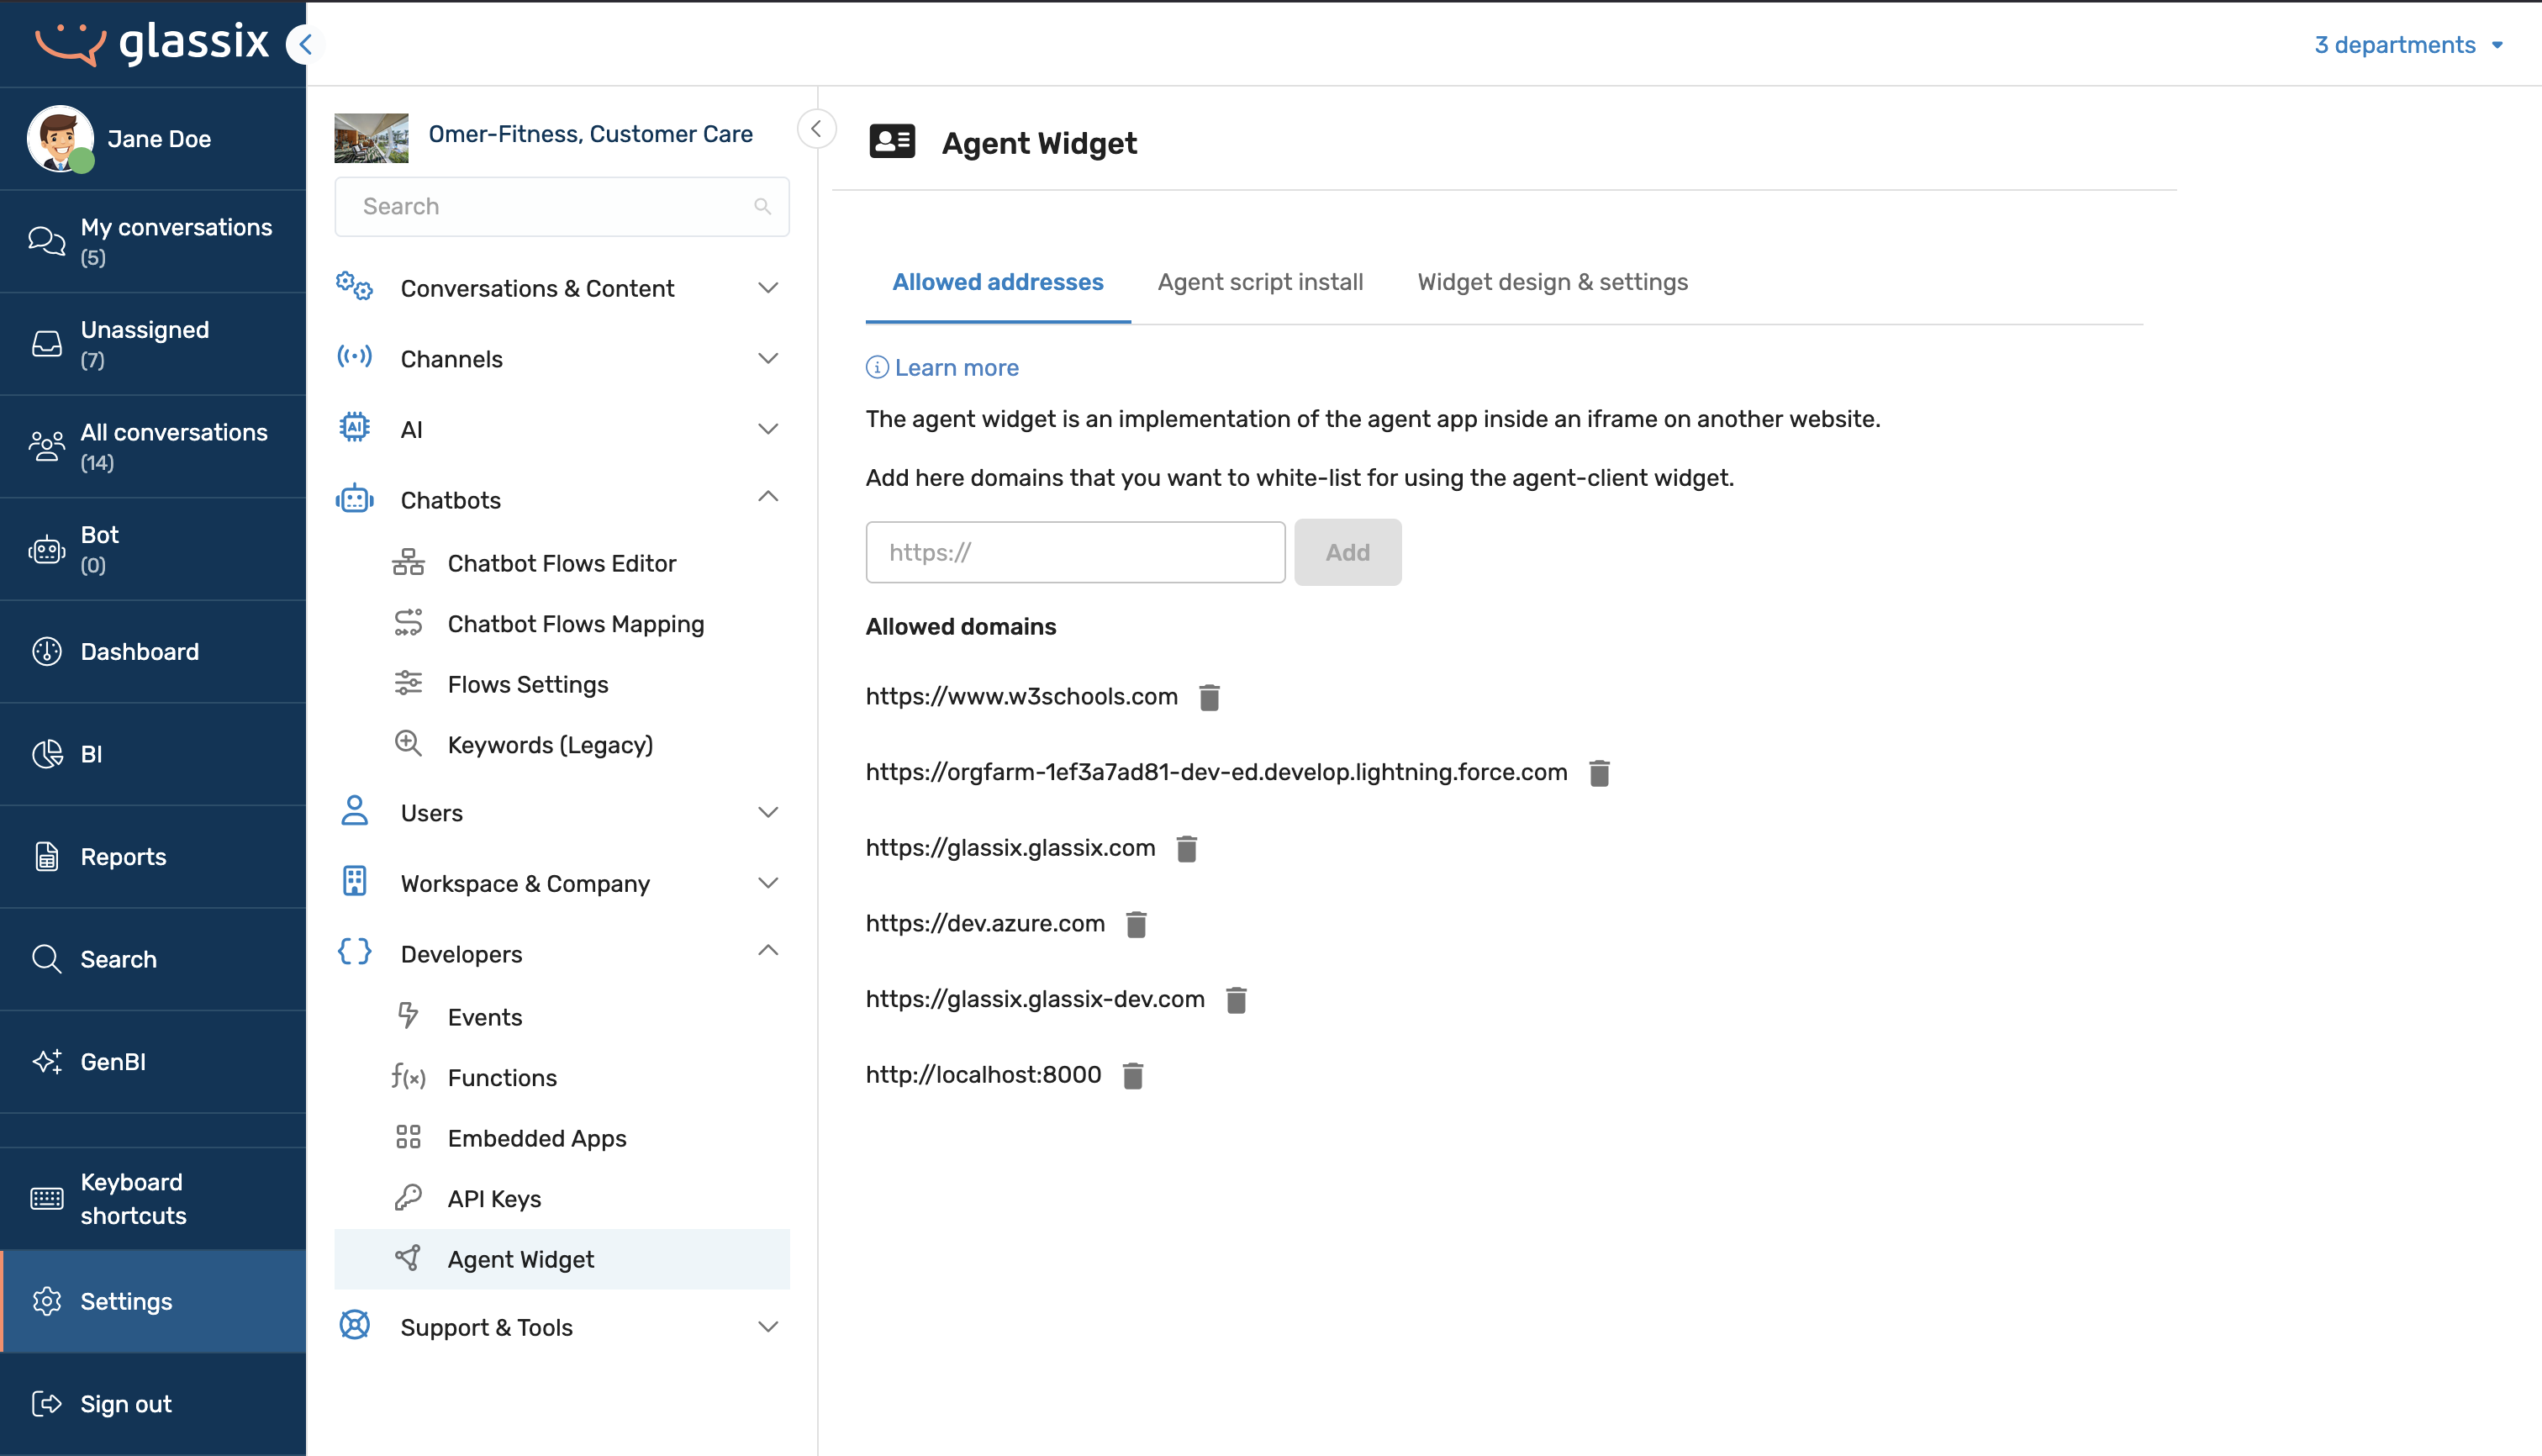
Step 2: Copy the Script
-
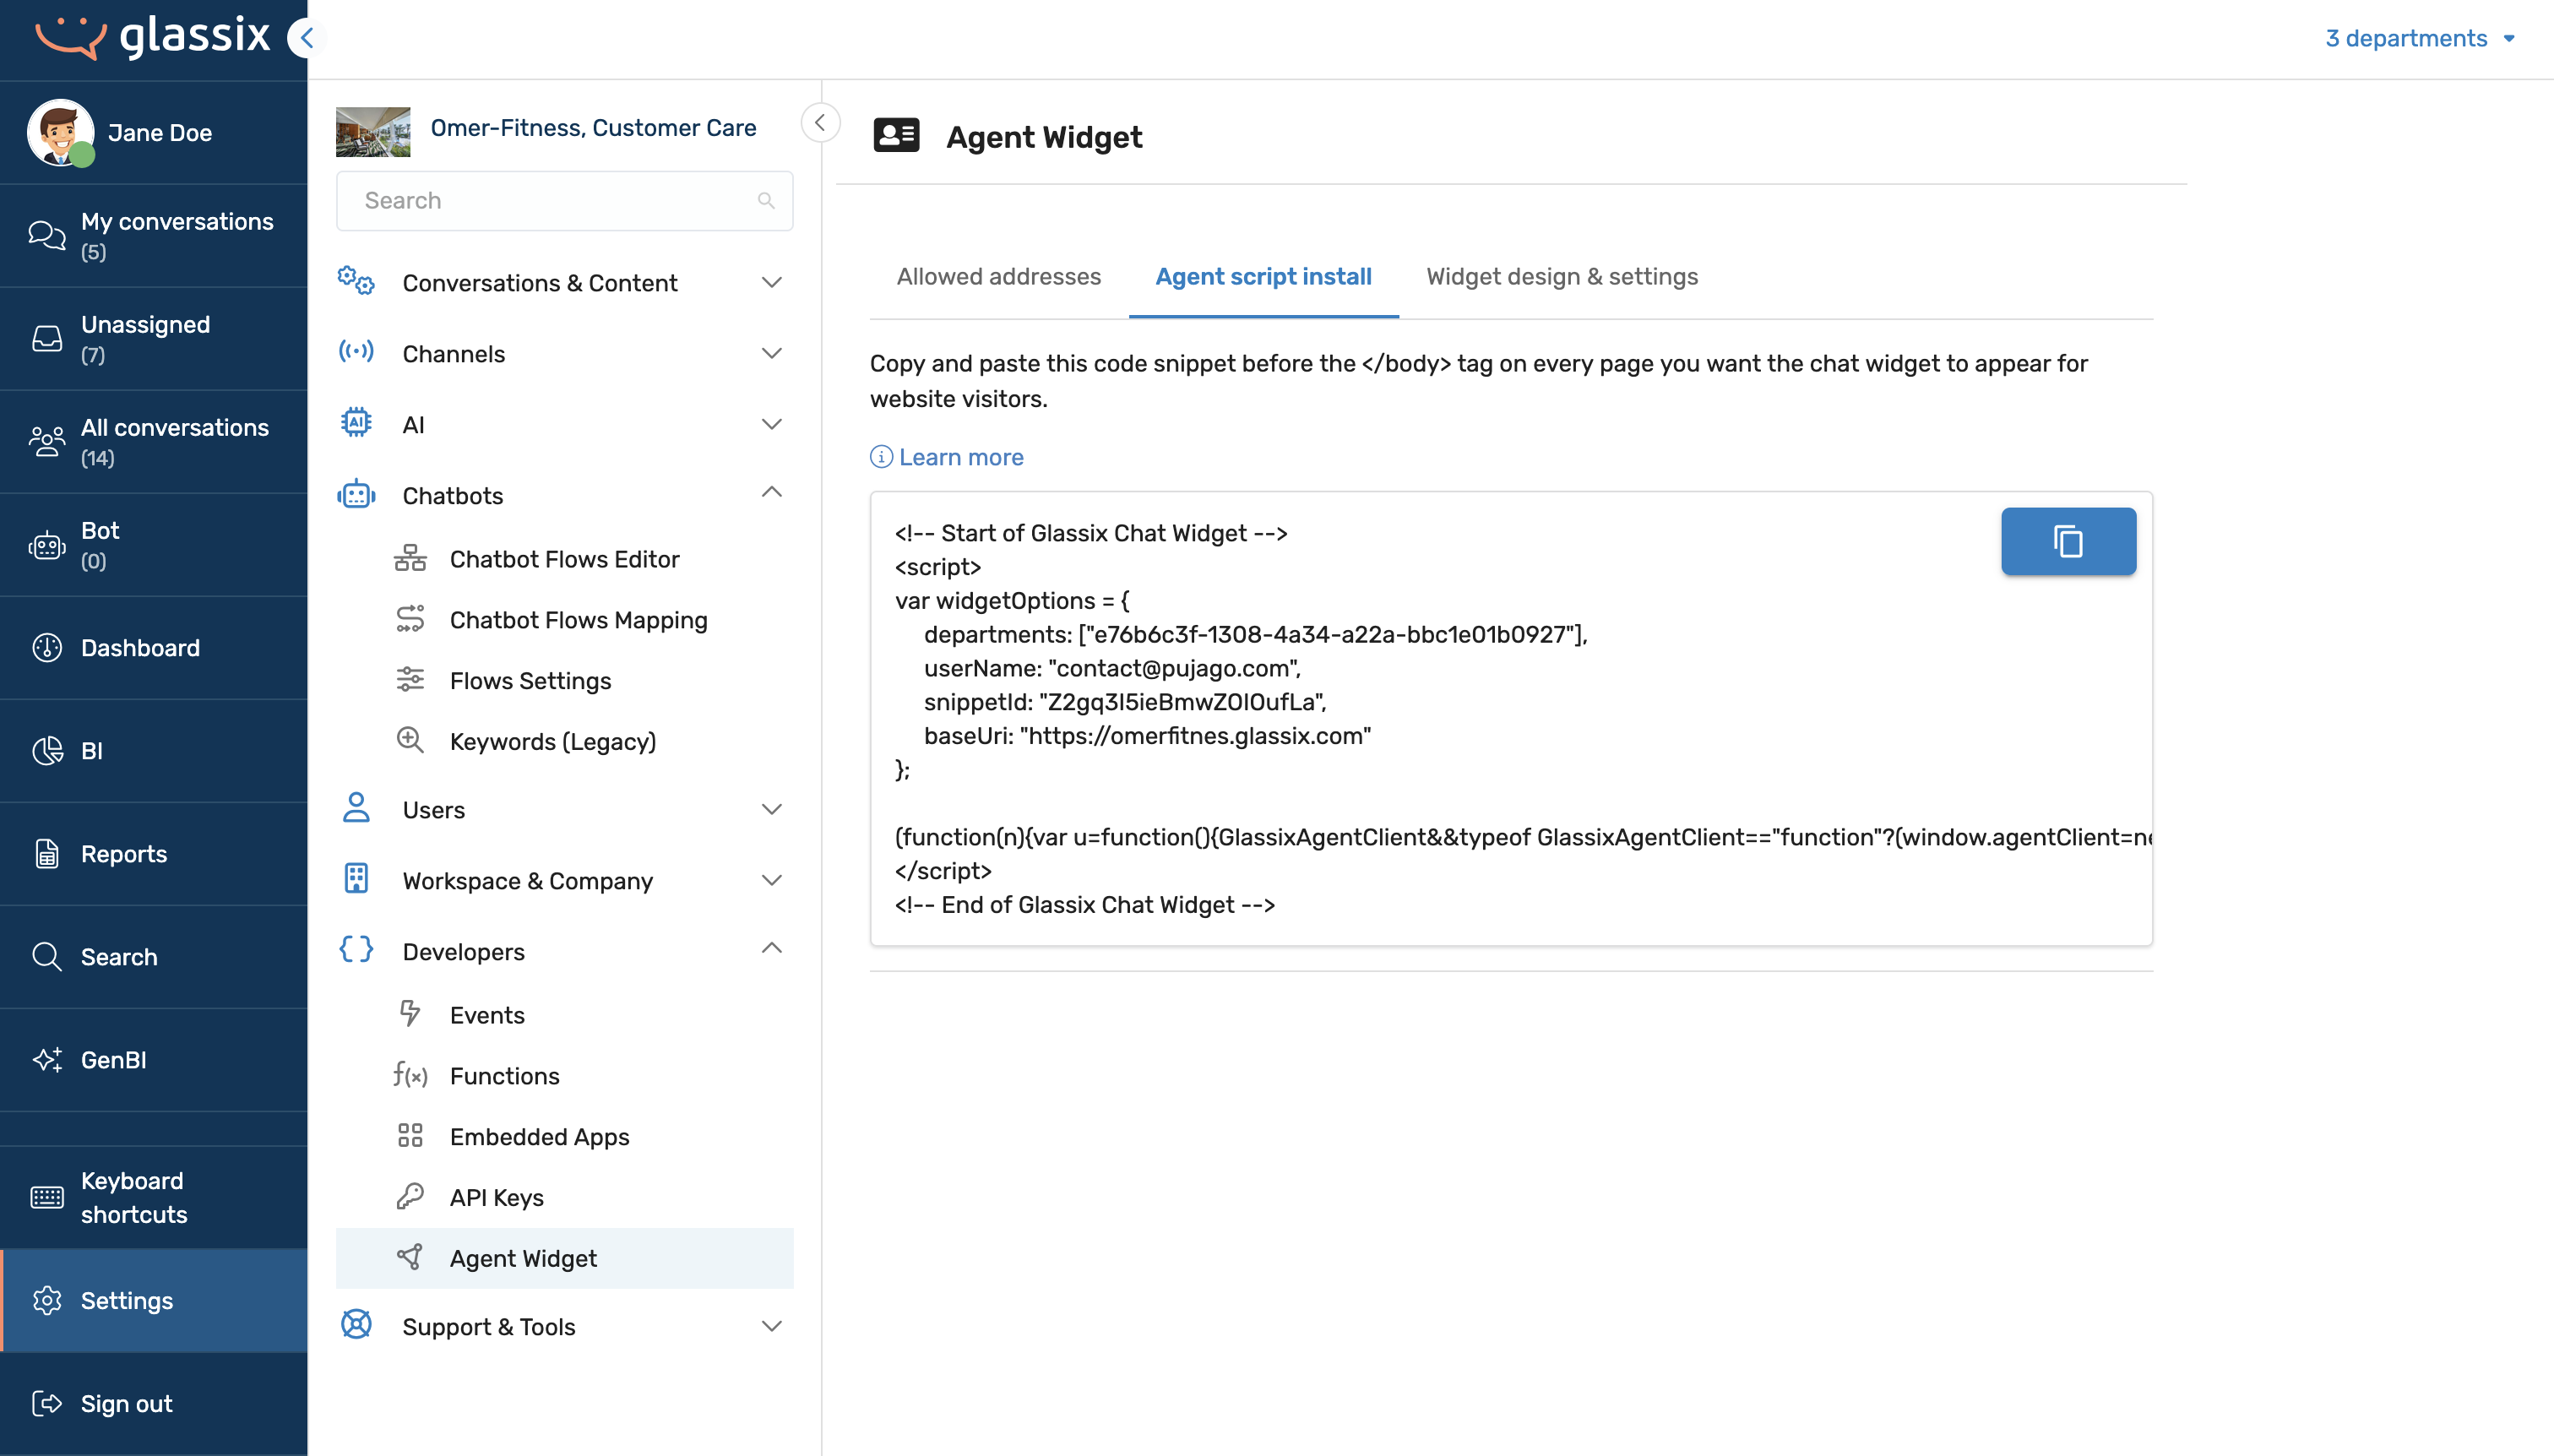
In Glassix, go to the Agent widget installation screen.
-
Copy the script. The script looks like this:
<!-- Start of Glassix Agent Widget -->
<script>
var widgetOptions = {
     departments: ["departments ids you want to sign into"],
     userName: "your-user-name",
     snippetId: "your-snippet-id"
};

(function(n){var u=function(){GlassixAgentClient&&typeof GlassixAgentClient=="function"?(window.agentClient=new GlassixAgentClient(n),agentClient.attach()):f()},f=function(){r.onload=u;r.src="https://cdn.glassix.net/clients/agent.1.3.min.js";document.body&&document.body.removeChild(t);i.parentNode.insertBefore(r,i)},i=document.getElementsByTagName("script")[0],t=document.createElement("script"),r;(t.async=!0,t.type="text/javascript",t.crossorigin="anonymous",t.id="glassix-agent-widget-script",r=t.cloneNode(),t.onload=u,t.src="https://cdn.glassix.com/clients/agent.1.3.min.js",!document.getElementById(t.id)&&document.body)&&(i.parentNode.insertBefore(t,i),t.onerror=f)})(widgetOptions)
</script>
<!-- End of Glassix Agent Widget -->
Don't paste the script onto your site yet. Make your edits to the widgetOptions object first, starting with userName, as described in the next step.
Step 3: Add Your Widget Options
Widget options are configured in the widgetOptions object at the top of the script, and they control the widget's behavior and appearance. Add them now, before you paste the script onto your site.
Widget options are added to the
widgetOptionsobject in the script before you paste it onto your site, not in the Glassix dashboard. Make sure you edit the script with your chosen options before embedding it.
For the full list of available options, including baseUri, width, height, and position, see the Options page.
Customizing the Username
By default, the userName value is hardcoded directly in the script's widgetOptions object. This means the widget will always sign in as that one user unless you override it with JavaScript before the widget initializes.
To dynamically set the username, for example, based on the agent who is currently logged into your internal system, replace the hardcoded value with a variable populated by your own logic:
var widgetOptions = {
     departments: ["departments ids you want to sign into"],
     userName: getCurrentAgentUsername(), // replace with your own logic
     snippetId: "your-snippet-id"
};
getCurrentAgentUsername() is a placeholder for how your site determines the currently signed-in agent, for example, by reading from session storage, a cookie, or by making an API call to your backend.
Set
userNamebefore the widget initializes. If the agent signed into your own application changes after the widget has loaded, log the current agent out withlogout()so the widget's session stays in sync with your application's authentication state.
Step 4: Paste the Script on Your Website
You can paste the script directly on your website or embed the agent widget in your own iframe if you need a custom placement. Follow the instructions for your method below.
For a full reference of the methods available on the widget client, including
attach()anddestroy(), see Methods.
Standard Website
Paste the copied script just before the closing </body> tag on every page where you want the agent widget to appear.
<!DOCTYPE html>
<html lang="en">
<head>
  <meta charset="UTF-8" />
  <title>My Internal Tool</title>
</head>
<body>

  <!-- Your page content goes here -->

  <!-- Start of Glassix Agent Widget -->
  <script>
  var widgetOptions = {
       departments: ["departments ids you want to sign into"],
       userName: "your-user-name",
       snippetId: "your-snippet-id"
  };

  (function(n){var u=function(){GlassixAgentClient&&typeof GlassixAgentClient=="function"?(window.agentClient=new GlassixAgentClient(n),agentClient.attach()):f()},f=function(){r.onload=u;r.src="https://cdn.glassix.net/clients/agent.1.3.min.js";document.body&&document.body.removeChild(t);i.parentNode.insertBefore(r,i)},i=document.getElementsByTagName("script")[0],t=document.createElement("script"),r;(t.async=!0,t.type="text/javascript",t.crossorigin="anonymous",t.id="glassix-agent-widget-script",r=t.cloneNode(),t.onload=u,t.src="https://cdn.glassix.com/clients/agent.1.3.min.js",!document.getElementById(t.id)&&document.body)&&(i.parentNode.insertBefore(t,i),t.onerror=f)})(widgetOptions)
  </script>
  <!-- End of Glassix Agent Widget -->

</body>
</html>
Once the script loads, the agent widget appears on your page, and agents can sign in.
Glassix creates the widget by injecting an iframe element into your page and filling it with the widget. You don't need to add any markup yourself, the script handles it.
iFrame
Use this method if you want to embed the agent widget inside your own iframe element instead of using the default injected widget, for example, if you need to place it inside a fixed panel in an internal tool rather than have it inject itself into the page.
<html xmlns="http://www.w3.org/1999/xhtml">
<head>
<meta charset="utf-8" />
<meta name="viewport" content="width=device-width, height=device-height, initial-scale=1.0, maximum-scale=1.0, user-scalable=no, target-densityDpi=device-dpi" />
</head>
<body>
<glassix-agent-iframe></glassix-agent-iframe>
<script src="https://cdn.glassix.net/clients/agent.1.3.min.js"></script>
<script>
var widgetOptions = {
     departments: ["departments ids you want to sign into"],
     userName: "your-user-name",
     snippetId: "your-snippet-id"
};
window.agentClient = new GlassixAgentClient(widgetOptions);
agentClient.getIframeUri().then(function (uri) {
    var iframe = document.getElementsByTagName("glassix-agent-iframe")[0];
    iframe.src = uri;
});
</script>
</body>
</html>
The iFrame method uses the same departments, userName, and snippetId options as the standard install. width, height, and position control the default injected widget's container, so they don't apply here — size and position your iframe with your own HTML/CSS instead. For the full list of configurable options, see the Options page.
Widgets embedded this way don't use
attach()ordestroy(). SeegetIframeUriin the Methods reference.
Parameters
| Name | Type | Description | Default Value |
|---|---|---|---|
departments | Array[string] | List of department IDs to log into. | [] |
userName | string | The specific agent's email. Hardcoded by default — override with JavaScript, see Customizing the Username. | |
snippetId | string | Use if you have more than one script configured for your department. |