Learn how to install the Glassix chat widget on your website using the JavaScript SDK.
The JavaScript SDK is the easiest way to add the Glassix chat widget to your site. This guide walks you through the process from start to finish: creating a widget snippet in Glassix, configuring it, adding any widget options, and embedding the script on your website.
There are two other ways to install the chat widget besides copying and pasting the standard script.
- Custom iframe: embed the widget inside your own iframe element when you need custom behavior. Learn more
- RequireJS: embed the widget using RequireJS, a loading optimizer for sites with a lot of JavaScript. Learn more
The standard method is described below. If you need one of the other methods, follow the links above.
Overview
Installing the Glassix chat widget involves four steps broadly:
- Create a new widget snippet in Glassix and configure its branding and behavior.
- Add any widget options you need (for example, a custom pop-up, the ability to skip text, or the ability to skip the new conversation form).
- Copy the generated script from the Widget installation screen.
- Paste the script onto your website before the closing
</body>tag.
Each part is covered in detail below.
Creating and installing widget snippets is only available to admins, typically department admins or workspace admins (for partners).
Prerequisites
- An active Glassix account with admin access.
- Access to the website where you want the widget to appear (you'll need to edit the page HTML).
If you already have an account, you can jump straight to the JavaScript code on the Widget installation screen.
Step 1: Create and Configure a Widget Snippet
A snippet is a single, self-contained configuration of the chat widget. Everything, branding, fonts, sizing, colors, your logo, and which features are turned on, is configured per snippet. Each snippet has its own unique snippet ID. Hence, you can create different widgets for different sites or pages.
-
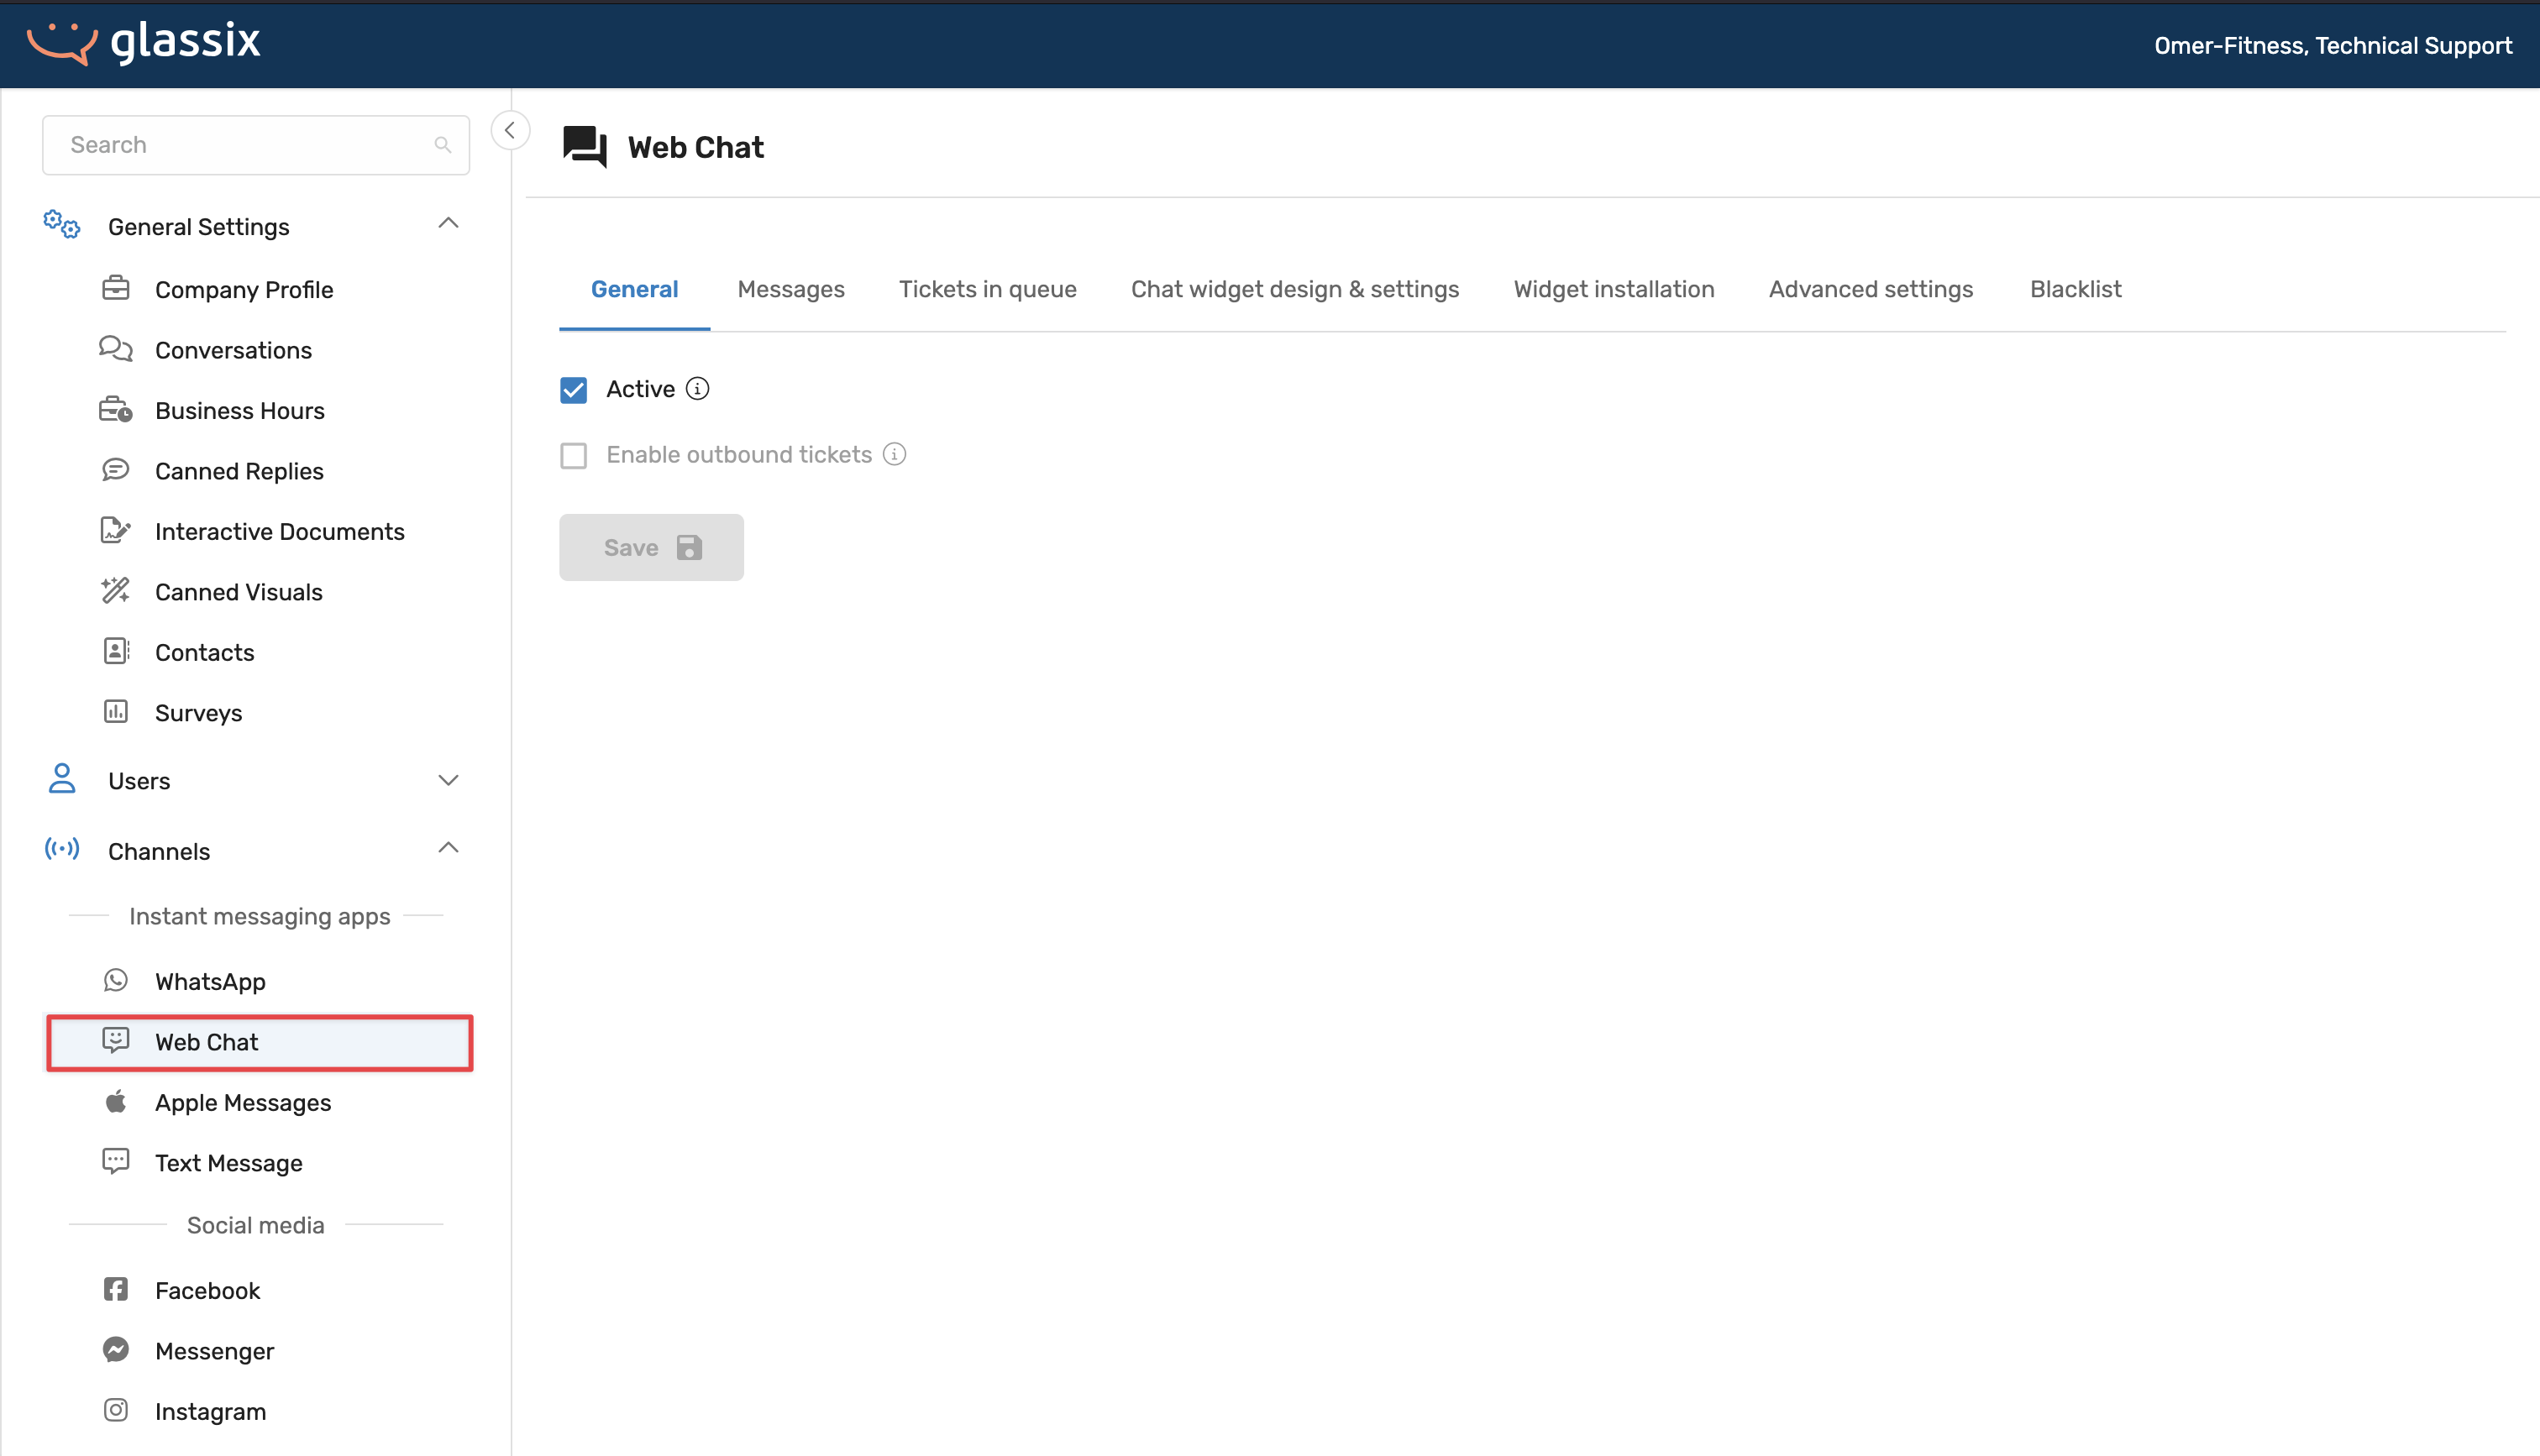
In Glassix, go to Settings → Channels → Web Chat.
-
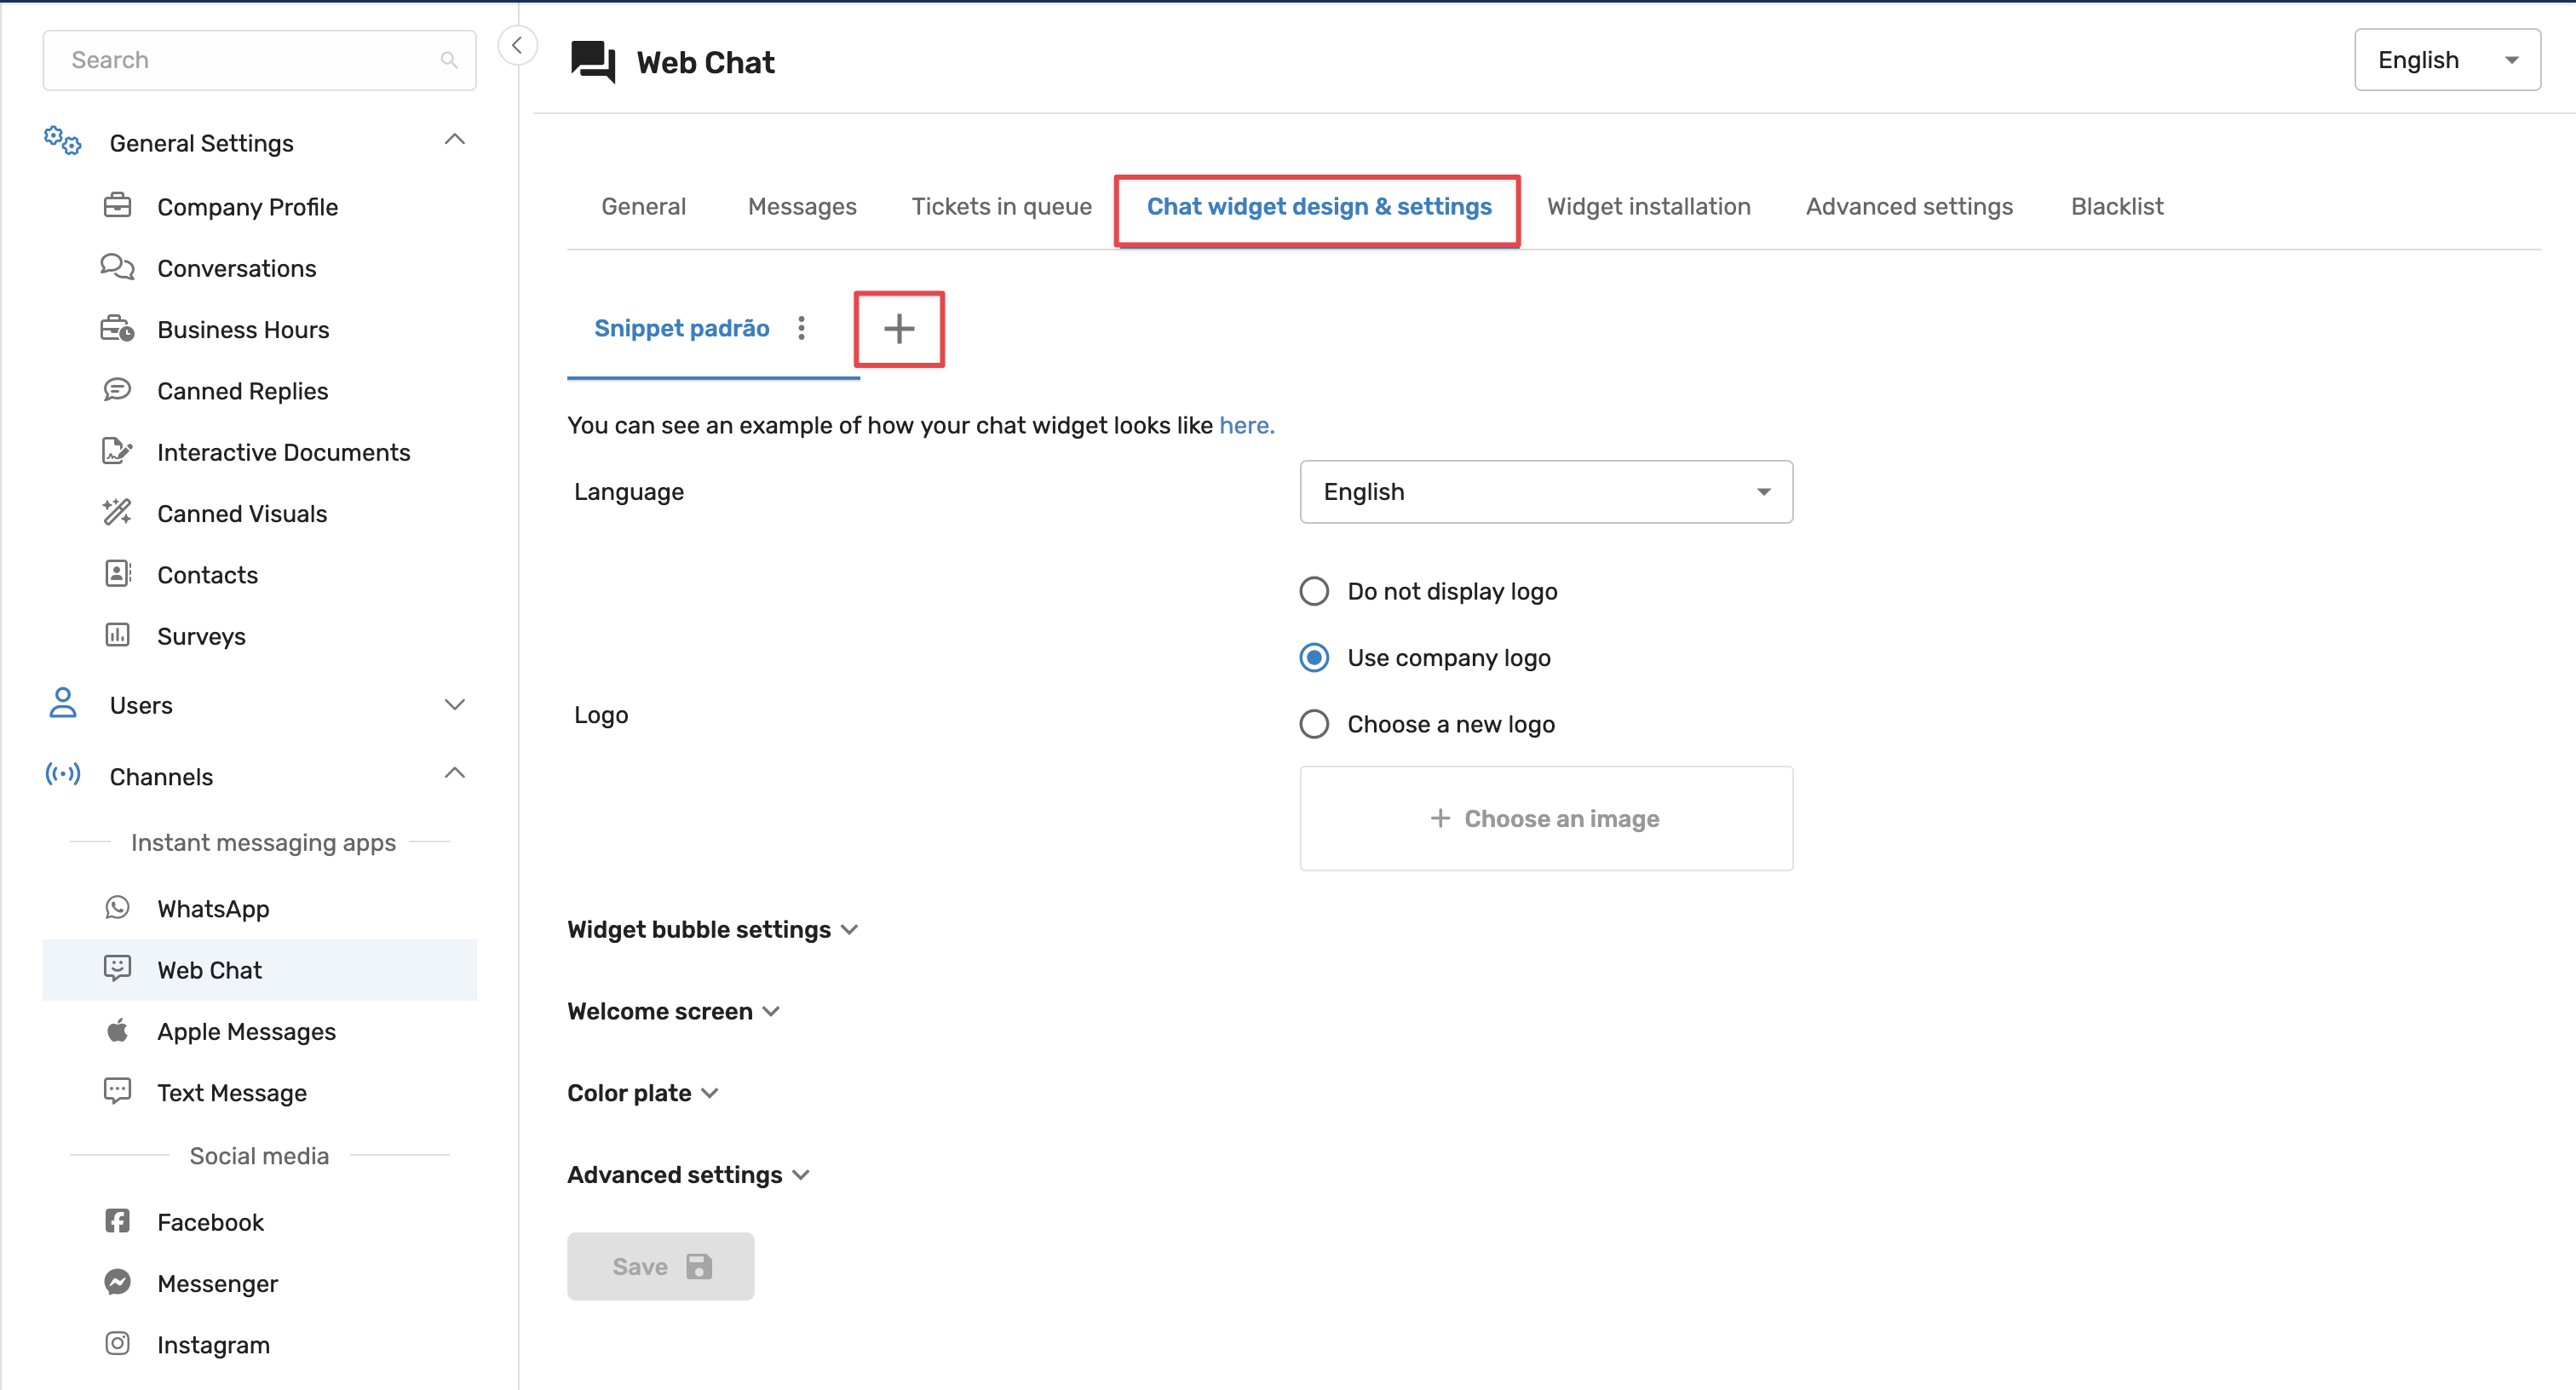
Open the Chat widget design & settings tab.
-
Click the + (plus) button at the top to create a new snippet.
-
Configure the snippet with your branding: fonts, sizing, colors, logo, and any other design settings.
-
Turn widget features on or off depending on where you plan to embed it.
-
Click Save once done.
All design and behavior settings are configured per snippet. If you create a second snippet, you'll need to reconfigure these settings for it, they are not shared between snippets.
The name you give a snippet here is the name you'll see later in the dropdown list on the Widget installation screen, so choose something you'll recognize.
Step 2: Add Your Widget Options
You can find the widget script at the Widget Installation tab.
Before you copy and paste the script, this is the point to add any widget options you want to apply. Widget options are configured in the widgetOptions object inside the script and control the widget's behavior and appearance.
For example, you might set custom popup text or skip the new conversation form:
var widgetOptions = {
    apiKey: "your-api-key",
    snippetId: "your-snippet-id",
    chatNowPopText: "Need help? Chat with us!",
    newConversationWithoutForm: true
};
For the full list of available options, configuration, design, and field options, see the Options page. Also, to see all available events and what each one does, see JS Events.
Widget options are added to the
widgetOptionsobject in the script before you paste it onto your site, not in the Glassix dashboard. This is a common point of confusion, so make sure you edit the script with your chosen options before embedding it.
Step 3: Copy the Script
- In Glassix, go to Settings → Channels → Web Chat.
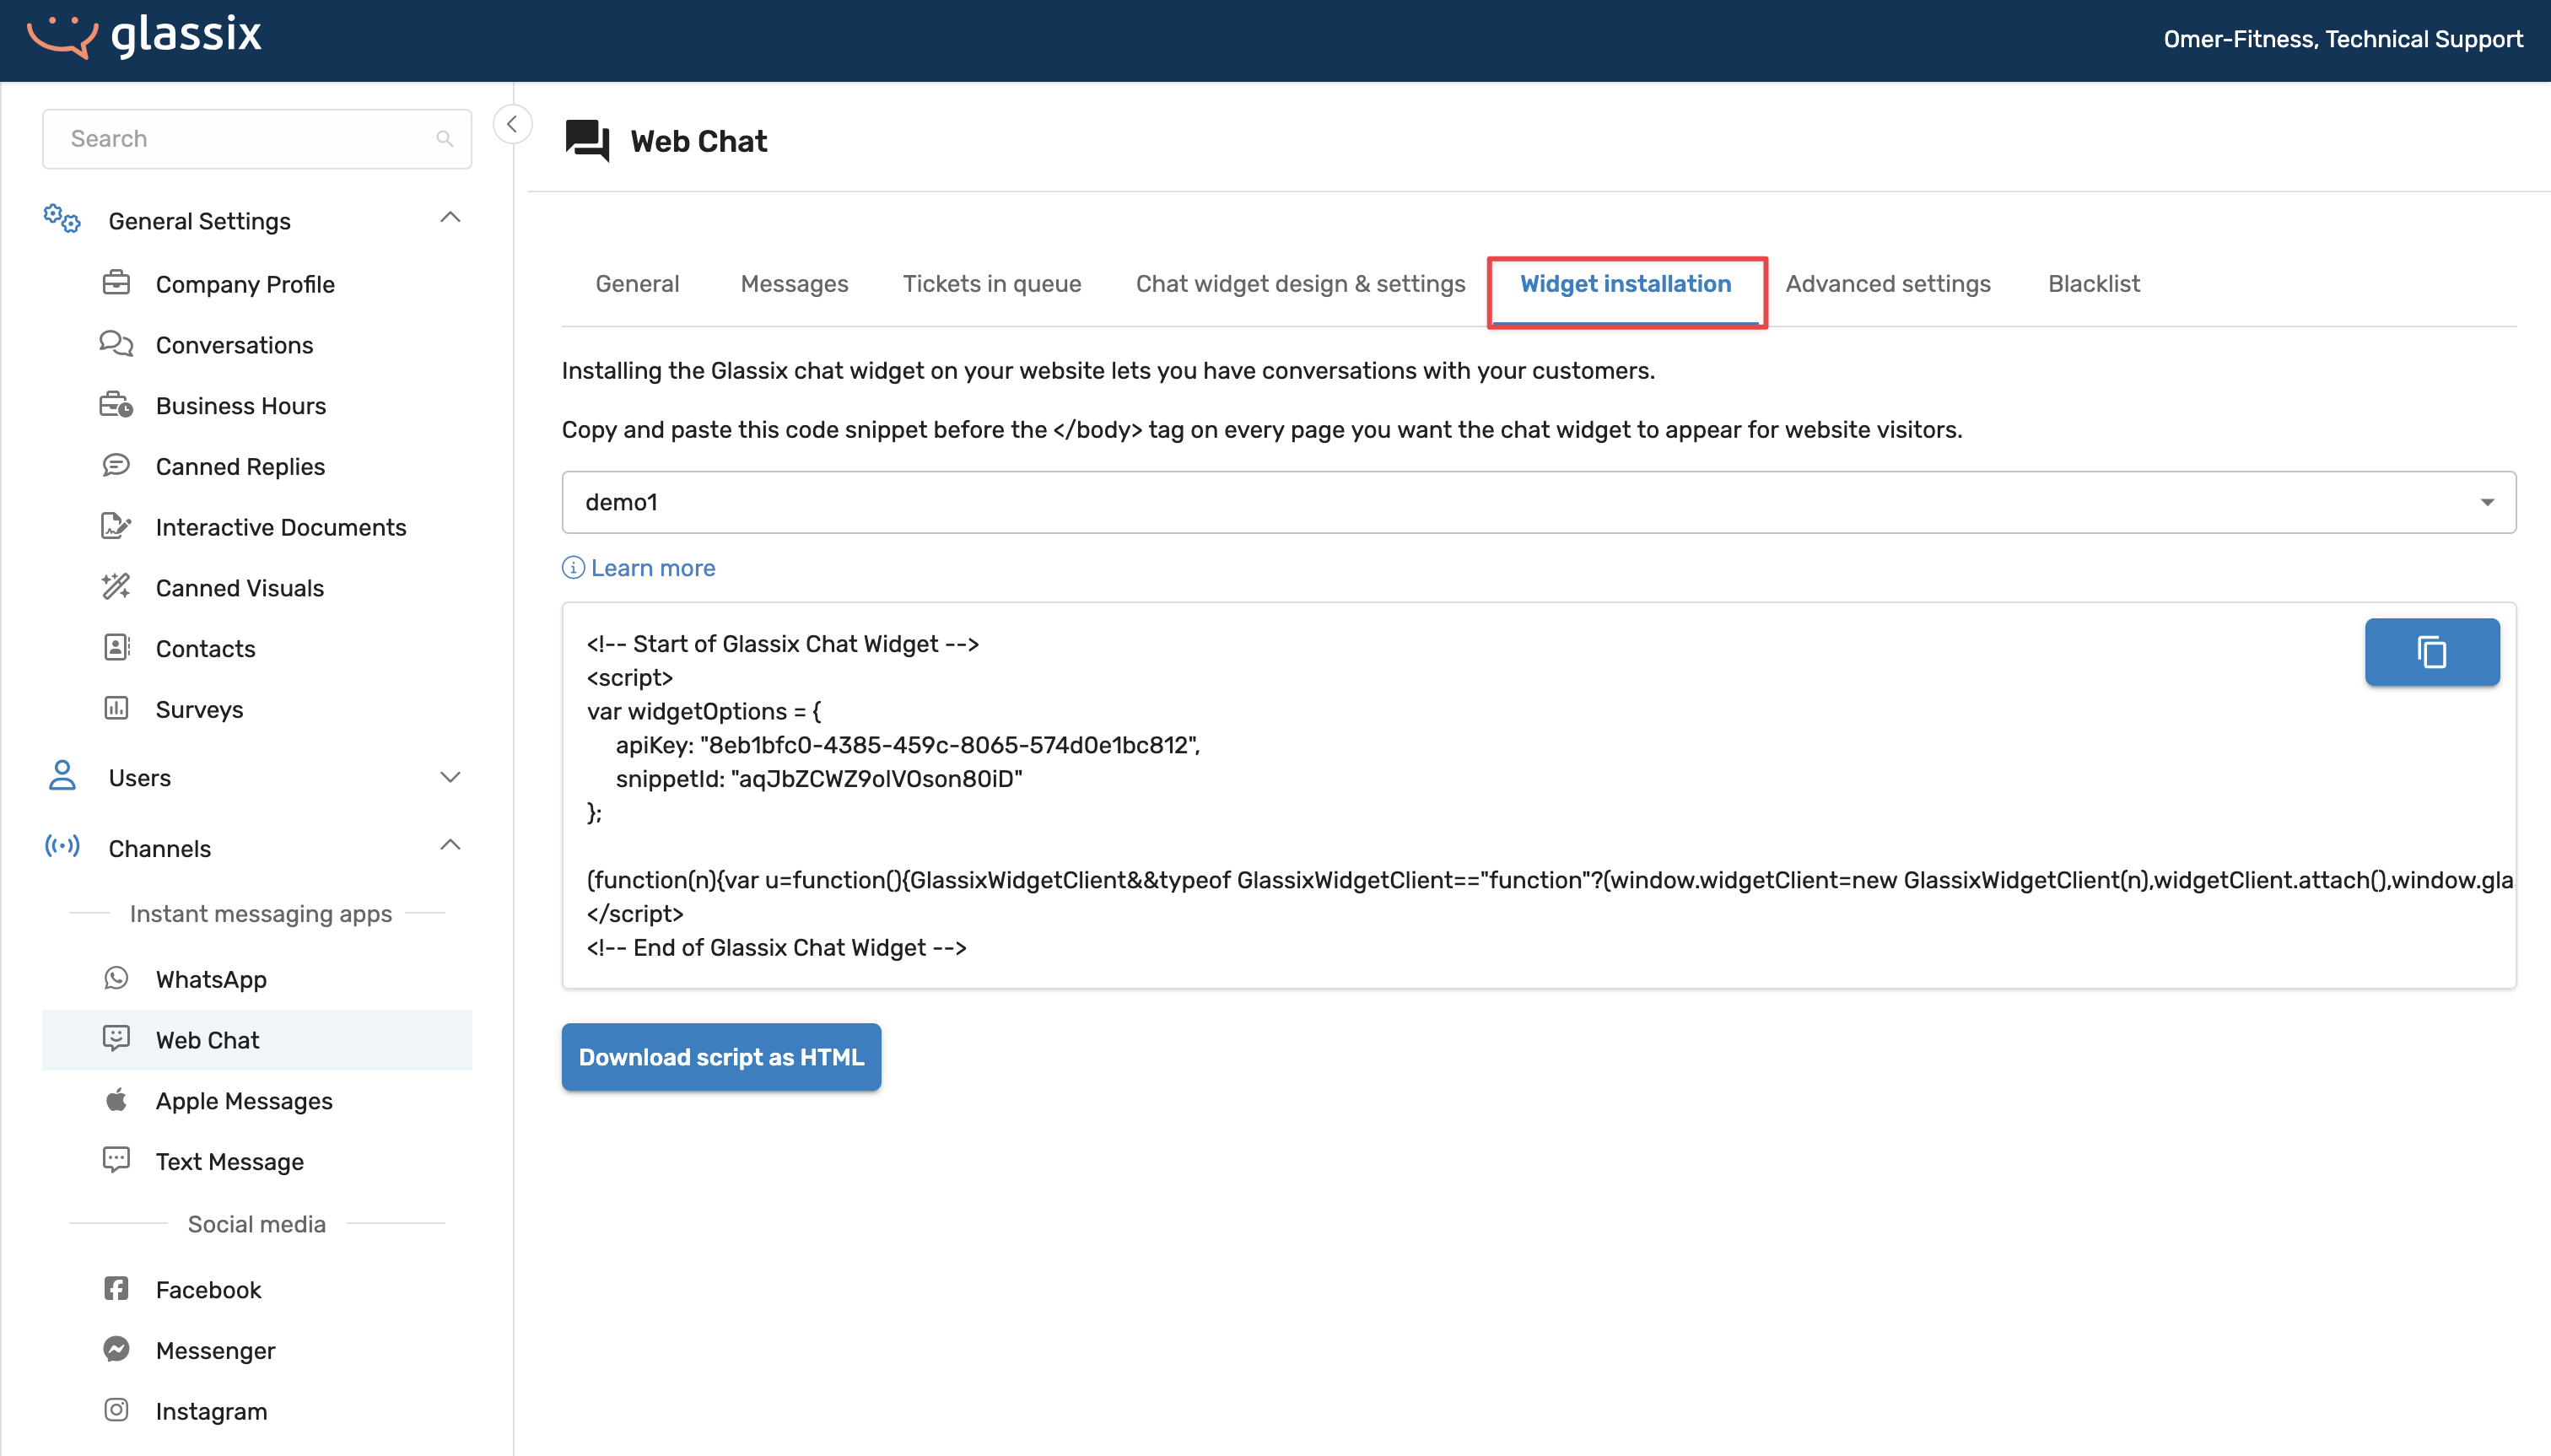
- Open the Widget installation tab.
- Select the snippet you just configured from the dropdown list (it appears under the name you gave it in Step 1).
- Copy the script.
The script looks like this:
<!-- Start of Glassix Chat Widget -->
<script>
var widgetOptions = {
     apiKey: "your-api-key",
     snippetId: "your-snippet-id"
};

(function(n){var u=function(){GlassixWidgetClient&&typeof GlassixWidgetClient=="function"?(window.widgetClient=new GlassixWidgetClient(n),widgetClient.attach(),window.glassixWidgetScriptLoaded&&window.glassixWidgetScriptLoaded()):f()},f=function(){r.src="https://cdn.glassix.net/clients/widget.1.2.min.js";r.onload=u;document.body.removeChild(t);i.parentNode.insertBefore(r,i)},i=document.getElementsByTagName("script")[0],t=document.createElement("script"),r;(t.async=!0,t.type="text/javascript",t.crossorigin="anonymous",t.id="glassix-widget-script",r=t.cloneNode(),t.onload=u,t.src="https://cdn.glassix.com/clients/widget.1.2.min.js",!document.getElementById(t.id)&&document.body)&&(i.parentNode.insertBefore(t,i),t.onerror=f)})(widgetOptions)
</script>
<!-- End of Glassix Chat Widget -->
Step 4: Paste the Script on Your Website
How you paste the script depends on how your website is built. Follow the instructions for your platform below.
For a full reference of the methods available on the widget client, including attach() and destroy(), see Methods.
Standard Website
Paste the copied script just before the closing </body> tag on every page where you want the chat widget to appear.
<!DOCTYPE html>
<html lang="en">
<head>
  <meta charset="UTF-8" />
  <title>My Website</title>
</head>
<body>

  <!-- Your page content goes here -->

  <!-- Start of Glassix Chat Widget -->
  <script>
  var widgetOptions = {
       apiKey: "your-api-key",
       snippetId: "your-snippet-id"
  };

  (function(n){var u=function(){GlassixWidgetClient&&typeof GlassixWidgetClient=="function"?(window.widgetClient=new GlassixWidgetClient(n),widgetClient.attach(),window.glassixWidgetScriptLoaded&&window.glassixWidgetScriptLoaded()):f()},f=function(){r.src="https://cdn.glassix.net/clients/widget.1.2.min.js";r.onload=u;document.body.removeChild(t);i.parentNode.insertBefore(r,i)},i=document.getElementsByTagName("script")[0],t=document.createElement("script"),r;(t.async=!0,t.type="text/javascript",t.crossorigin="anonymous",t.id="glassix-widget-script",r=t.cloneNode(),t.onload=u,t.src="https://cdn.glassix.com/clients/widget.1.2.min.js",!document.getElementById(t.id)&&document.body)&&(i.parentNode.insertBefore(t,i),t.onerror=f)})(widgetOptions)
  </script>
  <!-- End of Glassix Chat Widget -->

</body>
</html>
Once the script loads, the chat bubble appears on your page, and visitors can start a conversation.

Glassix creates the widget by injecting an iframe element into your page and filling it with the widget. You don't need to add any markup yourself, the script handles it.
Using this standard installation method, you can only have one widget per page. If you need more than one widget on a single page, you must use either the custom iframe or RequireJS installation method instead.
Wix
Adding the Glassix chat widget to a Wix website requires a slightly different process than a standard HTML site. Because Wix manages your page structure, you embed the widget using Wix's Editor X platform and its built-in HTML embed element.
To embed the widget correctly across both desktop and mobile versions of your site, you need to use Editor X, Wix's advanced editing platform. Editor X gives you more control over positioning and layout than the standard Wix editor, which is why it's required for embedding the chat widget correctly, particularly for pinning it to the screen so it stays in place as visitors scroll.
Before switching to Editor X, make sure you complete and publish any pending changes in your regular Wix editor first, so nothing is lost in the transfer. For more information on Editor X, read here.
Before following the steps below, complete Steps 1–3 of the Installation guide to create your snippet and copy the script, then return here for the Wix-specific embedding steps.
Embed the Widget in Editor X
- In the Editor X, click Add → Embed Code → Embed HTML. This inserts an HTML embed element (an iFrame) on your page to hold the chat widget script.
- Click Enter Code → Code to open the code input panel.
- In the Add your code here (HTTPS only) section, paste the Glassix chat script.
The script must be wrapped in an HTML code block to work correctly in Wix. You can get the full ready-to-paste HTML by clicking Download script as HTML on the Widget installation screen in Glassix.
- Drag the iFrame element to the position on the page where you want the chat widget to appear. Most implementations place it in the bottom-right or bottom-left corner.
- Resize the iFrame to fit the chat widget dimensions. Make sure it is large enough to display the full widget without clipping it.
- Right-click the iFrame element and select Pin to screen. This ensures the widget stays fixed in position as visitors scroll down the page, which is the expected behavior for a chat widget.
- In the Set position section that appears:
- Choose where on the screen the widget should be anchored (for example, bottom-right).
- Set the horizontal and vertical offsets to fine-tune its exact placement and ensure it doesn't overlap other elements, such as cookie banners or footers.
- Repeat steps 1–7 for each page and version (desktop, tablet, and mobile) where you want the widget to appear. The widget does not carry over automatically between pages or versions; each one needs to be configured separately.
Once you add the widget in the tablet version it will also appear in the mobile version. Check both to make sure it displays correctly and is not obscuring any page content.
- Save and publish your website.
RequireJS
Use this method if your site uses RequireJS to manage JavaScript dependencies.
RequireJS is a JavaScript file and module loader designed for use in the browser. It loads JavaScript files asynchronously and manages dependencies between them, ensuring that each script runs only after everything it depends on has loaded.
If your site uses RequireJS, loading the Glassix widget the standard way may cause conflicts or timing issues. This method loads the widget through RequireJS instead, so it fits cleanly into your existing dependency management setup.
To load the chat widget with RequireJS, add the following to your page:
<script>
  var widgetOptions = {
    apiKey: "your-api-key",
    snippetId: "your-snippet-id"
  };

  requirejs.config({
    paths: { 'GlassixWidgetClient': 'https://cdn.glassix.com/clients/widget.1.2.min' }
  });

  require(['GlassixWidgetClient'], function(GlassixWidgetClient) {
    window.widgetClient = new GlassixWidgetClient(widgetOptions);
    widgetClient.attach();
  });
</script>
Here is what each part does:
requirejs.configregisters the Glassix widget client as a named module calledGlassixWidgetClientand tells RequireJS where to load it from (the Glassix CDN).require(['GlassixWidgetClient'], function(...))tells RequireJS to load the module and, once it has finished loading, run the callback function.- Inside the callback, a new widget instance is created with your
widgetOptionsandattach()is called to load it into the DOM.
When using the RequireJS Optimizer to bundle your JavaScript files for production, it cannot load external network or CDN resources directly. To work around this, declare the Glassix widget as an empty module in your optimizer config so it is excluded from the bundle and continues to load from the CDN at runtime. See how to do this in the RequireJS documentation.
Google Tag Manager
Use this method if your site uses Google Tag Manager (GTM) to manage and deploy scripts. Instead of pasting the Glassix script directly into your page HTML, you create a Custom HTML tag in GTM and deploy it from there. This is useful if you want to manage the widget alongside your other tags, control which pages it appears on, or deploy updates without touching your site's code.
If you want to track widget interactions in Google Analytics alongside your other GTM events, see JS Events for the full list of events that are automatically pushed to the data layer.
- Log in to Google Tag Manager and open the container for your website. If you have multiple containers, make sure you select the one that corresponds to the site where you want the widget to appear.
- In the left sidebar, click Tags → New.
- Click Tag Configuration and select Custom HTML as the tag type. This lets you paste a raw script directly into GTM without needing a built-in template.
- In the HTML field, paste the full Glassix chat widget script, replacing
your-api-keyandyour-snippet-idwith your actual values from the here:
<!-- Start of Glassix Chat Widget -->
<script>
var widgetOptions = {
     apiKey: "your-api-key",
     snippetId: "your-snippet-id"
};
(function(n){var u=function(){GlassixWidgetClient&&typeof GlassixWidgetClient=="function"?(window.widgetClient=new GlassixWidgetClient(n),widgetClient.attach(),window.glassixWidgetScriptLoaded&&window.glassixWidgetScriptLoaded()):f()},f=function(){r.src="https://cdn.glassix.net/clients/widget.1.2.min.js";r.onload=u;document.body.removeChild(t);i.parentNode.insertBefore(r,i)},i=document.getElementsByTagName("script")[0],t=document.createElement("script"),r;(t.async=!0,t.type="text/javascript",t.crossorigin="anonymous",t.id="glassix-widget-script",r=t.cloneNode(),t.onload=u,t.src="https://cdn.glassix.com/clients/widget.1.2.min.js",!document.getElementById(t.id)&&document.body)&&(i.parentNode.insertBefore(t,i),t.onerror=f)})(widgetOptions)
</script>
<!-- End of Glassix Chat Widget -->- Scroll down to Triggering and click the + button to add a trigger. The trigger controls which pages the widget loads on.
- To show the widget on every page, select the built-in All Pages trigger. This fires on every page view across your entire site.
- To show the widget only on specific pages, click + to create a new trigger, select Page View, and add a filter condition based on the page URL (for example,
Page URL contains /support).
- Give the tag a descriptive name at the top, for example,
Glassix Chat Widget, so it's easy to identify later alongside your other tags. - Click Save.
- Before publishing, click Preview in the top-right corner to open GTM's debug mode and verify that the tag is firing correctly on the intended pages. Once confirmed, close the preview.
- Click Submit in the top right corner, add a version name and description if you'd like (for example,
Added Glassix chat widget), then click Publish to push the changes live.
The widget will appear on your site on the next page load after the container is published.
iFrame
Use this method if you want to embed the chat inside your own iframe element rather than using the default injected widget. Unlike the standard installation, which injects the widget automatically into your page, the iframe method gives you direct control over where and how the widget is placed, making it useful in situations where the default behavior doesn't fit your setup.
Common use cases:
- Mobile apps (Android & iOS): Embed the chat widget inside a WebView within your mobile application. This keeps the widget contained within a defined area so it doesn't take over the entire screen or block your app's content.
- Launch via button: Use the iFrame URL as the target of a button that opens the chat in a new tab, outside your main website entirely.
- Always-visible embed: Embed the widget directly into a section of your webpage so the chat is always open and visible to your visitors, rather than behind a chat bubble that visitors need to click to open.
To place the chat iframe on your page, set the iframe src to the following URL, replacing {{apiKey}} and {{snippetId}} with your values:
https://cdn.glassix.com/clients/widget-in-iframe.html?apiKey={{apiKey}}&snippetId={{snippetId}}Example:
<iframe
  src="https://cdn.glassix.com/clients/widget-in-iframe.html?apiKey=your-api-key&snippetId=your-snippet-id"
  width="400"
  height="600">
</iframe>If you are using Identity Verification, you must also pass
uniqueIdentifierandidentityTokenas URL parameters.
Parameters
The iFrame installation supports a subset of the standard widget options. Only Configuration options and Fields are supported; Design, Accessibility, and other option categories are not applicable when embedding via iFrame.
For the full list of supported configuration options and fields, see the Options page.