Tags
Predefined labels for your tickets
Overview
Tags are predefined labels which can be applied to your tickets either manually or programmatically.
Similar to dynamic fields, tags provide you and your agents with a method for adding categorization and information to your tickets. Unlike dynamic fields, however, tags must be added ahead of time by an admin. Agents may only choose from and apply existing tags to tickets, and you may only use preexisting tags in your automations.
There is a range of functionality in Glassix that is based on tags, and there are a number of prebuilt ways to automatically add tags to your tickets. Here are just some of the things you can do with tags using the built-in features:
- Label ticket automatically based on their channel (SMS, WhatsApp, etc.)
- Label ticket automatically based on the contact who submitted them
- Automatically prioritize tickets in the queue
- Automatically label tickets based on the chatbot which was used
- Automatically assign tickets based on contacts, channels and chatbot flows
If you're looking for even more functionality, tags are also available to you in Flows and via the Glassix API. Tags can be added and removed to ticket via the API, and are included in the returns of the Get Ticket and Get Contact endpoints.
Getting There
To access your tags click here or:
- Go to Settings.
Click on the symbol in the agent dashboard.
- Click General Settings → Conversations
Creating and Deleting Tags
The only place where tags can be created and deleted is in the department settings. While you may add and remove a ticket's tags in a wide range of places, they must always be created first in the settings screen. It is not possible to create new tags via the API.
Note:Tags are department specific. They must be created in a department by following the steps in this section before they can be used in that department.
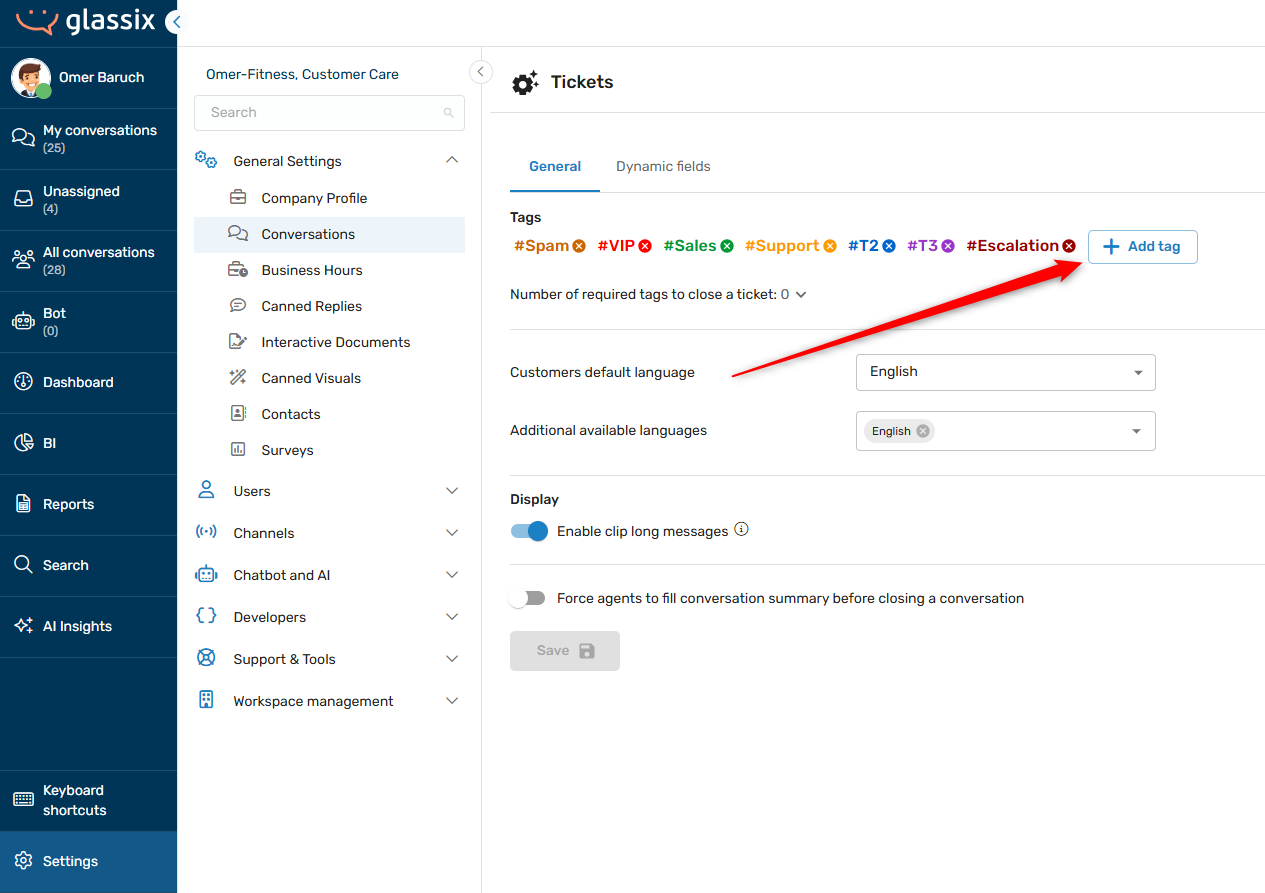
To add a new tag from the settings screen:
-
Click the +Add tag button:
-
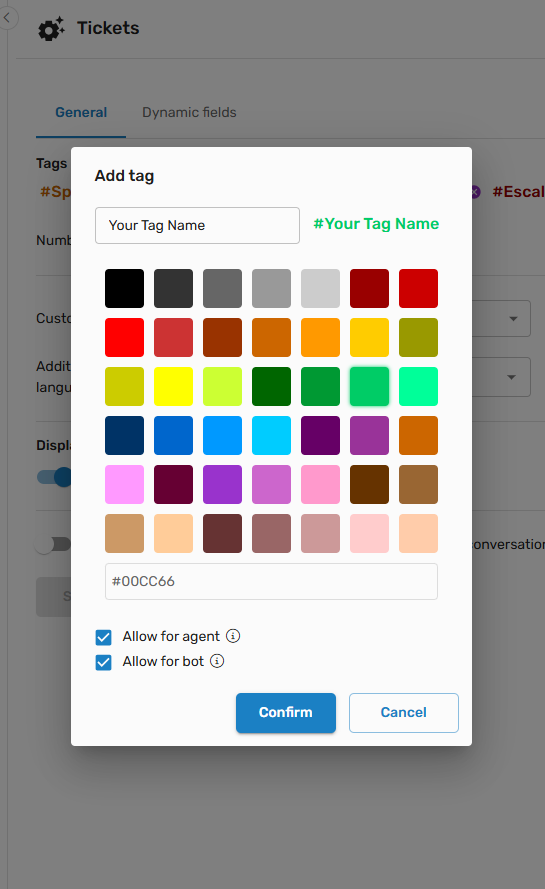
Enter a name and choose a color for your tag. The name will be visible on tickets in the agent view and in reporting, and will be used to reference the tag via Flows and the API. The color will also be visible in the agent view:
Some guidelines for choosing tag names:
- Keep it short - tickets will often end up with more than one tag
- Make it descriptive - you want tags to be easy for your agents to find quickly
-
Set permissions for your tag:
-
Allow for agent - if switched on, this tag will appear in the tags list in the agent view:
-
Allow for bot - if switched on, this tag will appear in the tags list in the flows editor:
-
-
Confirm your new tag, then make sure to save before leaving the page:
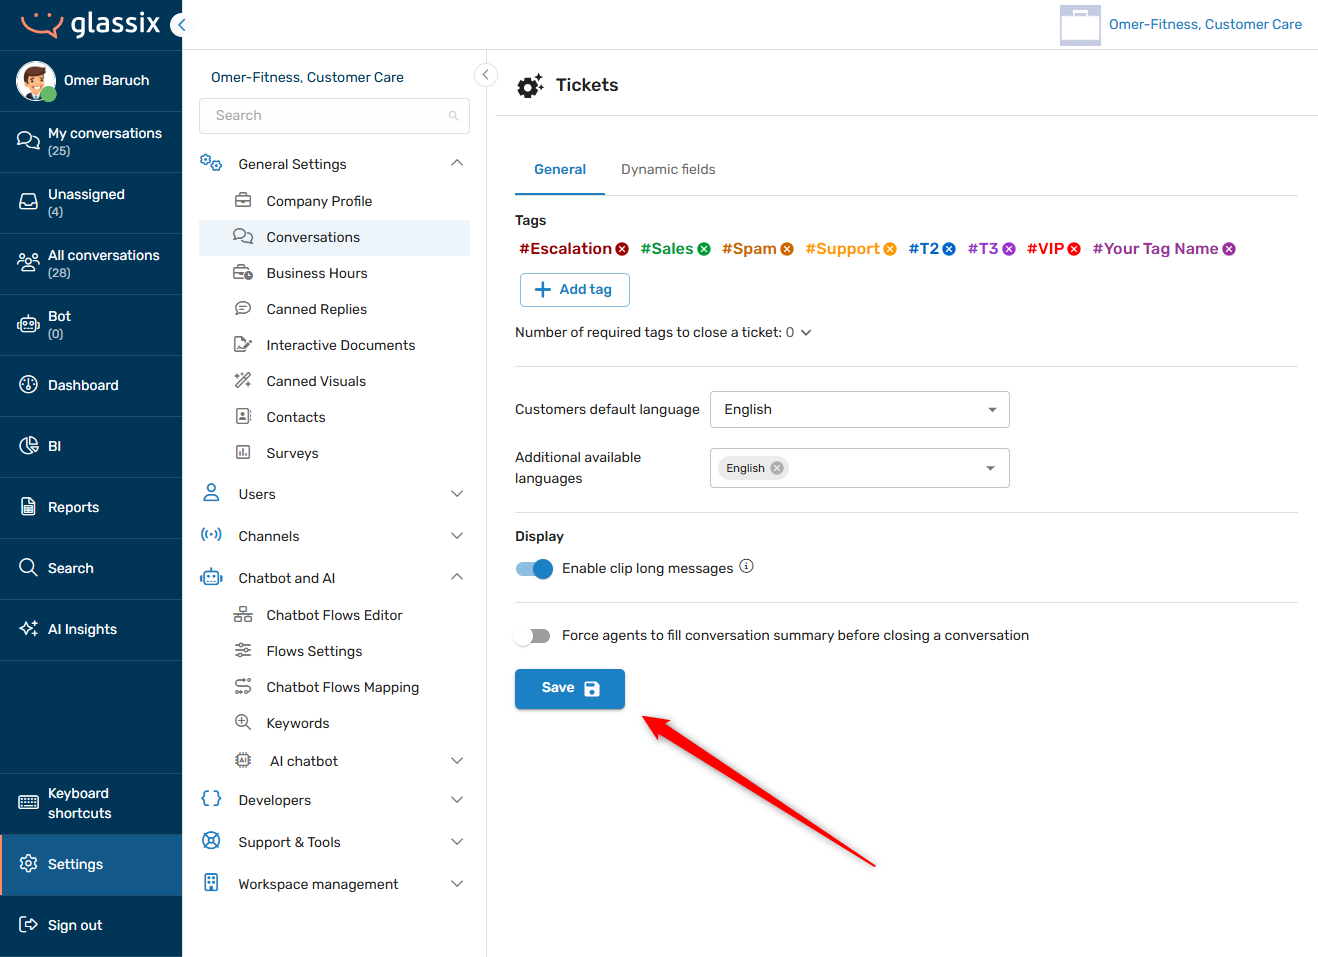
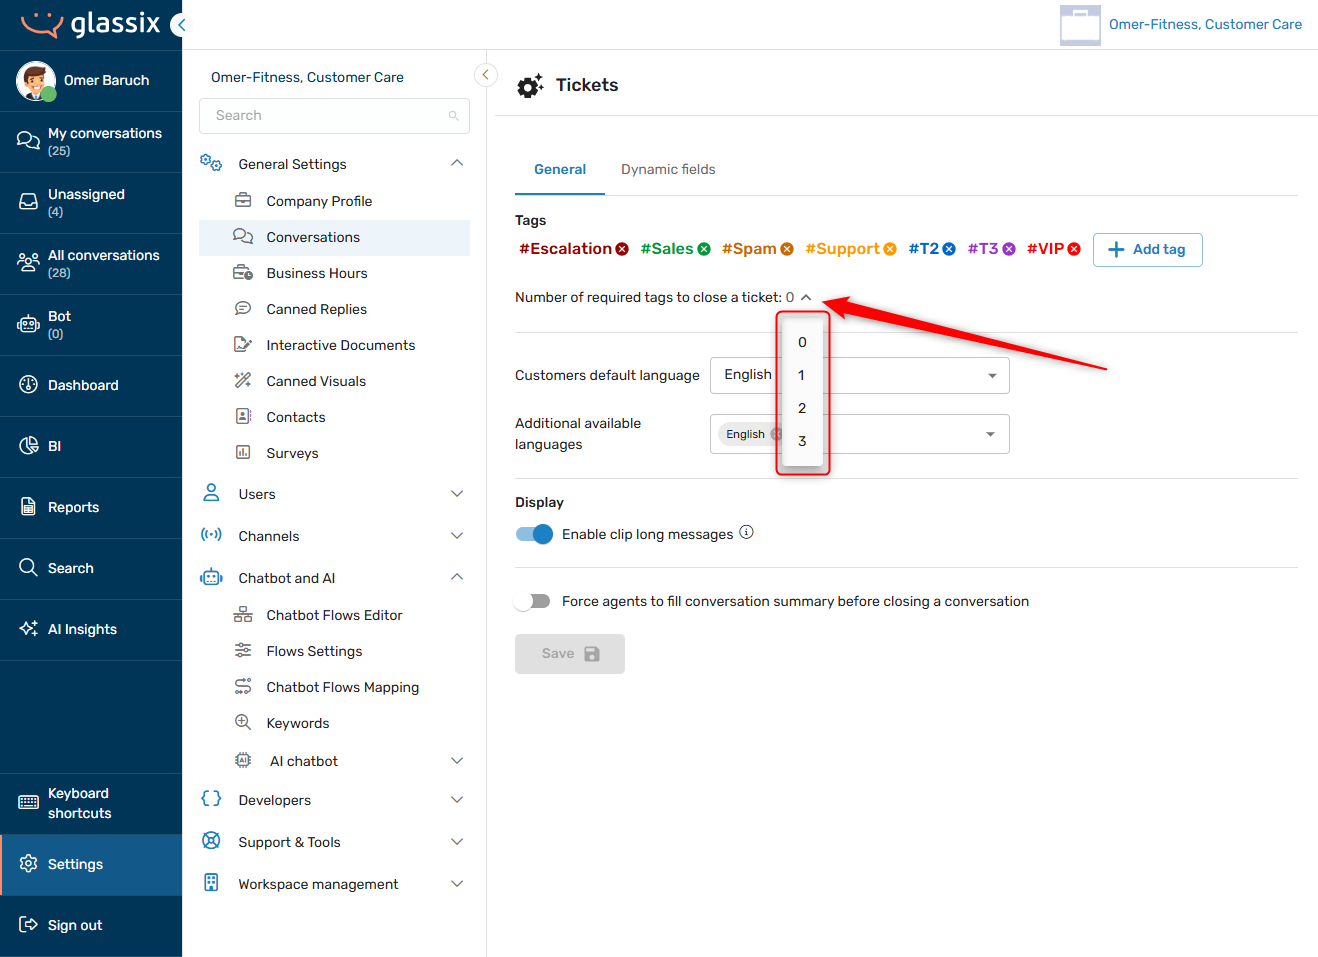
Setting Required Tags
You may choose to make between zero and three tags required before closing a ticket. This requirement will apply both to agents and in the API.
Note:Bots will continue to be able to close tickets without the required number of tags via the End Conversation flow step.
If your flow relies on a Glassix NPM function to close tickets, however, you will need to make sure the required number of tags are added to the ticket before the function attempts to close it.
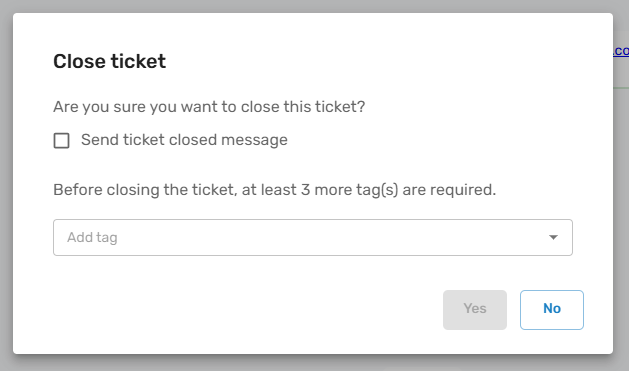
When this option is enabled, agents will be prompted to add additional tags when attempting to close a ticket with less than the required number:
In the API, attempting to close a ticket without the required number of tags will result in a 400 error like the below:
{
  "message": "Minimum tags required before closing a ticket is 3",
  "errorCode": "closeTicketMinTags"
}
Adding Tags to Tickets
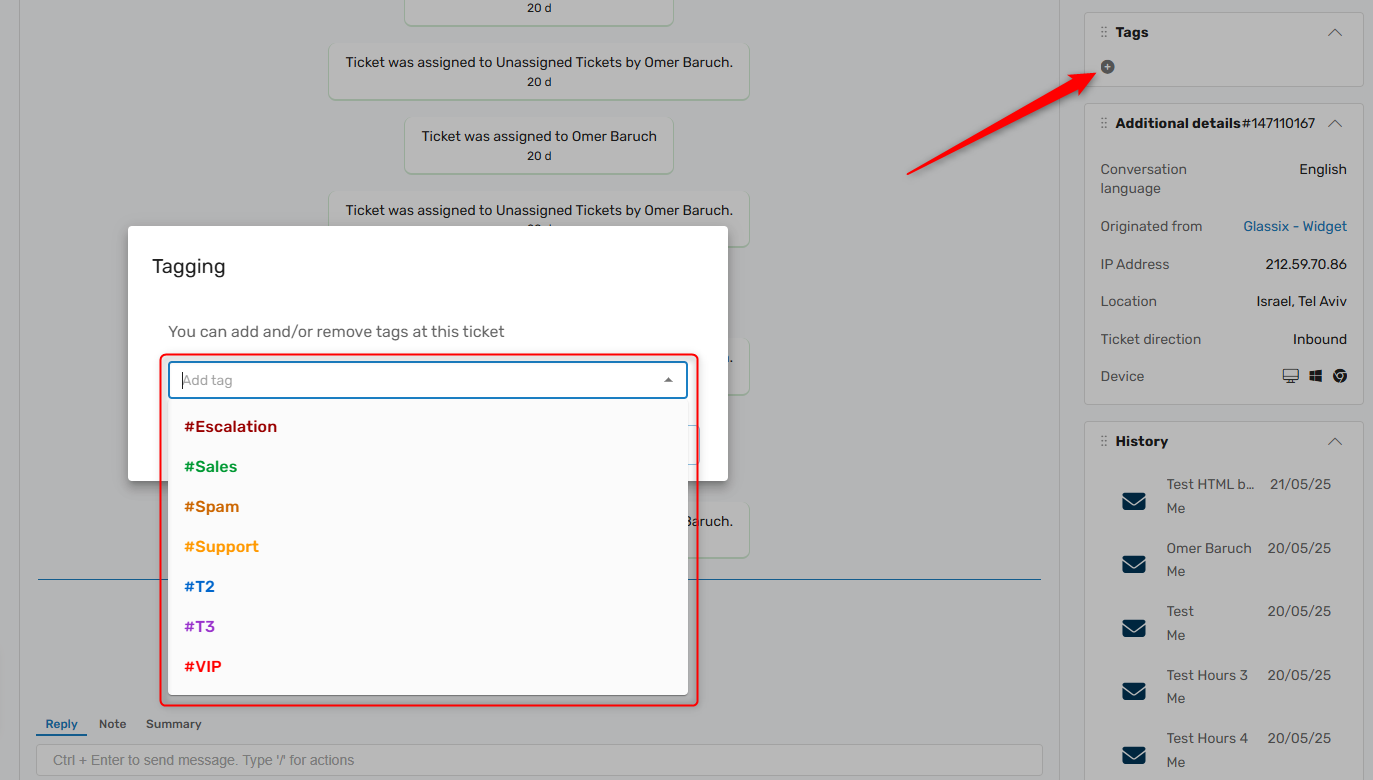
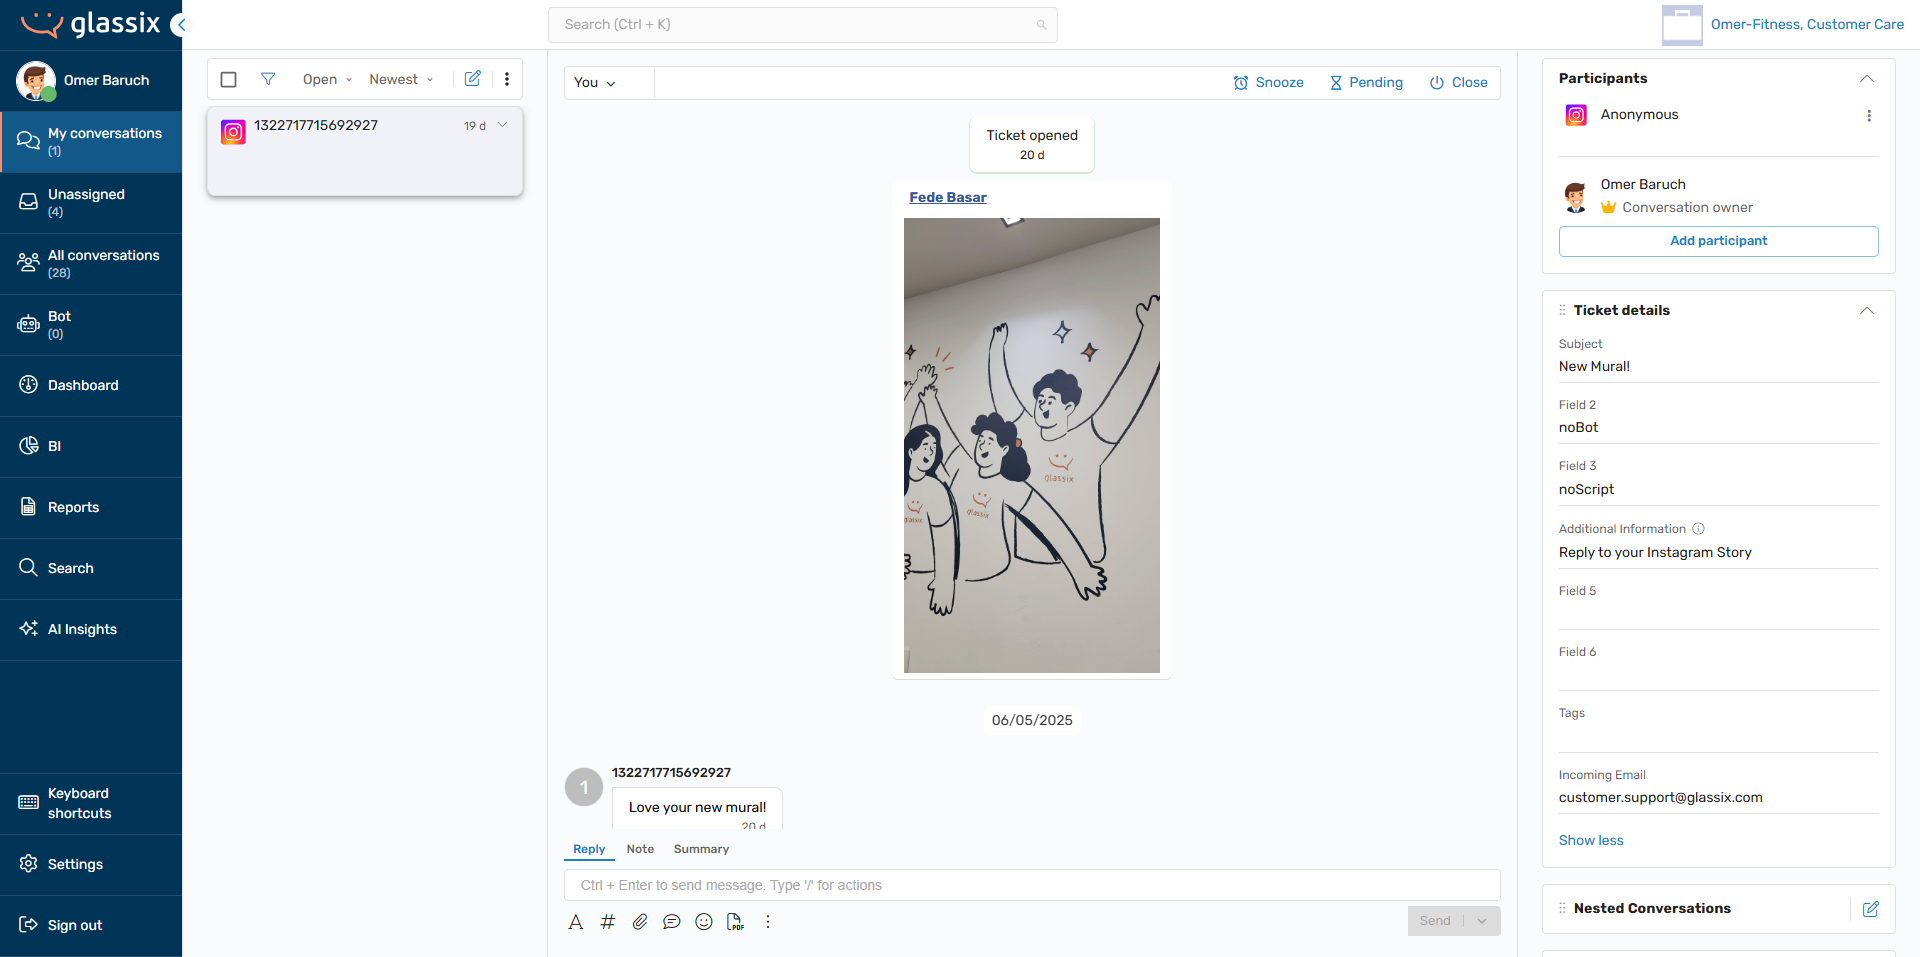
Agents may manually tag tickets using the Tags widget in any open conversation:

Note:Tickets which are in closed status do not allow their tags to be updated, and it is not possible to modify tags for tickets which cannot be reopened.
Adding Channel Tags
Adding channel tags allows you to apply tags to tickets automatically based on their channel. These tags are applied to incoming tickets whenever a new ticket is created in the relevant channel.
Info:Channel tags are not available in the Web Chat channel. Use Flows and Flow Tags instead to apply tags to web chats.
To add a channel tag:
-
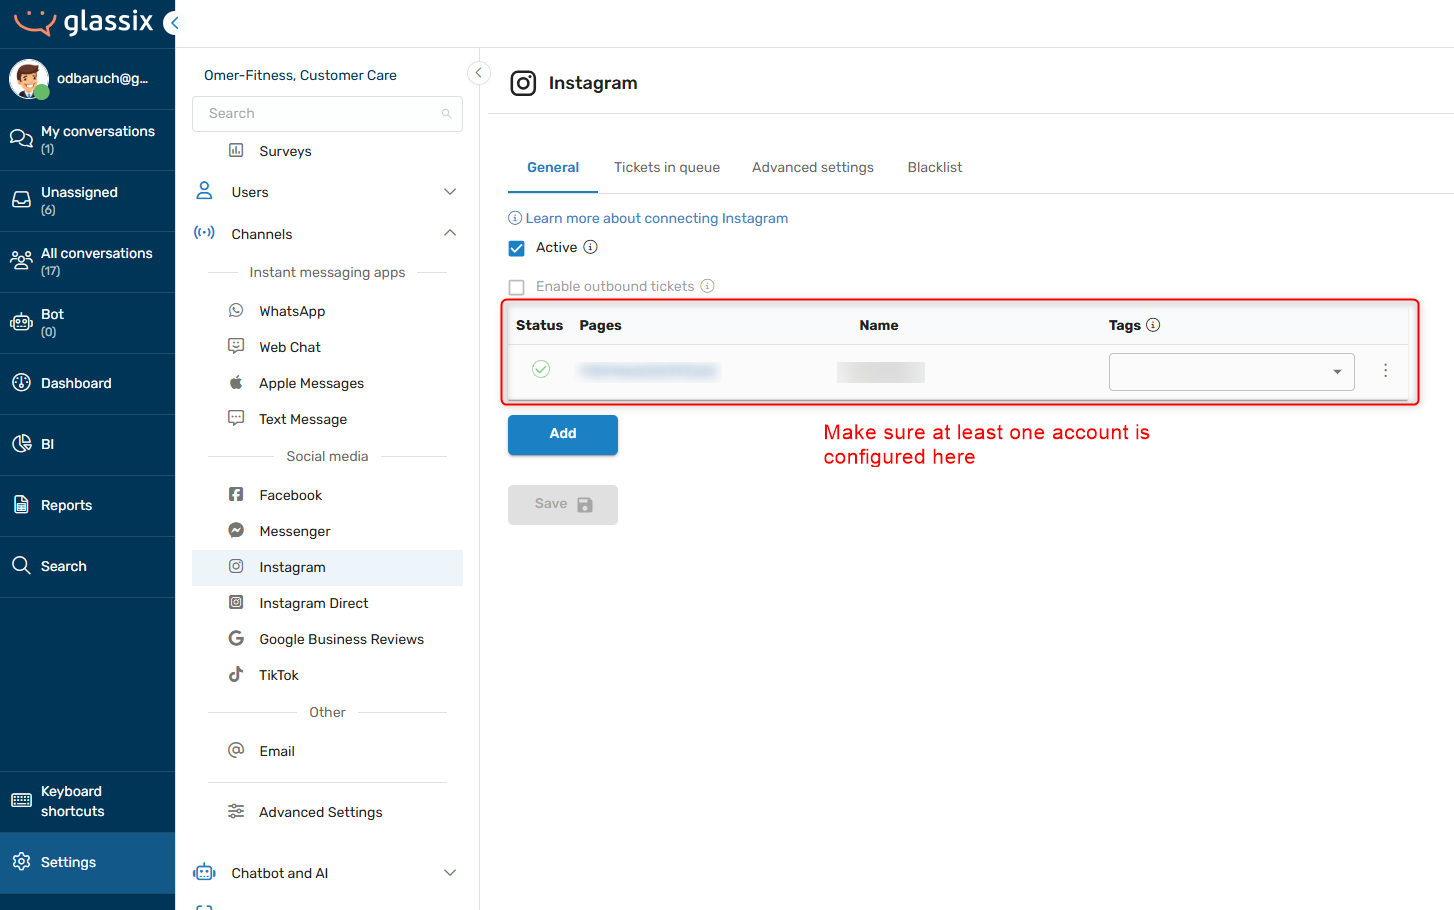
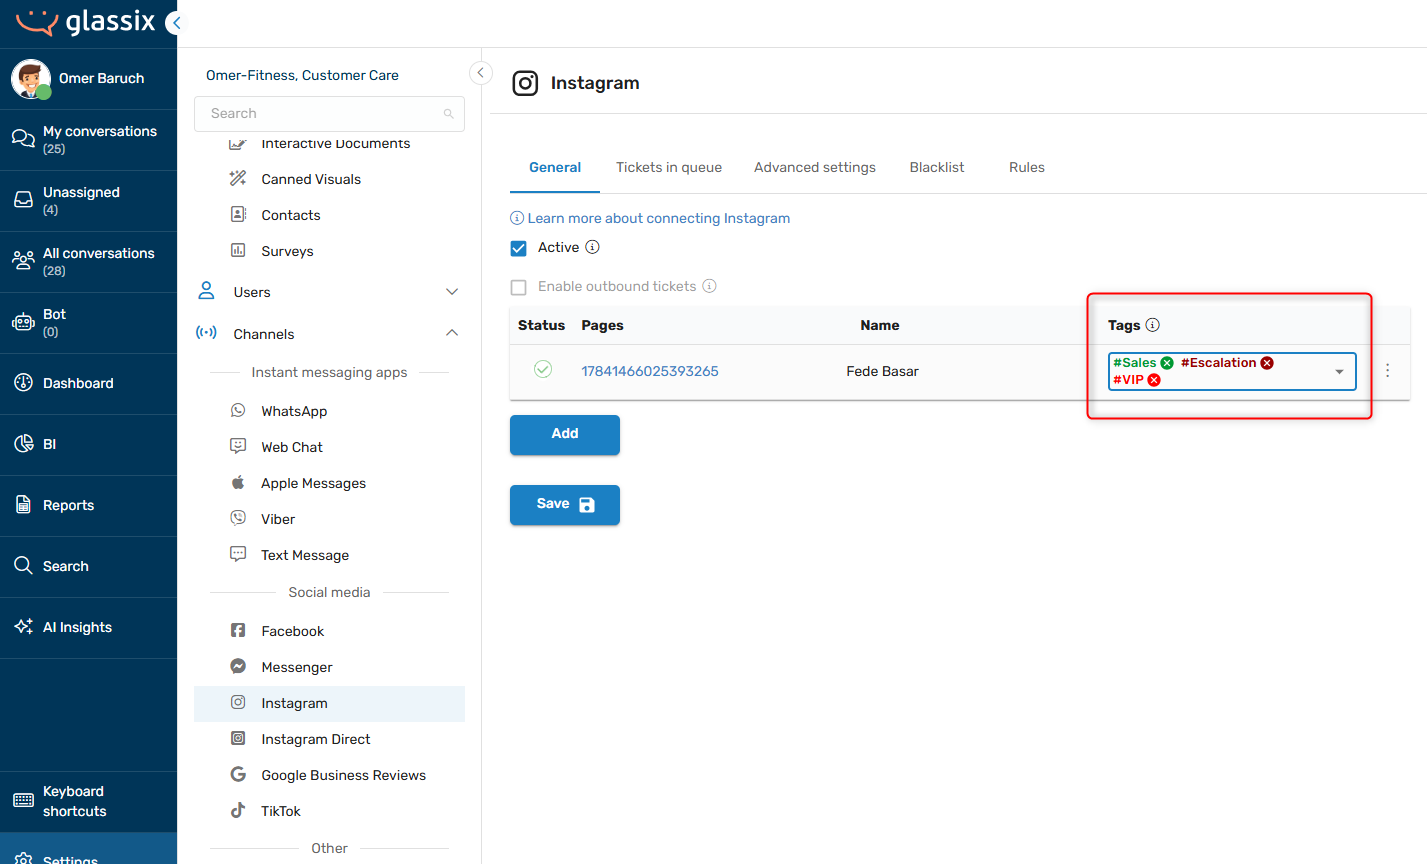
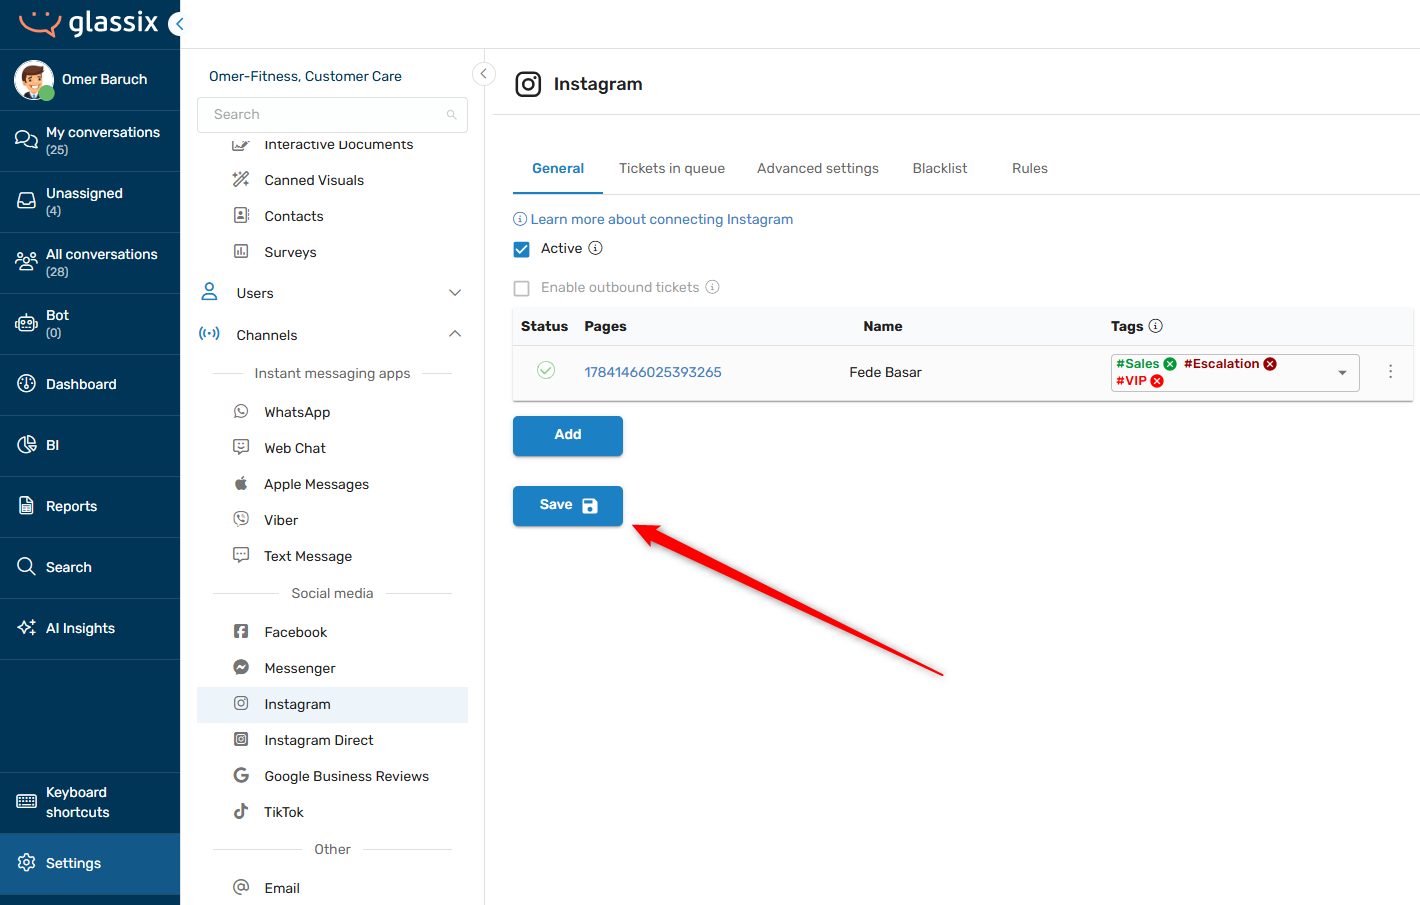
Go to Settings → Channels → Your Chosen Channel. Make sure the channel is active and has at least one configured account:
-
Under Tags, choose up to three channel tags to apply. You can choose different tags for different accounts in the same channel:
-
Save your changes:
Adding Contact Tags
Adding contact tags allows you to apply tags to tickets automatically whenever a particular contact is a participant in a conversation. Contact tags are applied to tickets whenever the specified contact is added to the ticket, including when the ticket is opened by the contact.
Tip:Contact tags work in every channel.
They're a great way to mark your VIP contacts, especially in combination with Prioritized Tags.
To add a contact tag:
-
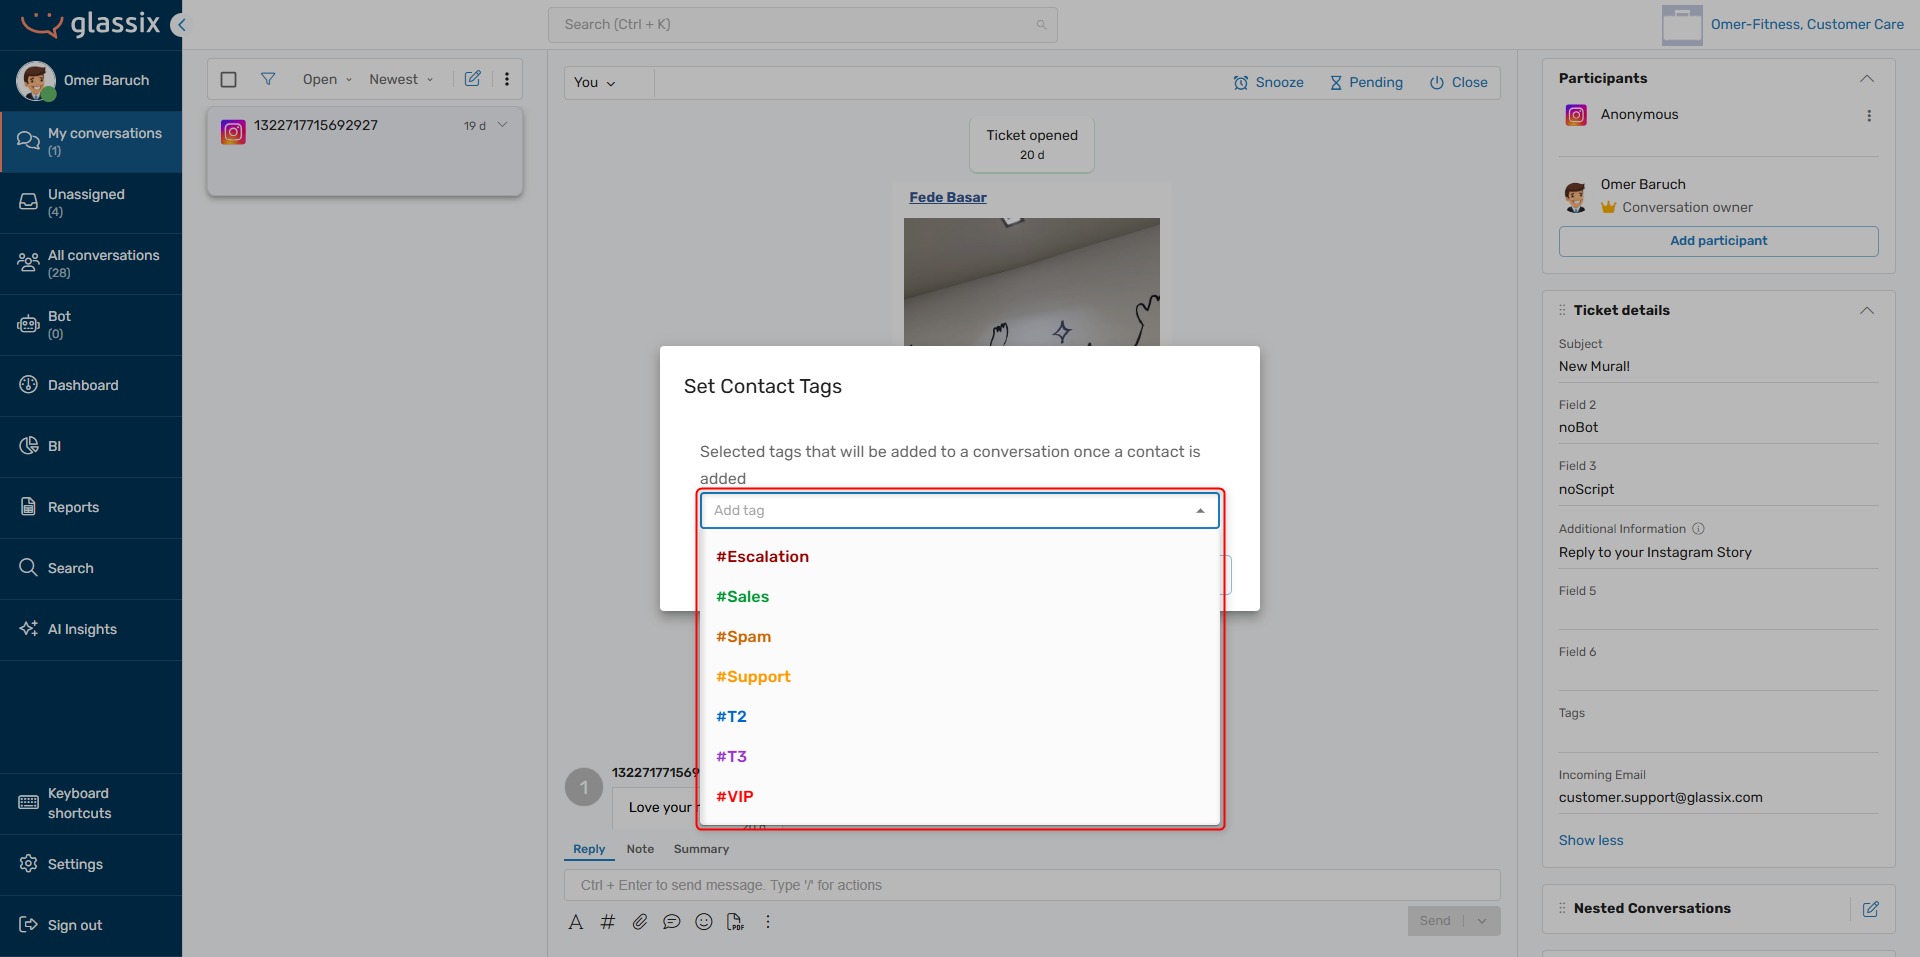
Open any conversation with the contact for whom you want to add a tag (including closed tickets):
-
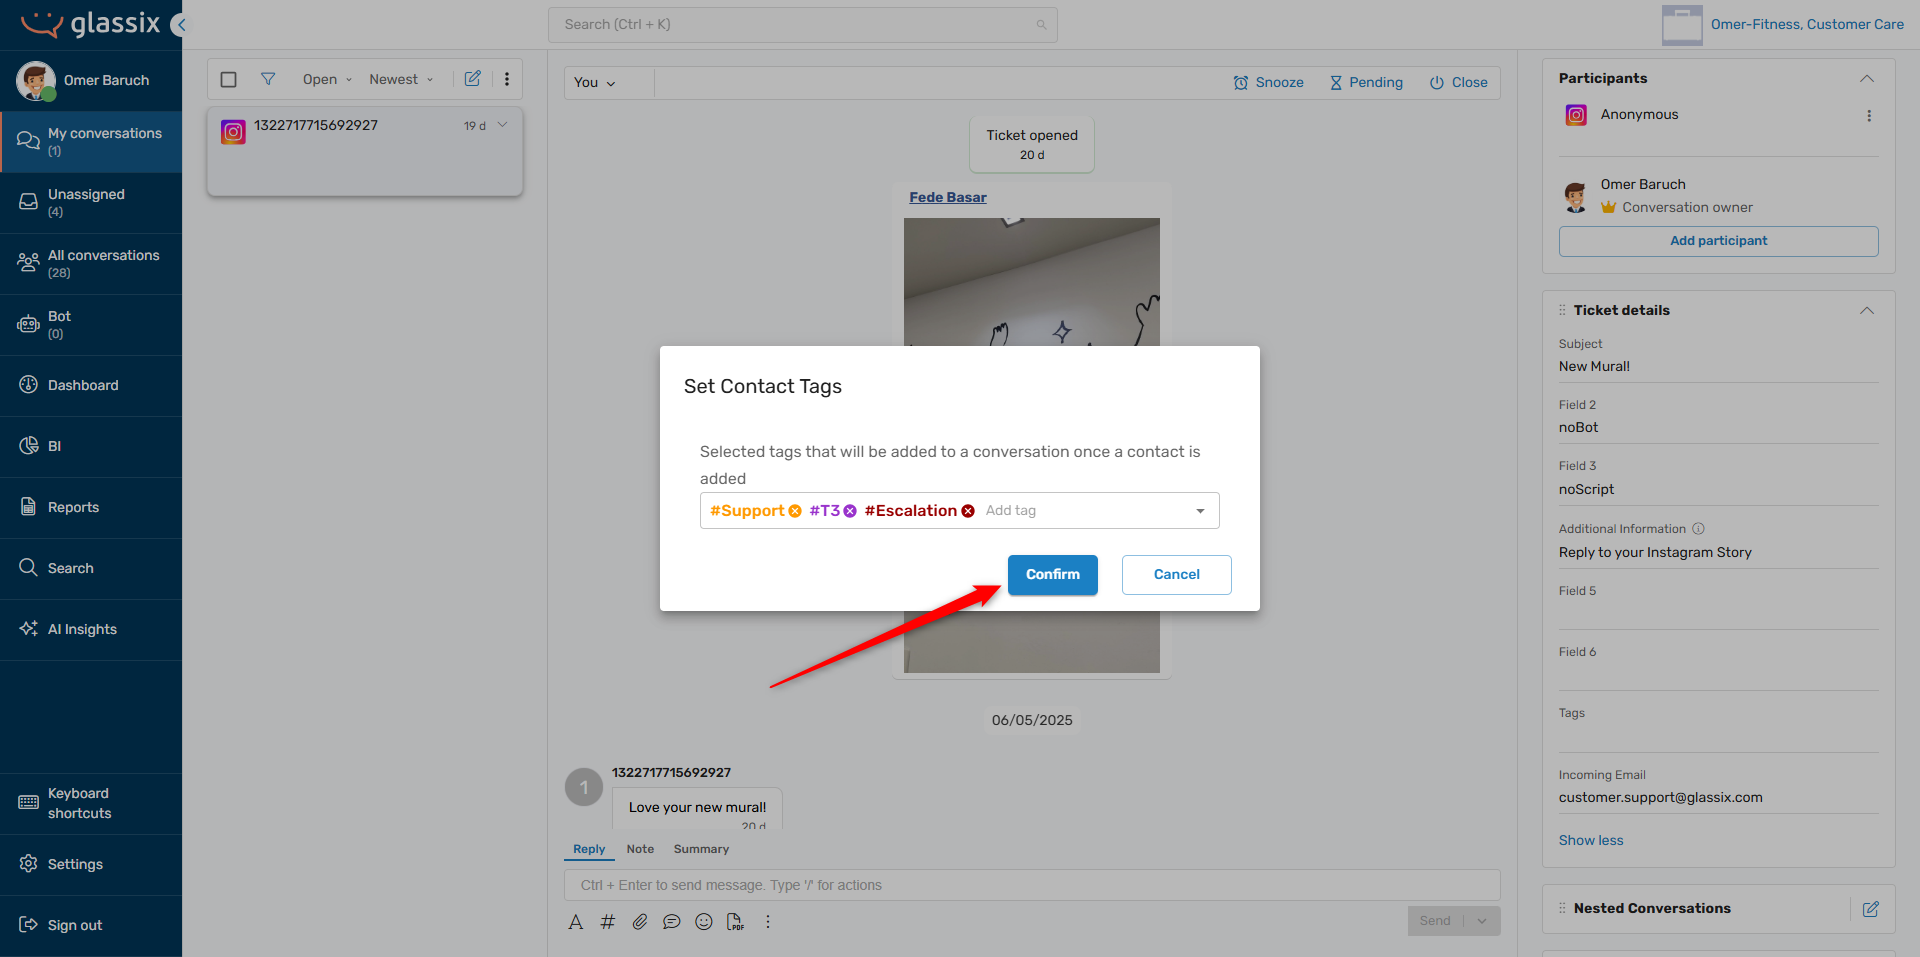
Under Participants, choose the three-dot menu next to the contact's name and select Add contact tags:

-
Search for or select any of your tags from the dropdown list:
-
Select Confirm to save your contact tags:
All future tickets which include this contact will have the contact tags you set applied automatically.
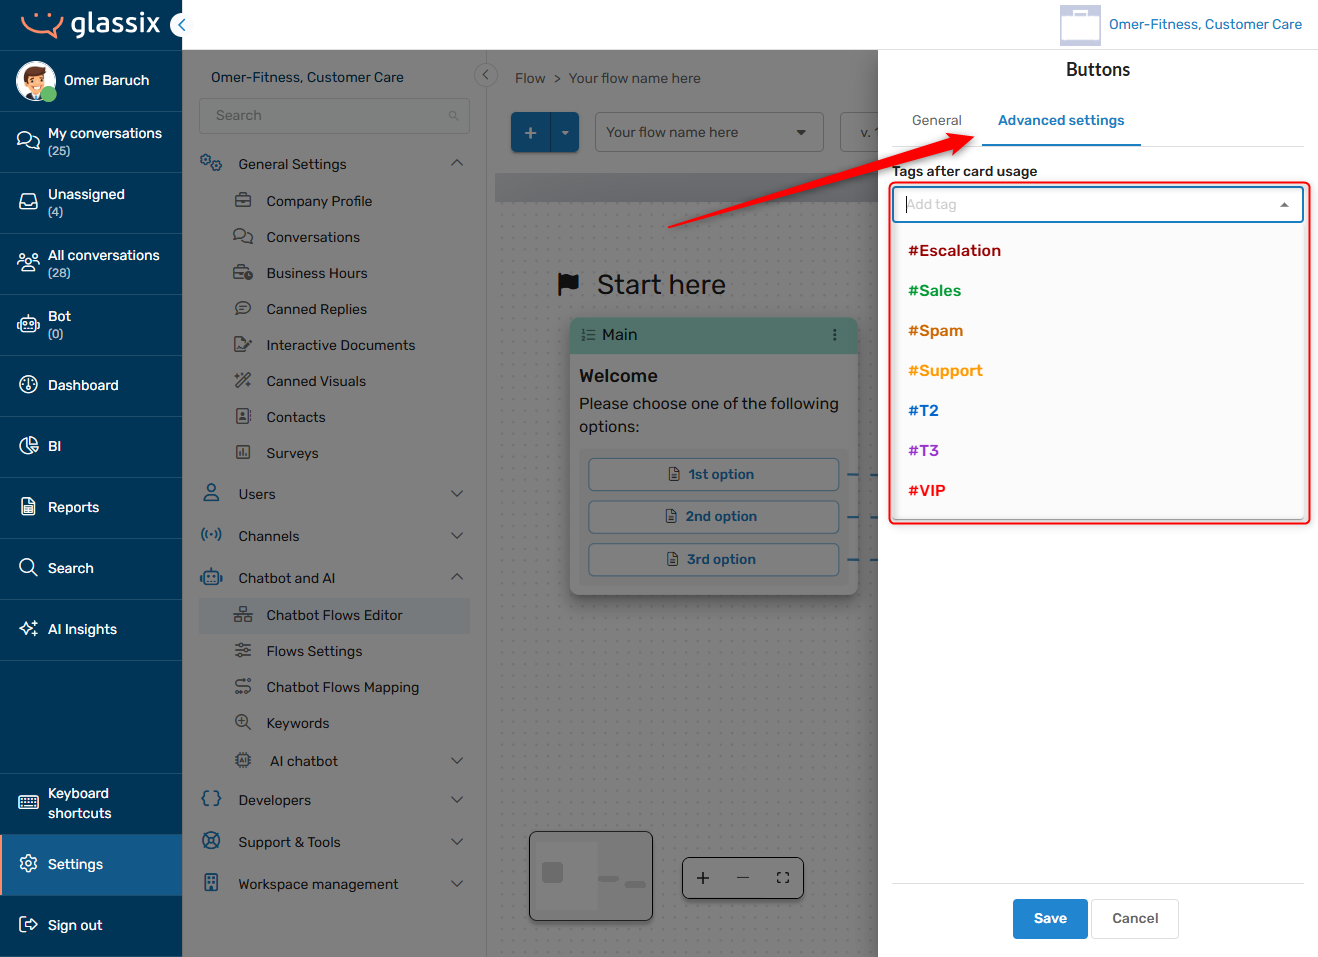
Adding Flow Tags
See Add Tags to Flows for instructions on adding flow tags.
Working with Tags via the API
See Add Tags and Remove Tag in our developer documentation for more information on working with tags via the API.
Working with Tags in Glassix Functions
See Using Glassix NPM Package on functions for examples of how to work with tags in Glassix functions.
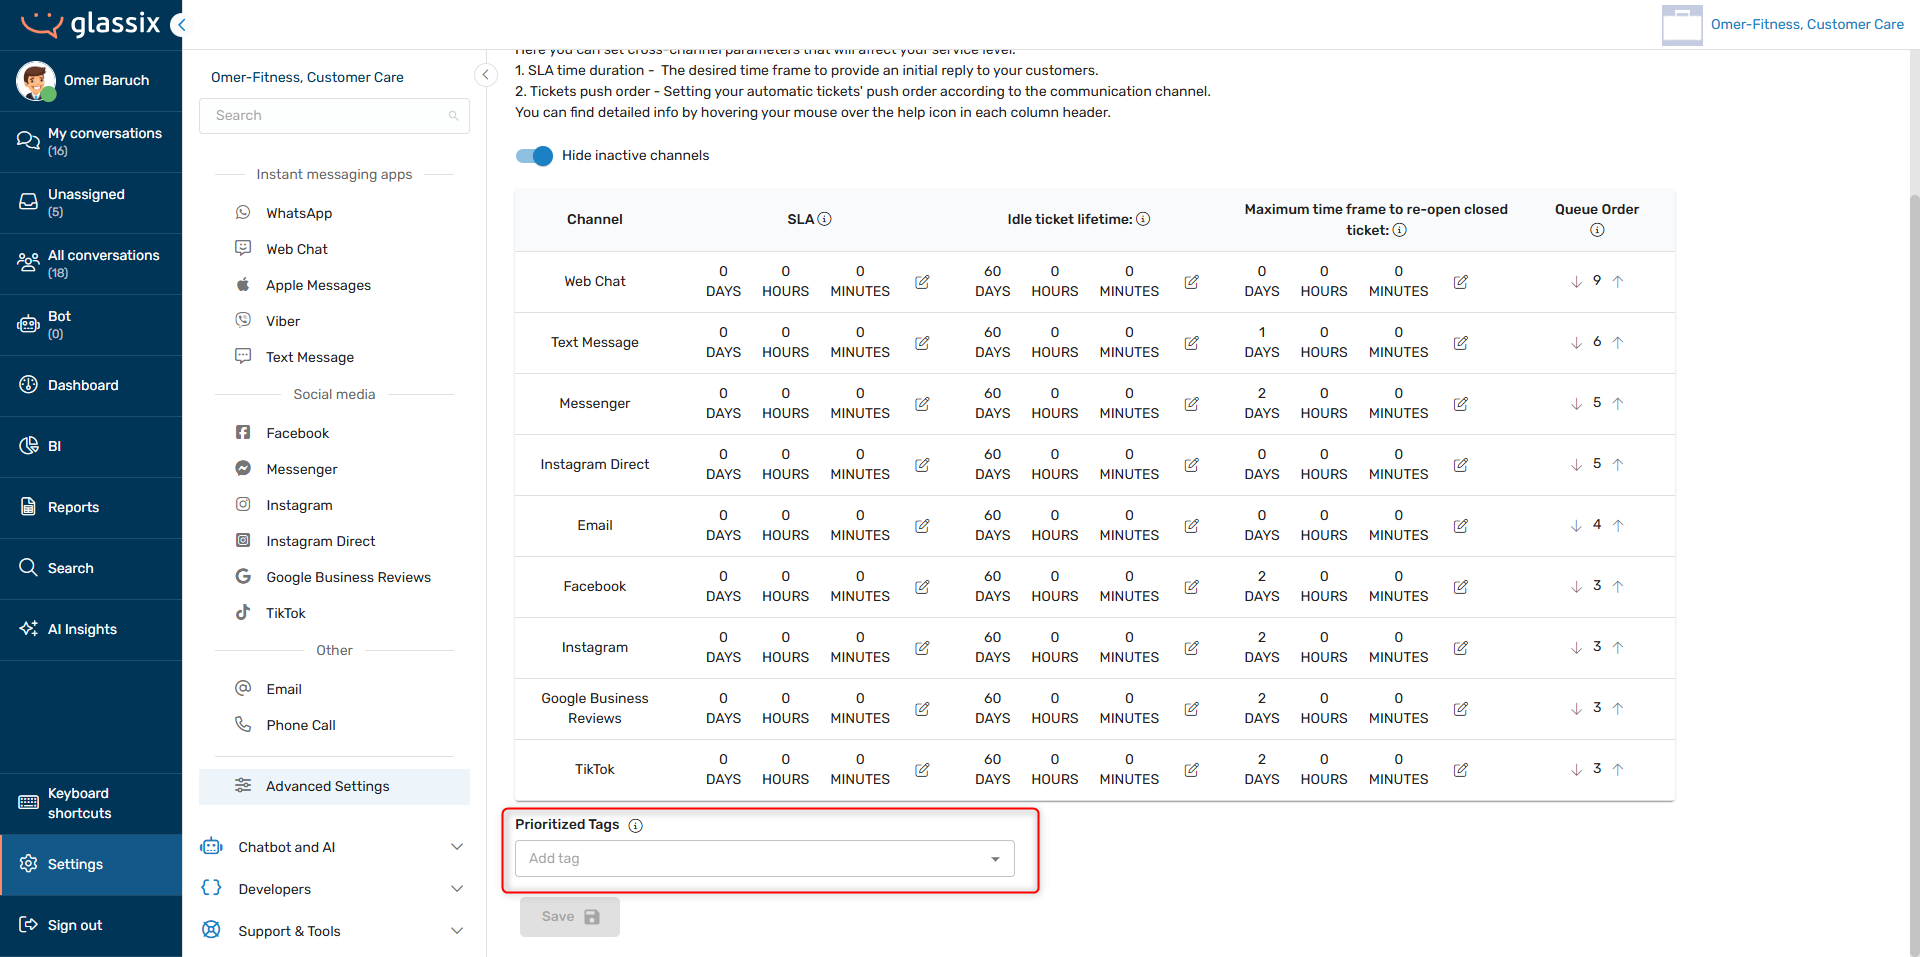
Setting Prioritized Tags
Setting prioritized tags allows you to prioritize automatic ticket distribution to agents based on the tags you set. Conversations tagged with prioritized tags take precedence in the queue. These tags can indicate urgency, complexity, or other characteristics requiring
faster attention.
Note:Prioritized tags require automatic ticket distribution to be enabled in any channels where you want to use them.
In combination with channel and contact tags, prioritized tags allow you to make sure tickets from specific contacts or channels are always assigned to agents before any other tickets.
In combination with flows and the API, prioritized tags allow you to make sure tickets about certain subjects or customers with specific questions are always assigned to agents before any other tickets.
To set prioritized tags:
-
Go to Settings → Channels → Advanced Settings, or click here, and scroll to the bottom of the page:
-
Choose one or more tags to prioritize - any tickets with the tags you choose will be assigned to agents before any other tickets:

-
Save your selection:

Assigning Tickets by Tags
Assigning tickets by tags allows you to choose specific agents or teams who will be assigned tickets with the tags you specify. This lets you, for example, direct conversations tagged as "Tier 2" exclusively to agents or teams who can handle escalations.
Important:Assigning tickets by tags overrides any channel permissions. Tickets will be assigned to agents even if they are not authorized for the communication channel in which the conversation was received.
This
is to enable the creation of dedicated agents and teams for specific issues or escalations, by removing other channel permissions for the agent or team.
Note:Assigning tickets by tags requires automatic ticket distribution to be enabled in any channels where you want to use the functionality.
In combination with channel, contact and flow tags, assigning tickets by tags lets you create dedicated, cross-channel teams to:
- Manage specific channels
- Handle tickets from specific groups of customers
- Always be assigned tickets after specific chatbot flows
- Always be assigned tickets with certain topics
Tip:If you want an agent or team to always receive tickets from a specific customer, you can also use channel-specific conversation routing under Settings → Channels → Your Chosen Channel → Conversation routing.
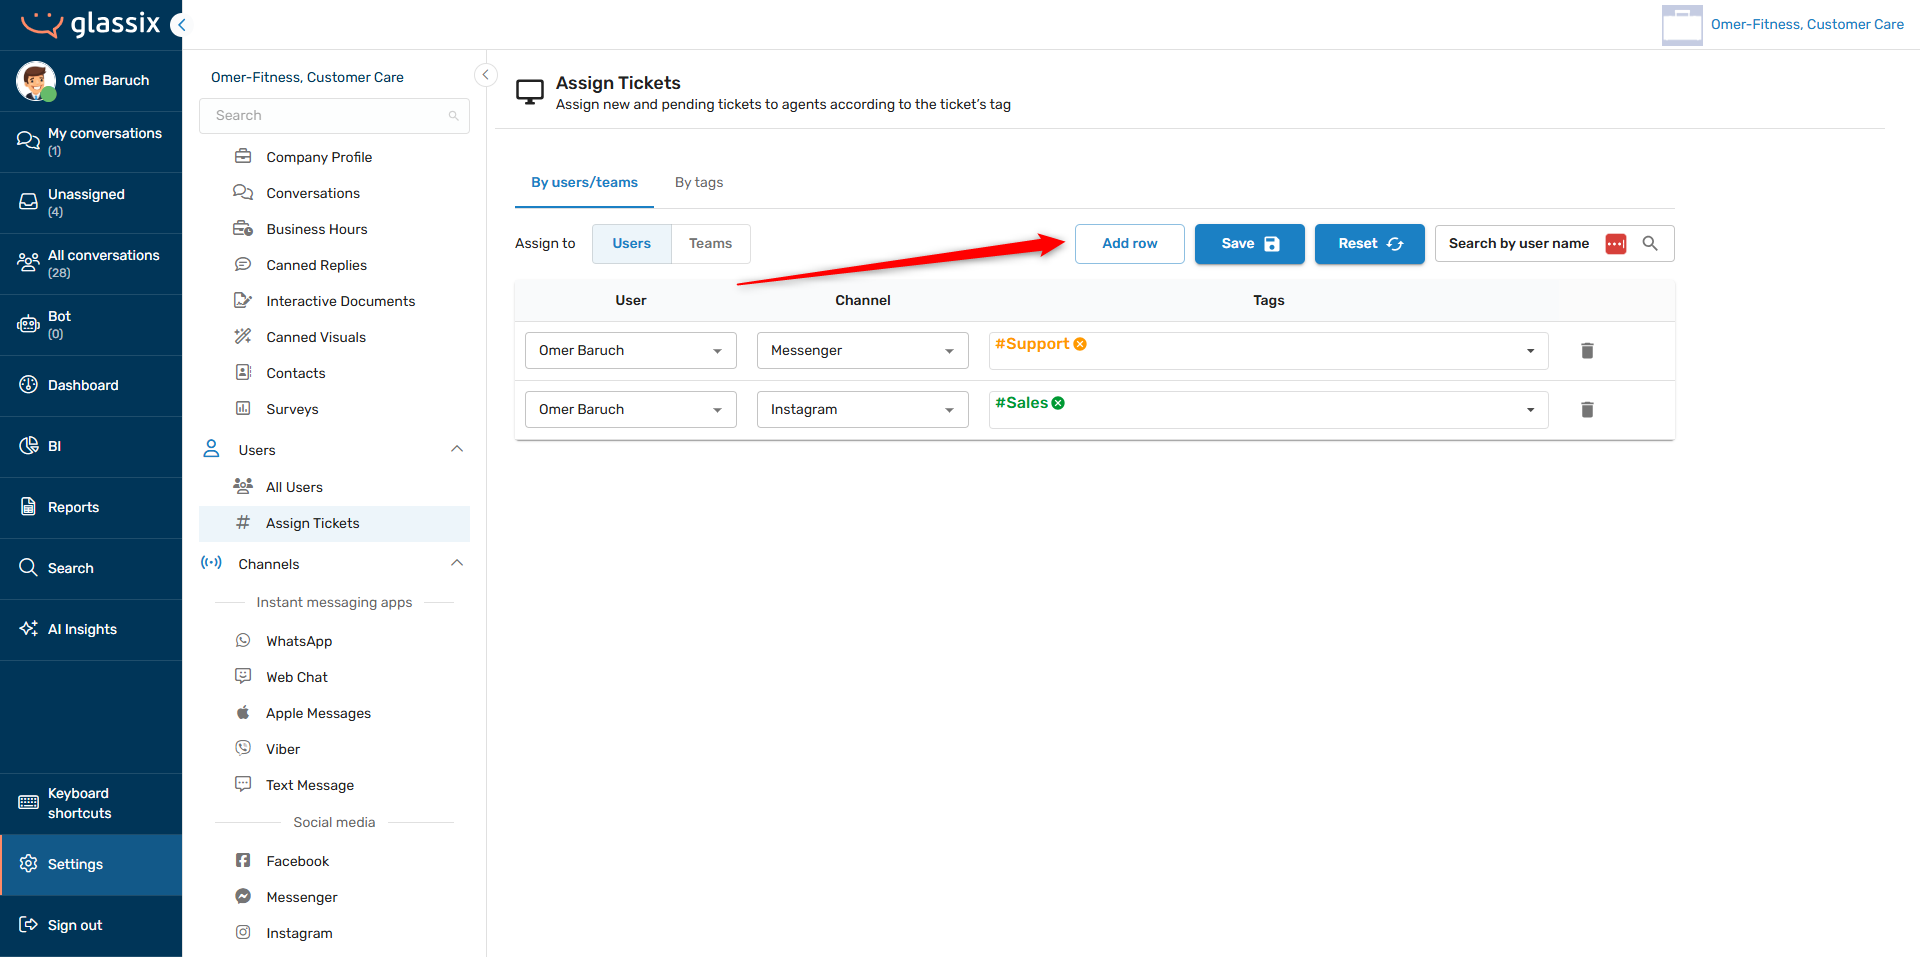
To assign tickets by tags:
-
Go to Settings → Users → Assign Tickets, or click here:

-
Choose whether you would like to define assignments by users/teams or by tags:
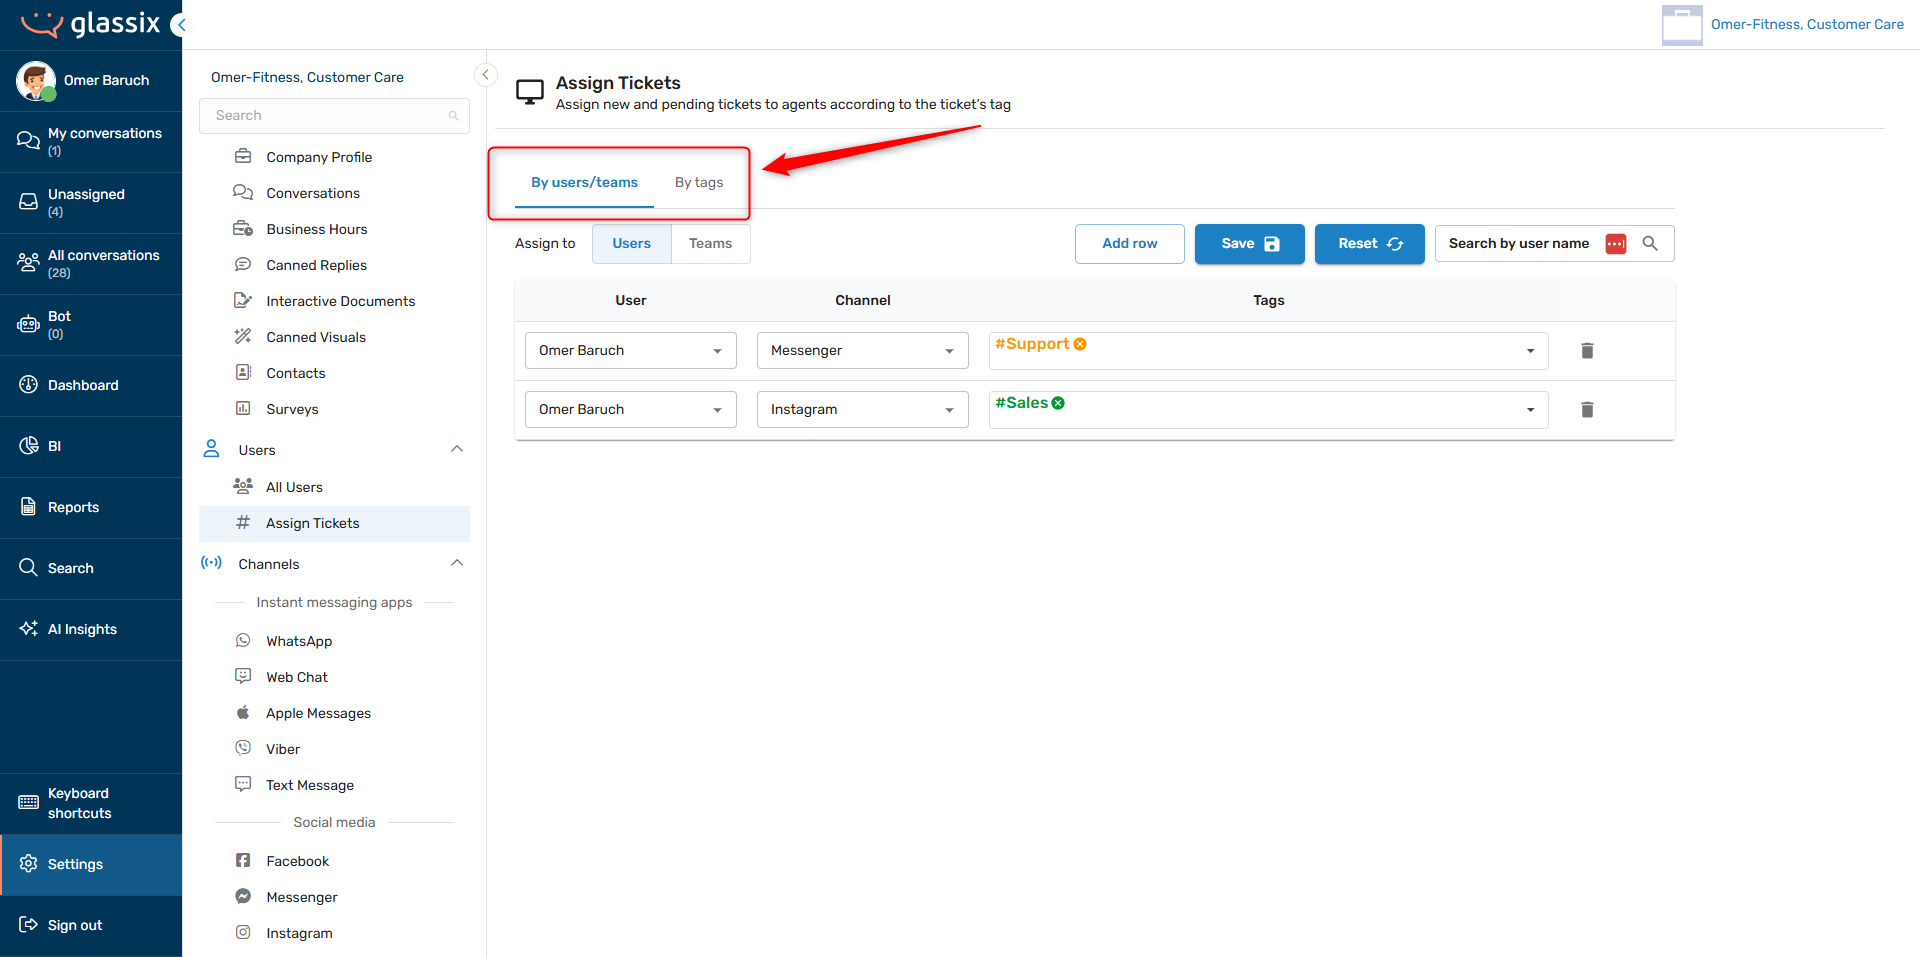
Both tabs control the same set of assignment rules, they are simply arranged differently.
By users/teams lets you choose a user or team and define the tags which will be assigned to them, while By tags lets you choose a tag and define the users or teams which will receive those assignments.
Tip:Any assignment rule you set on the By users/teams tab will automatically create an assignment rule on the By tags page, and vice versa.
-
Click Add row:
-
Depending on the tab you're working in, select either a user/team or a tag in the first dropdown:

-
In the second dropdown, select a channel where you would like tickets to be assigned by this tag, or choose all channels:
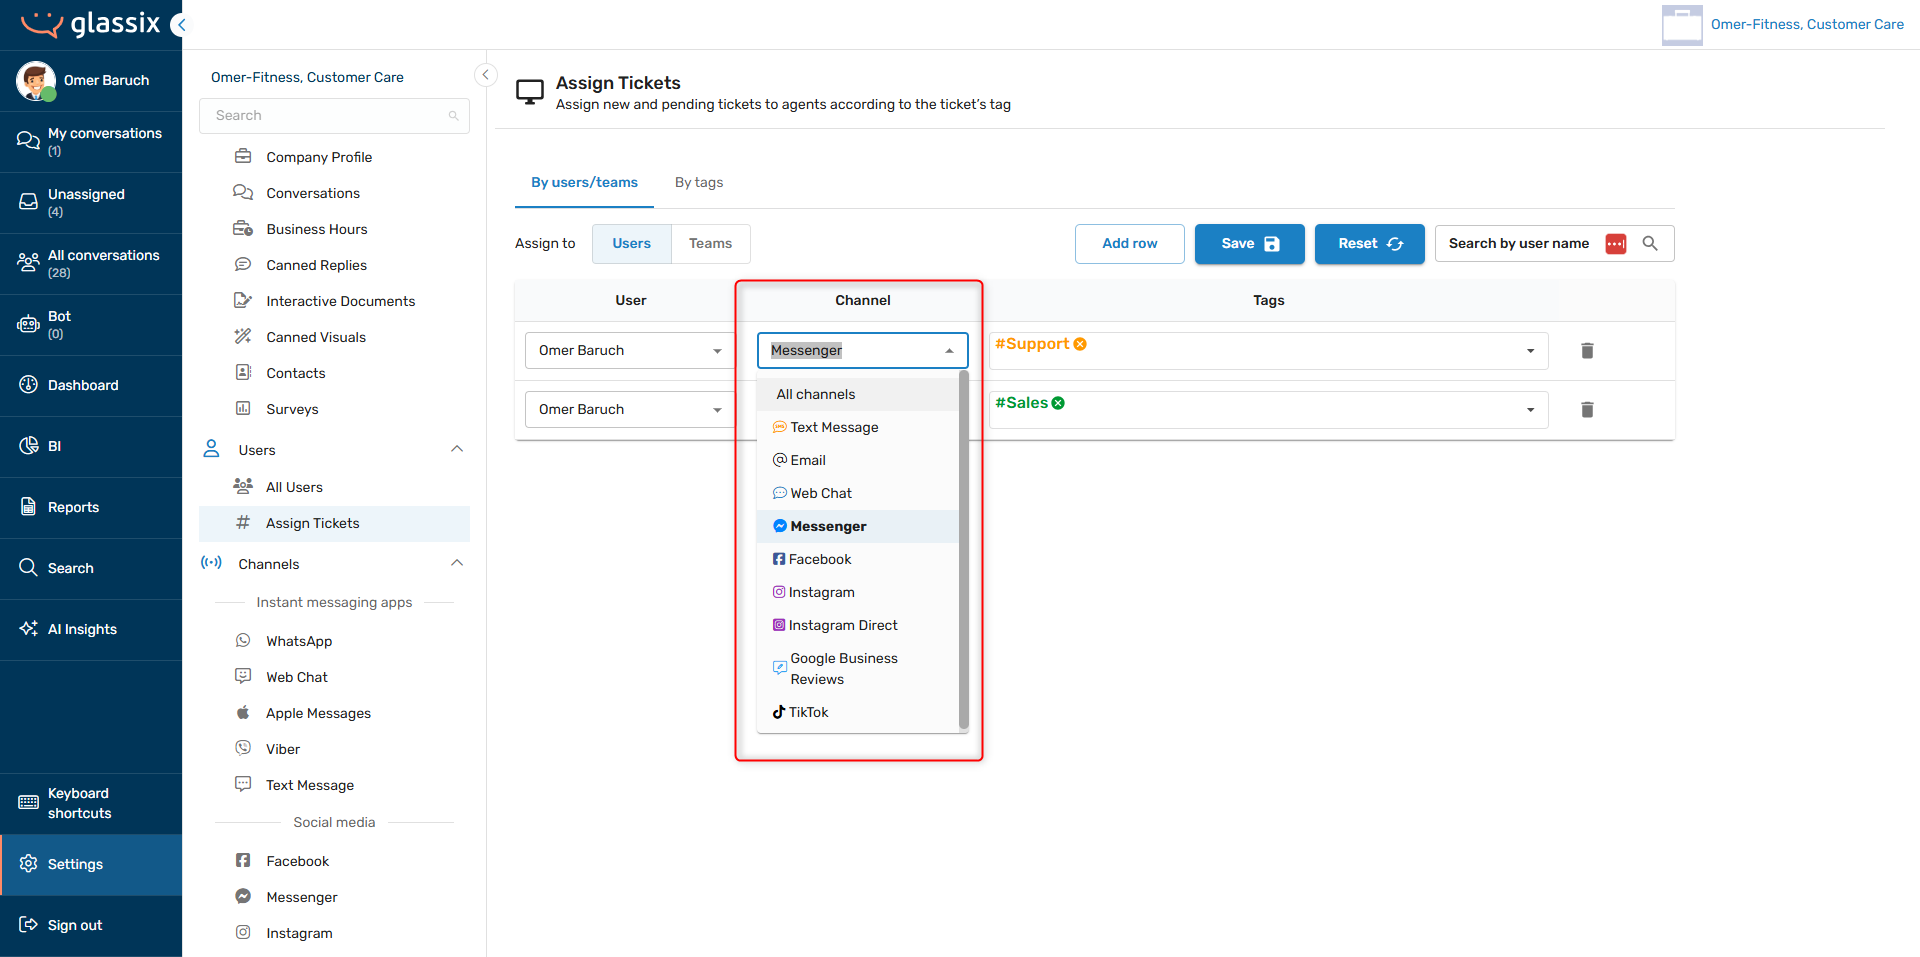
-
In the last field, depending on the tab you're working in, select:
-
By users/teams tab: One or more tags to assign to your chosen user or team
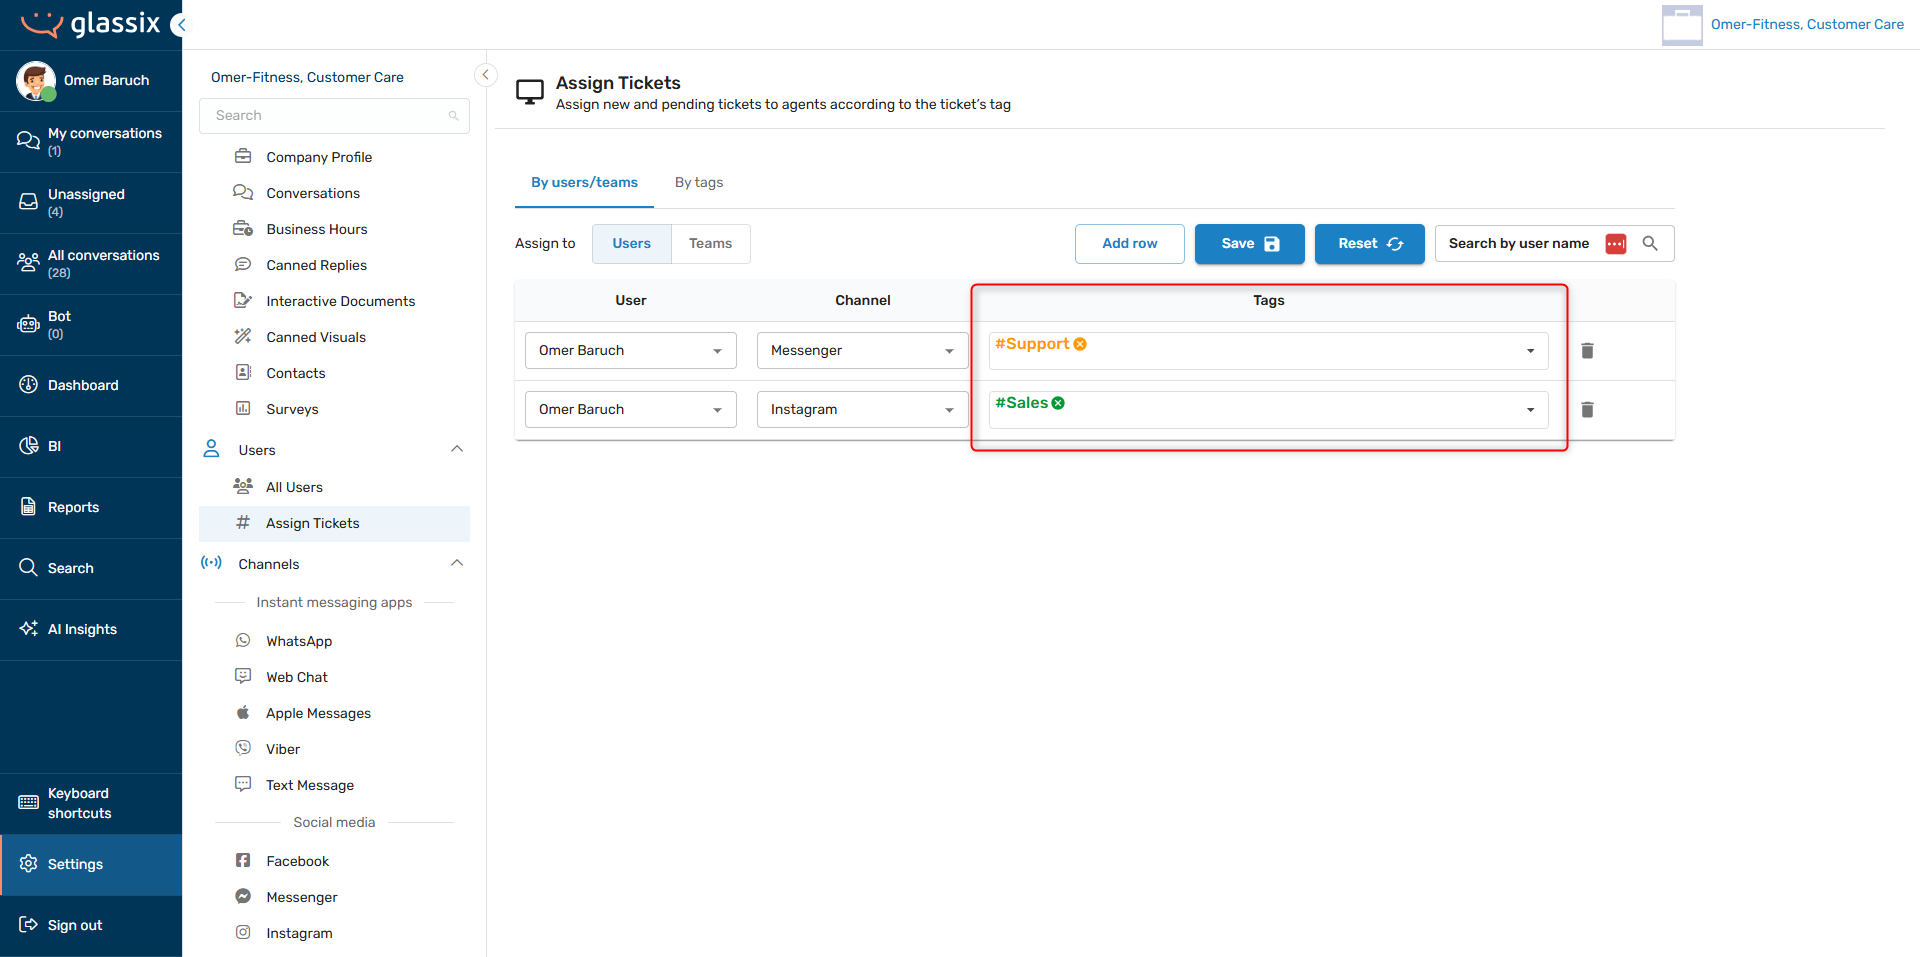
-
By tags tab: One or more users/teams to receive assignments with your chosen tag
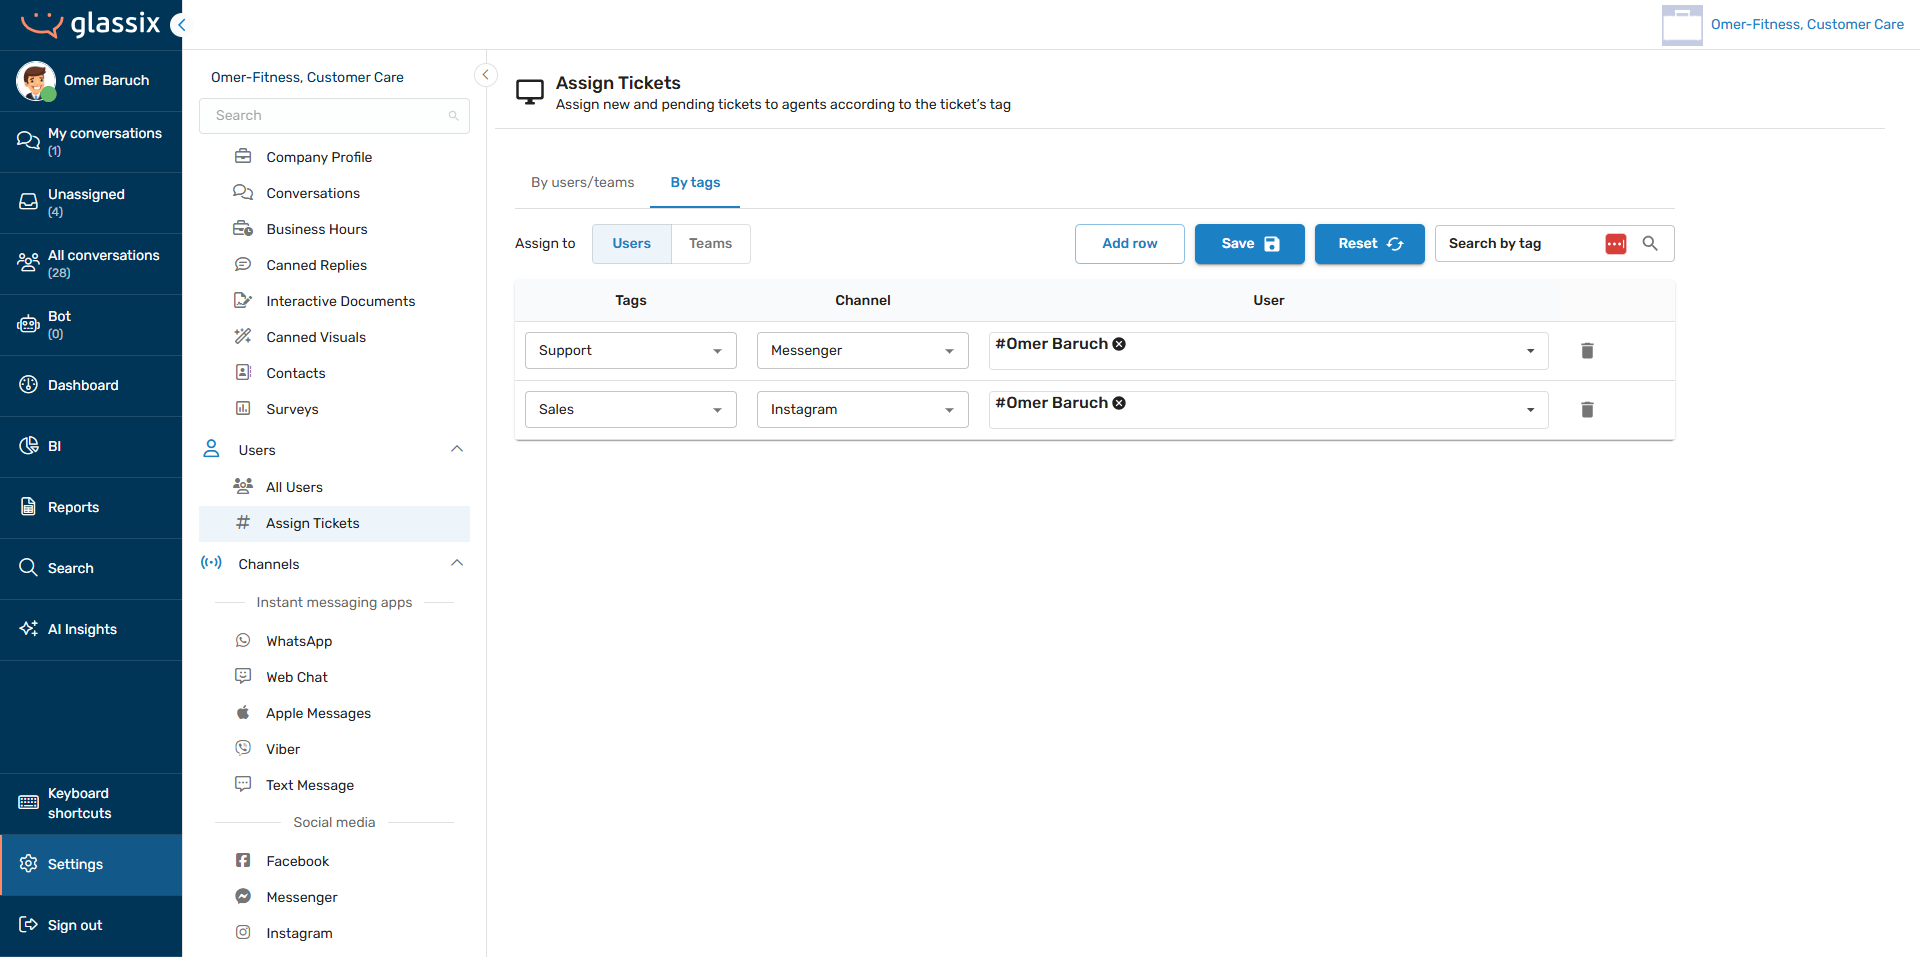
-
-
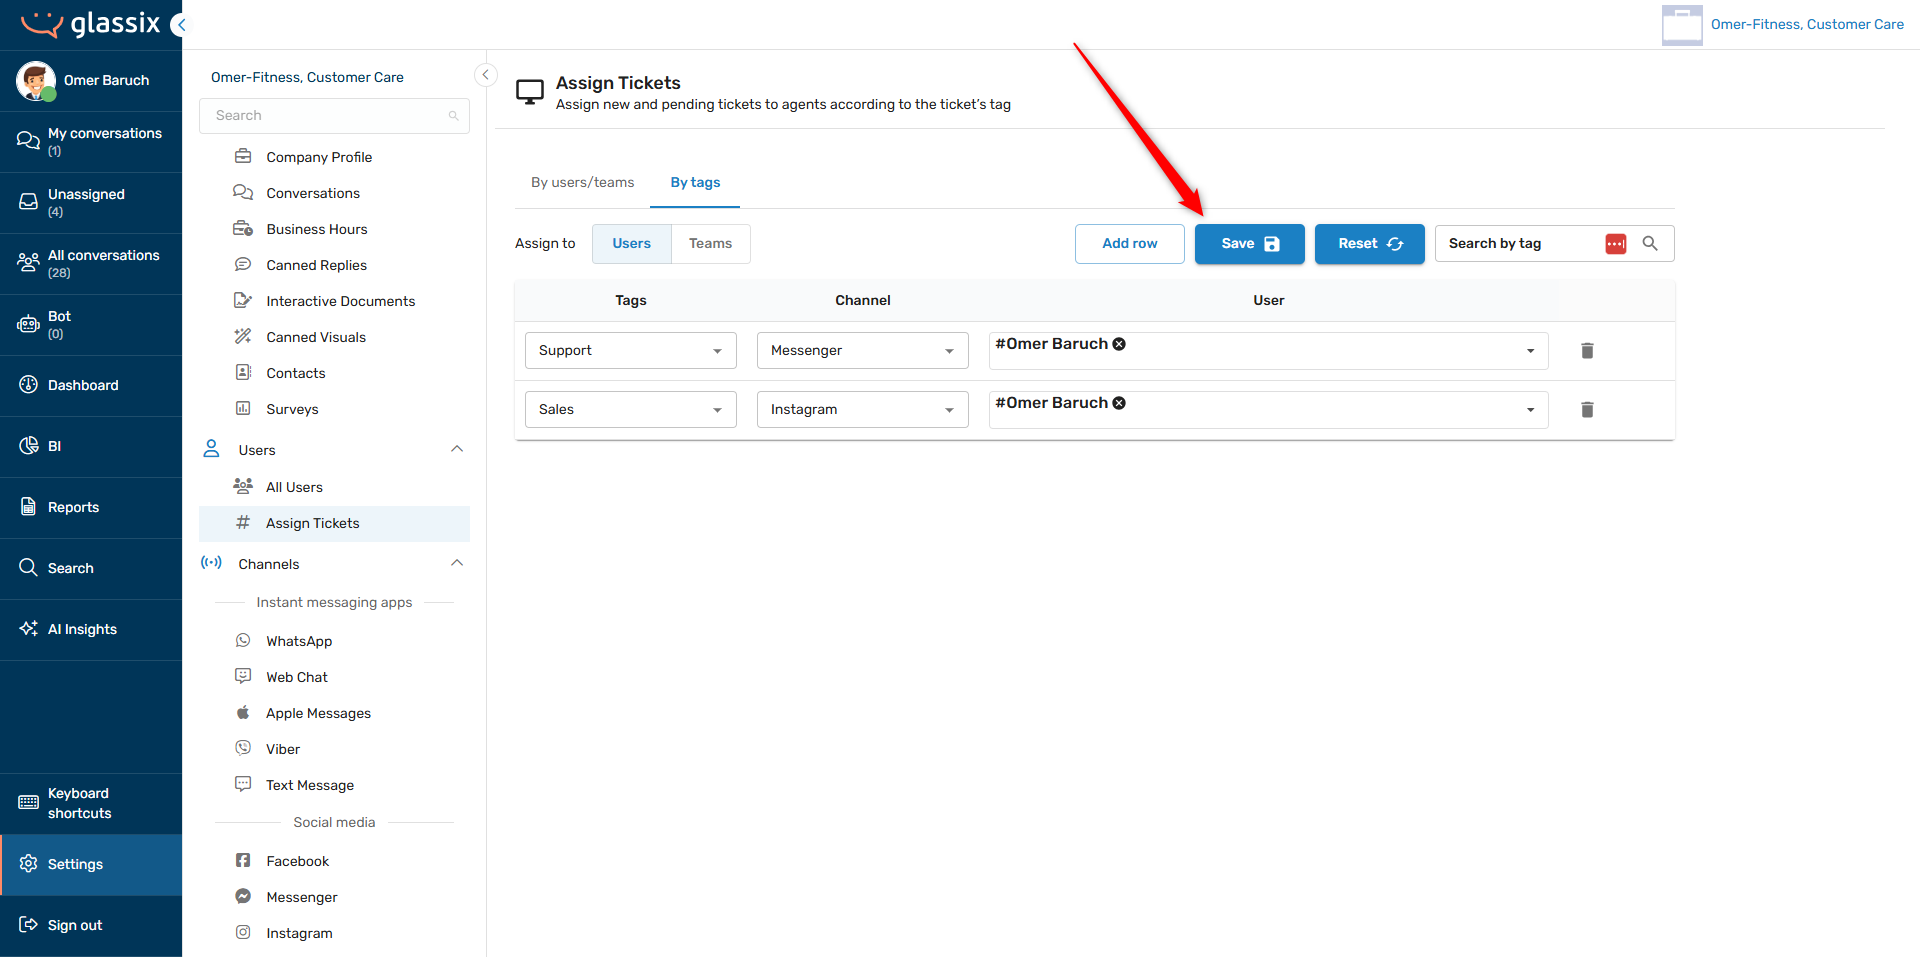
Save your changes:
Updated about 1 year ago