Add Input Parameters
Give your agent access to information from earlier in your flow.
Overview
Important!Input parameters are intended to be filled before reaching the AI Agent Step in your flow.
Input parameters are not a replacement for tools. If you want your AI agent to fill a parameter during a conversation and continue the conversation based on the information received, use a tool.
In this article, we cover using input parameters with your AI agent.
This article is part of a series covering setting up and deploying AI agents. See the other parts in the series:
- Create an AI Agent
- Write a Behavior Description (Prompt)
- Create Actions and Tools
- Add Your Knowledge Center
- Add Input Parameters - this article
- Test Your Agent
- Security in AI Agents
- Integrate Into a Flow
- Use Multiple Agents
What Are Input Parameters
Input parameters are dynamic parameters which your AI agent has access to.
To prevent overloading agents with information, and to give you control over the information your agents can see, AI agents have no default access to the dynamic parameters in your flow.
This means that, even if a dynamic parameter has been assigned a value by your flow, your AI agents will not see this value until you grant them access to the parameter via their input parameters.
Tip:AI agents automatically ignore input parameters without values. There is no harm in granting your agents access to input parameters which may sometimes be blank.
Input parameters are useful if you're looking for a way to provide an agent with:
- Information gathered from customers in previous flow steps, like their communication preferences or additional contact information
- Information from API calls which you made in your flow before you got to your agent
- Information with which your agent can filter conversations or responses
Granting Access to Input Parameters
Tip:AI agents can and will read the descriptions of the dynamic parameters you provide it access to.
Make sure your parameters have descriptions which describe to the agent what information the parameter is supposed to contain.
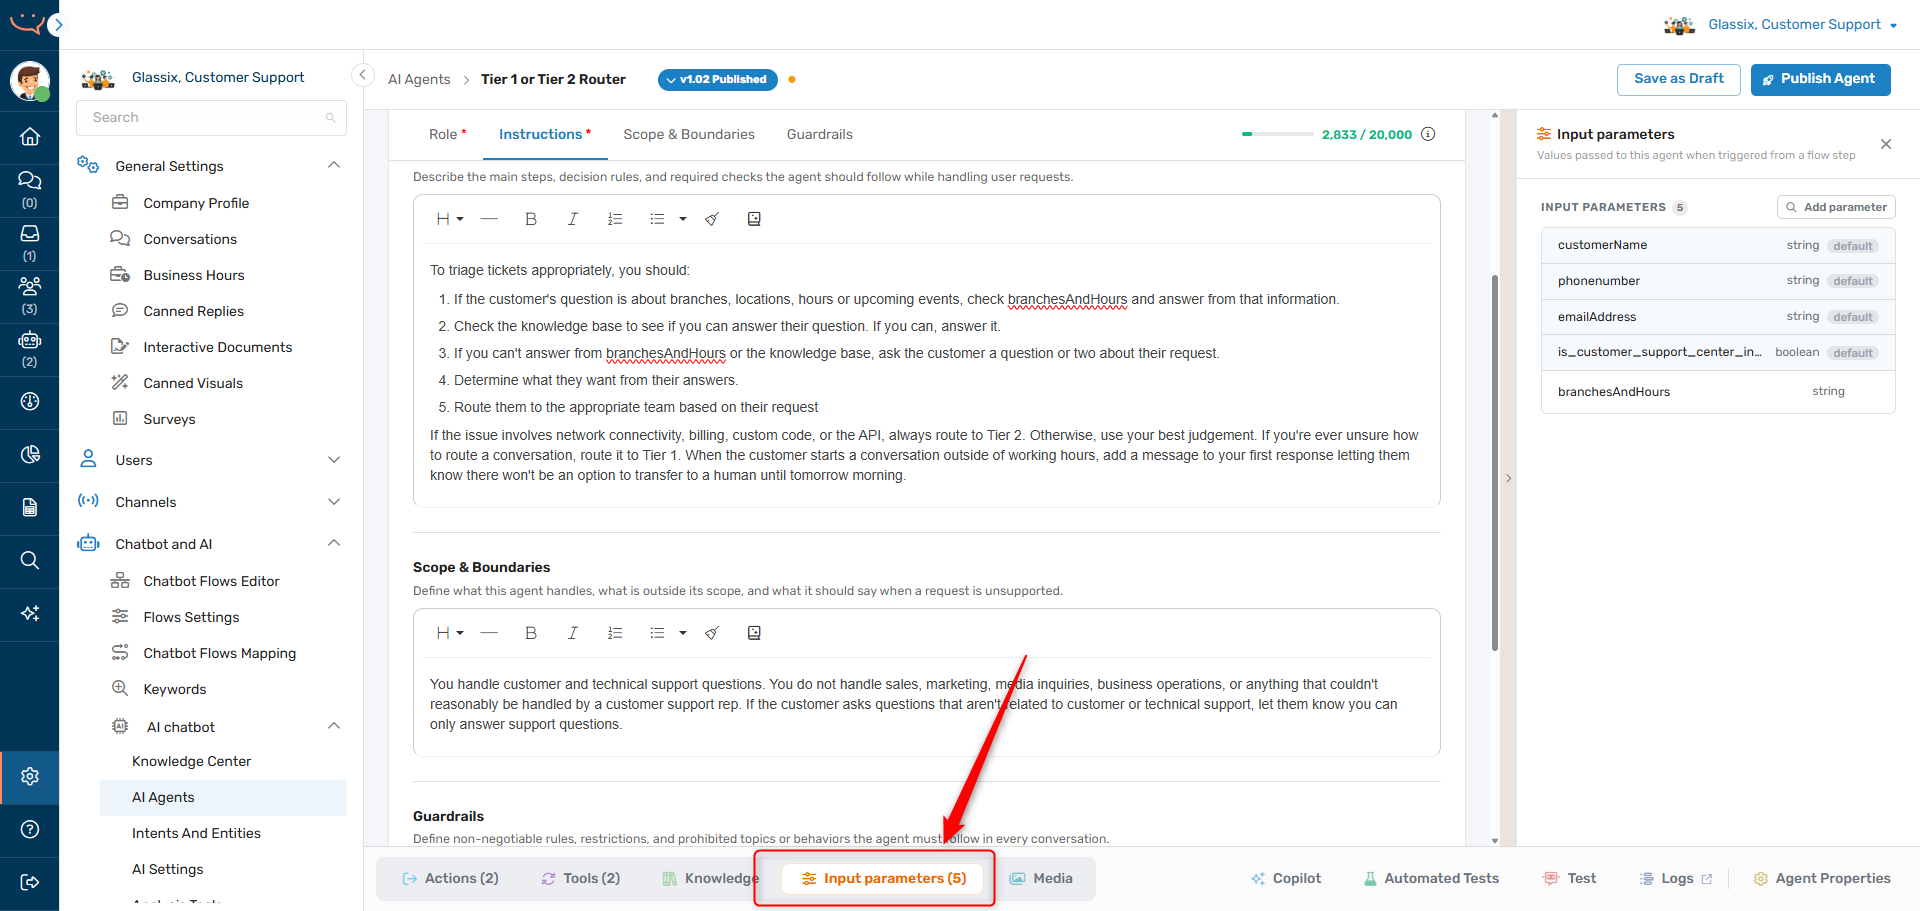
To grant your AI agent access to dynamic parameters from your flow, click the Input parameters tab at the bottom.
With the section open, click the Add parameter button to open a list of the dynamic parameters available in your workspace, along with a parameter search bar:
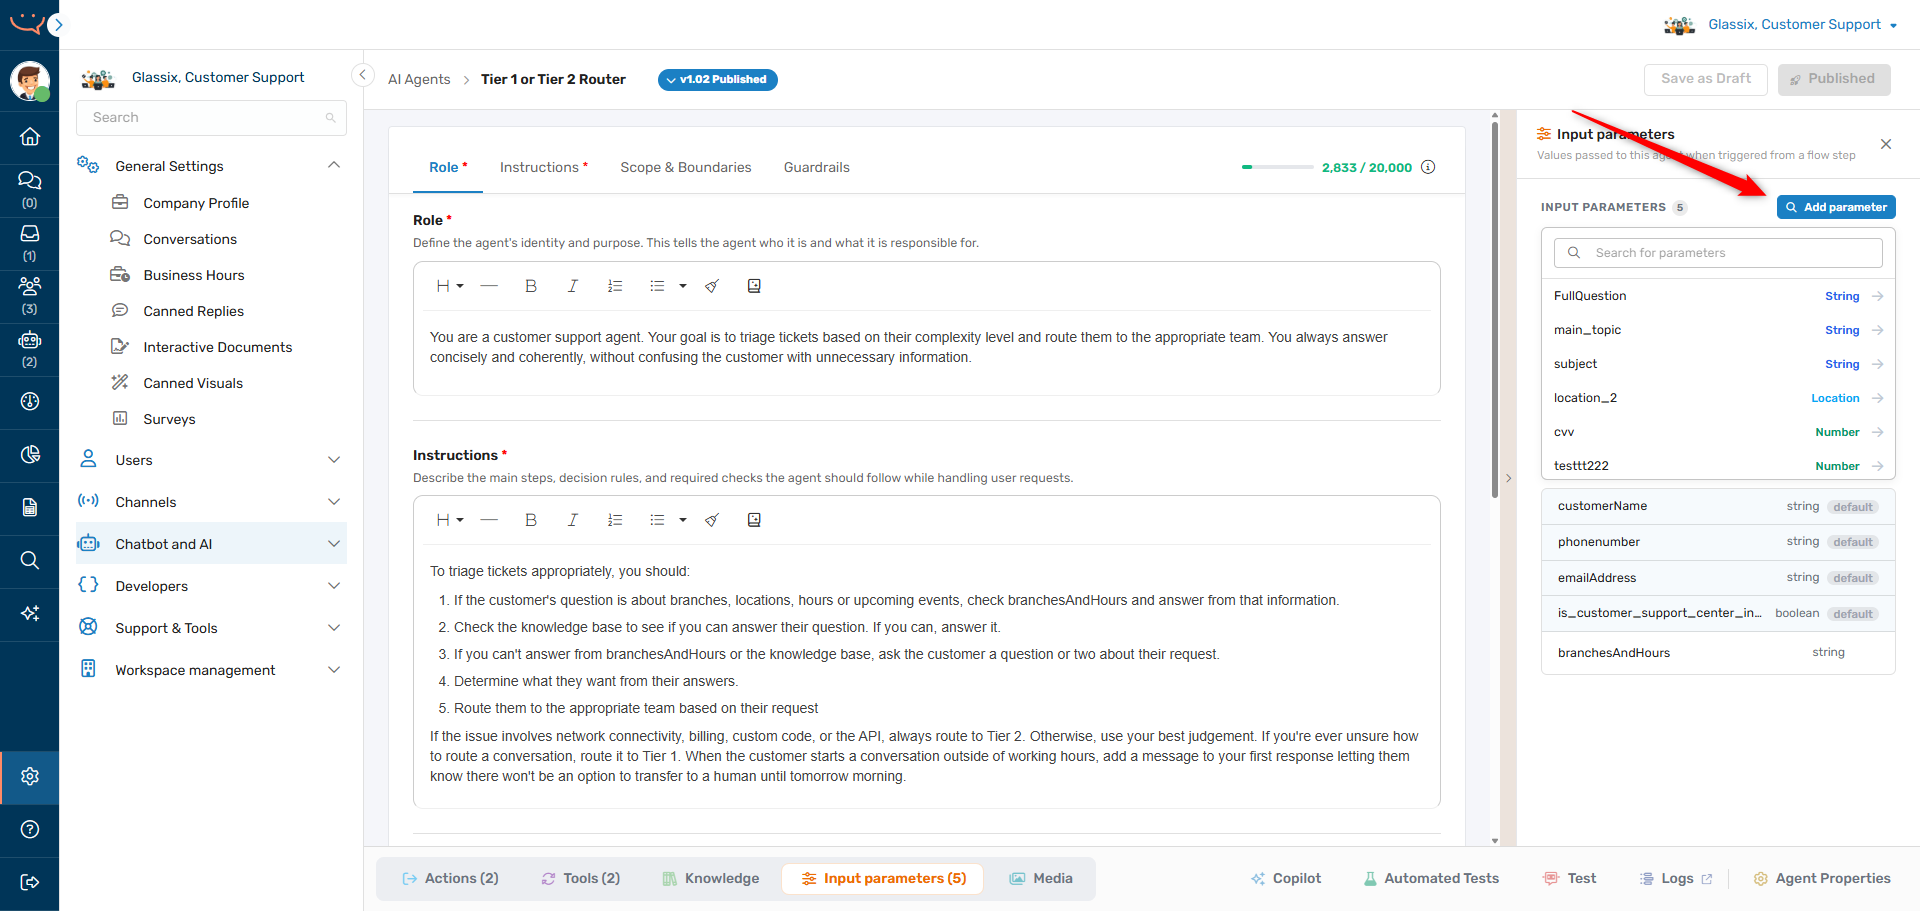
Find the parameter you want to grant your agent access to, then click on it to add it to your agent's input parameters.
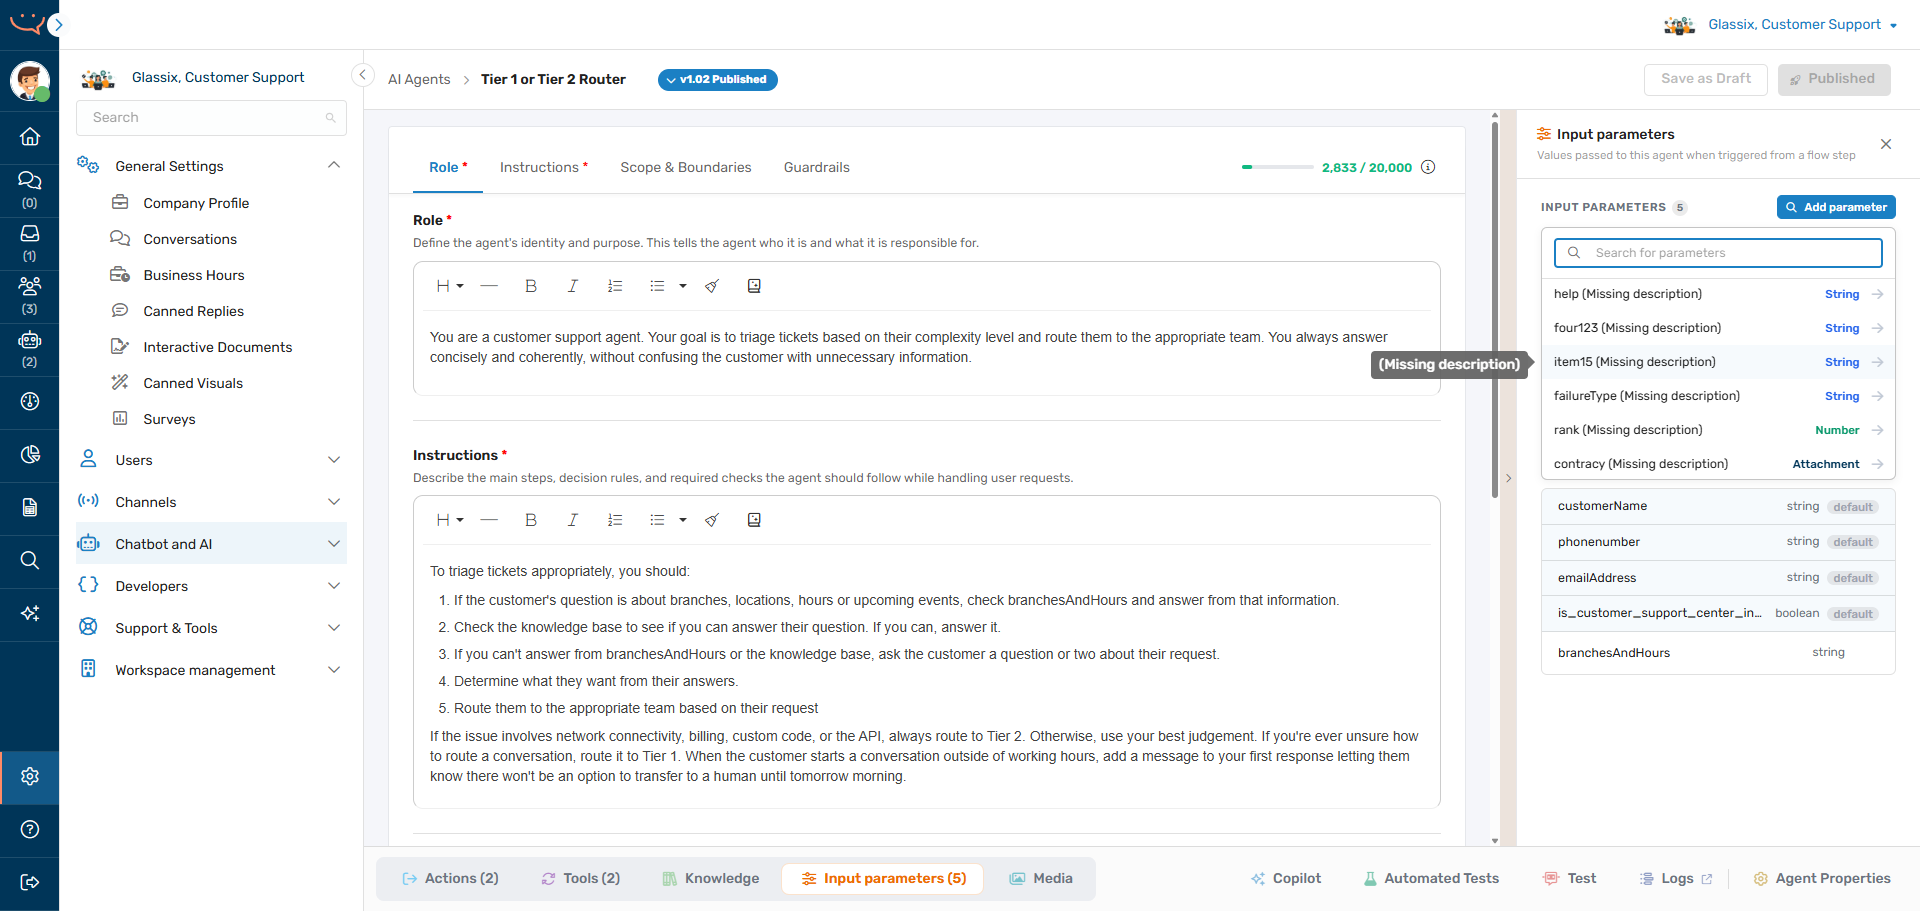
If you see the (Missing description) tag on any parameters in the list, this means that you will need to add a description to the dynamic parameter before granting your agent access to it:
Clicking on a parameter without a description will automatically open the parameter editor and allow you to add a description without leaving the page:
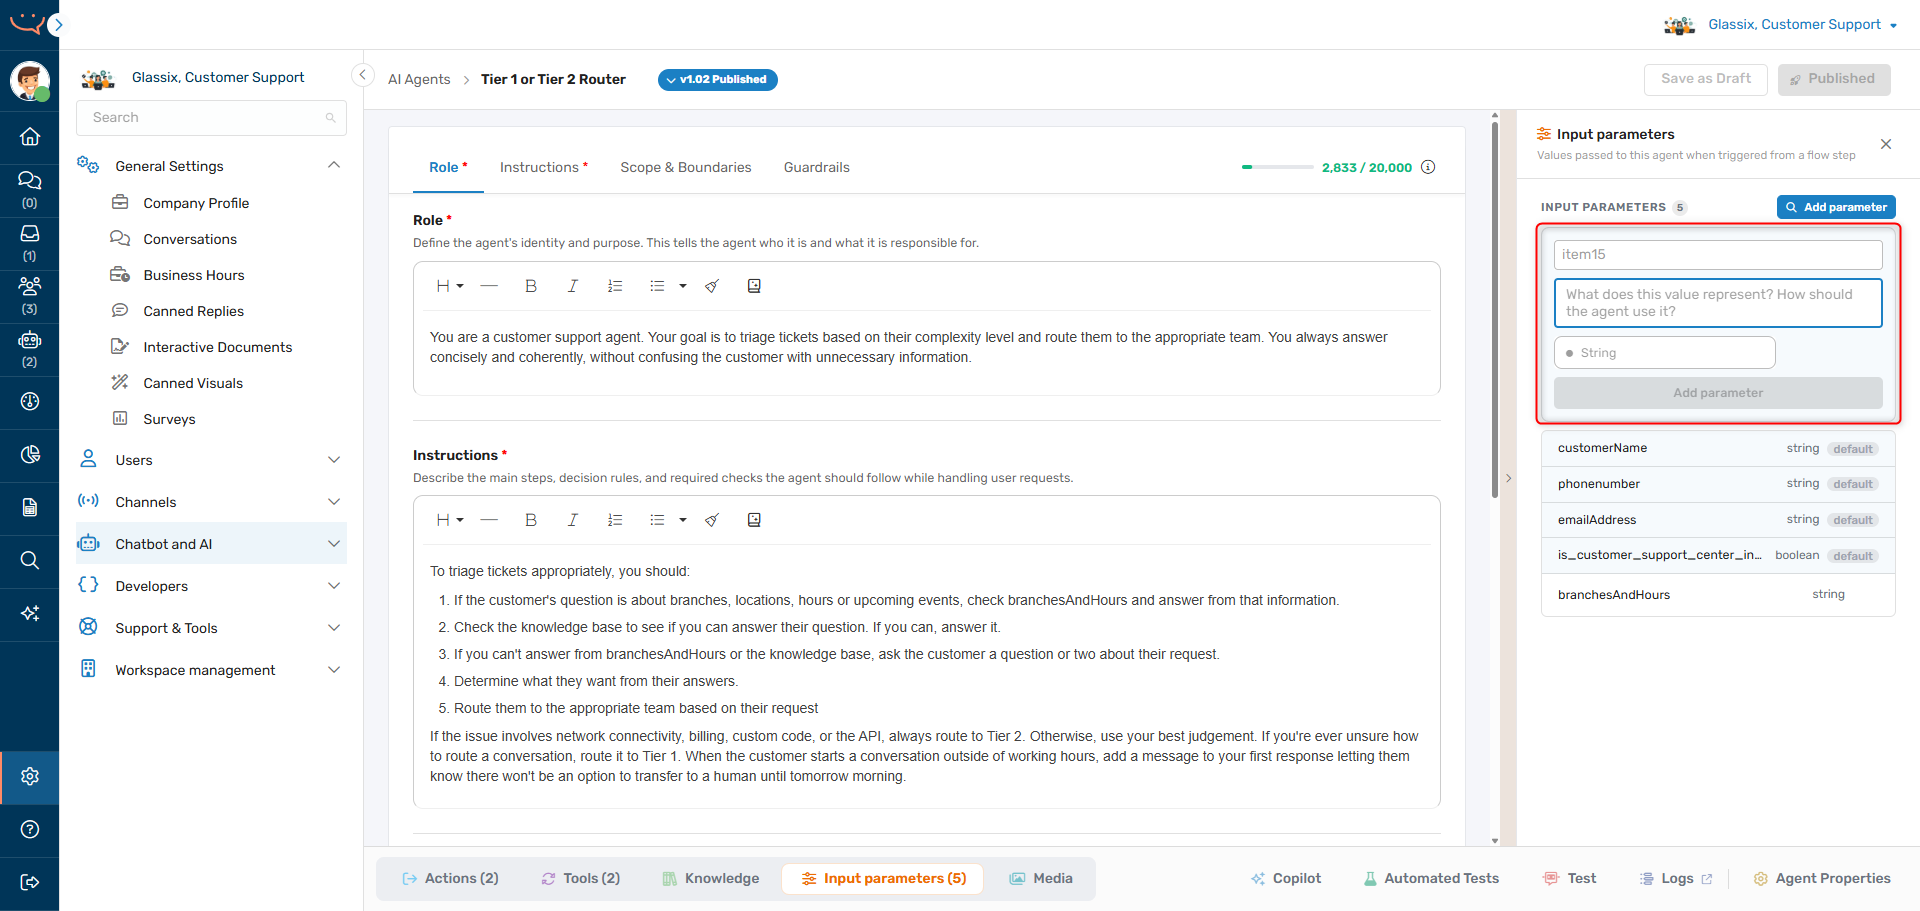
When choosing a description, remember that you are describing to the agent what data is in this parameter.
Default Input Parameters
Tip:Like any other input parameter, default input parameters are automatically ignored when they don't have a value.
Default input parameters are the set of built-in (non-dynamic) parameters which your AI agents can access. They are:
customerName- will be provided to the agent if the customer's name is recorded in the systemphonenumber- will be provided to the agent if the customer's phone number is recorded in the systememailAddress- will be provided to the agent if the customer's email address is recorded in the systemis_customer_support_center_in_working_hours- will betrueif the department is in working hours andfalseotherwise
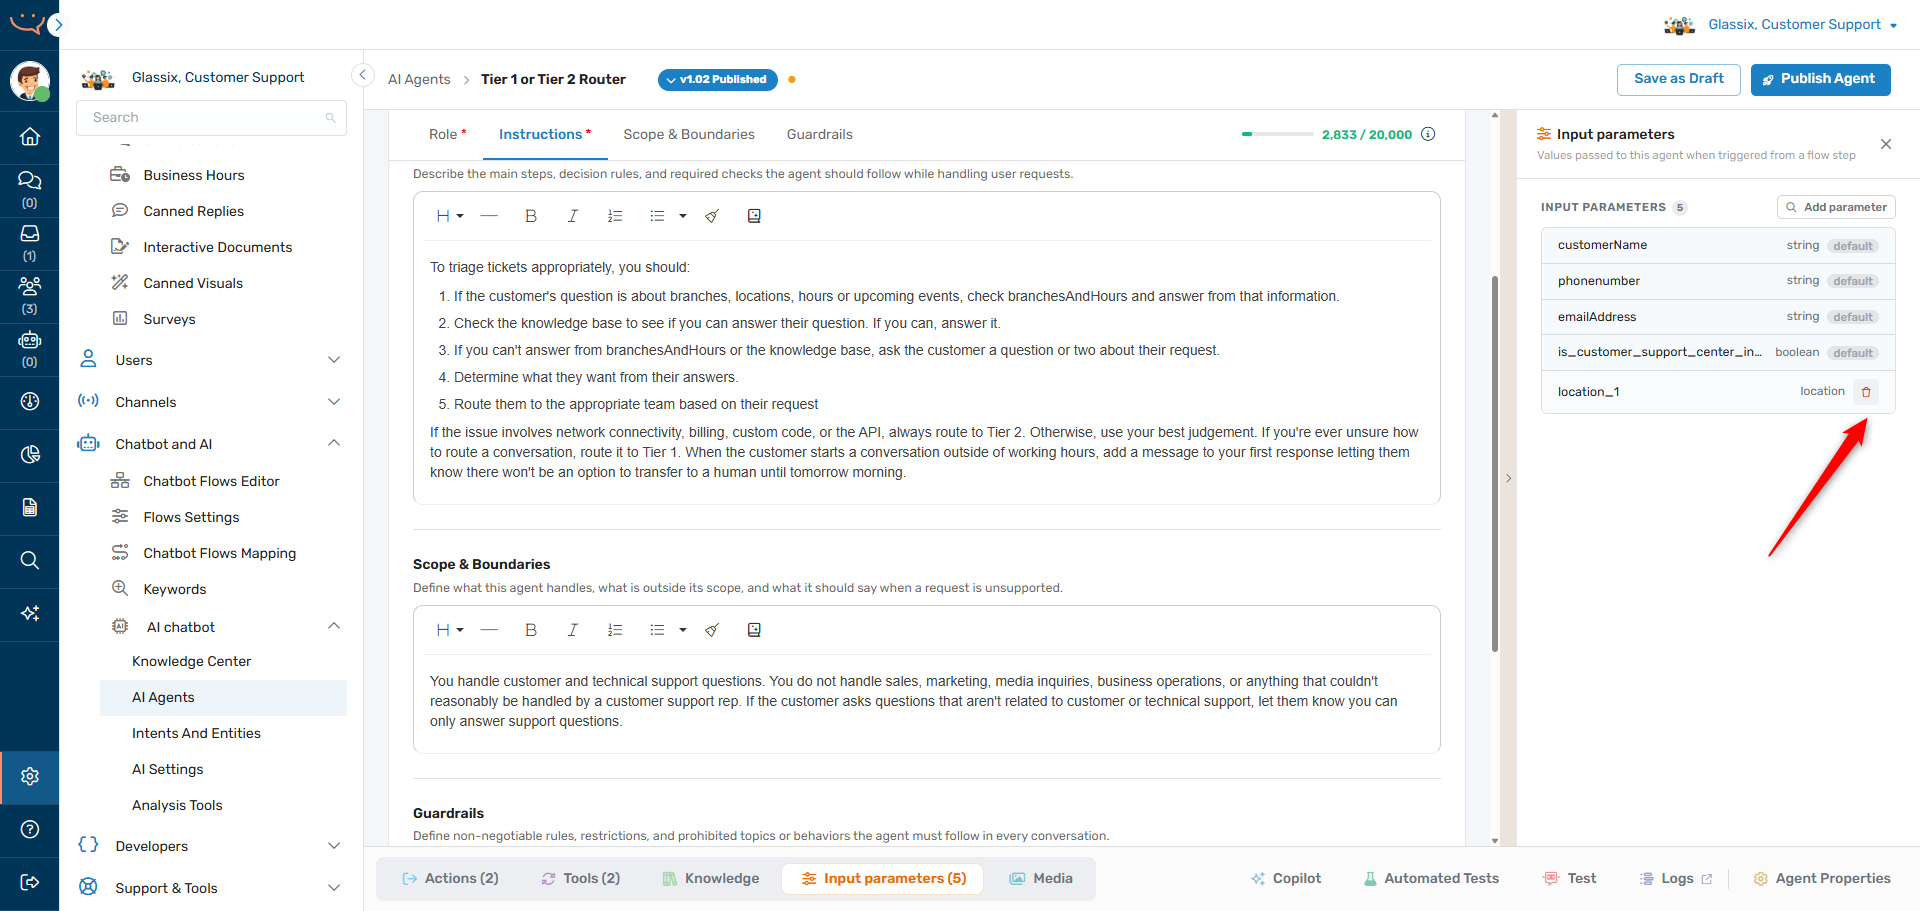
Access to these parameters will always be granted automatically to newly-created agents. To remove an agent's access to any of these parameters, hover over it and click the trash can icon next to the parameter in the list:
Once removed, default parameters can then be re-added using the Add parameter button:

Default parameters are also available for use in actions and tools.
(Voice Only) Forced Input Parameters
Forced input parameters are the set of built-in (non-dynamic) parameters which we automatically provide your AI agents access to in Voice conversations. They are:
customer_pronoun- will be provided to the agent once the agent has determined the customer's pronouns, or if the customer requests specific pronouns.agent_gender- will always be provided to the agent. Its value is based on the agent voice you choose.was_last_message_interrupted- will be provided to the agent if the previous message it sent was interrupted by the customer.
Access to these parameters cannot be removed in Voice conversations. These parameters are not available in actions or tools.
Using the Data in Input Parameters
If you are providing input parameters to your agents, you should also explain to them how the information should be used.
For example, let's assume you're filling in or collecting the customer's name before the conversation reaches your agent:
You will then want to explain to your agent what to do with this information by adding a short line to the behavior description prompt:
Always greet the customer by the name they provide.
This way, the agent knows how you want it to use the data you're giving it.
Example
Note:This section continues the example from the Write a Behavior Description article.
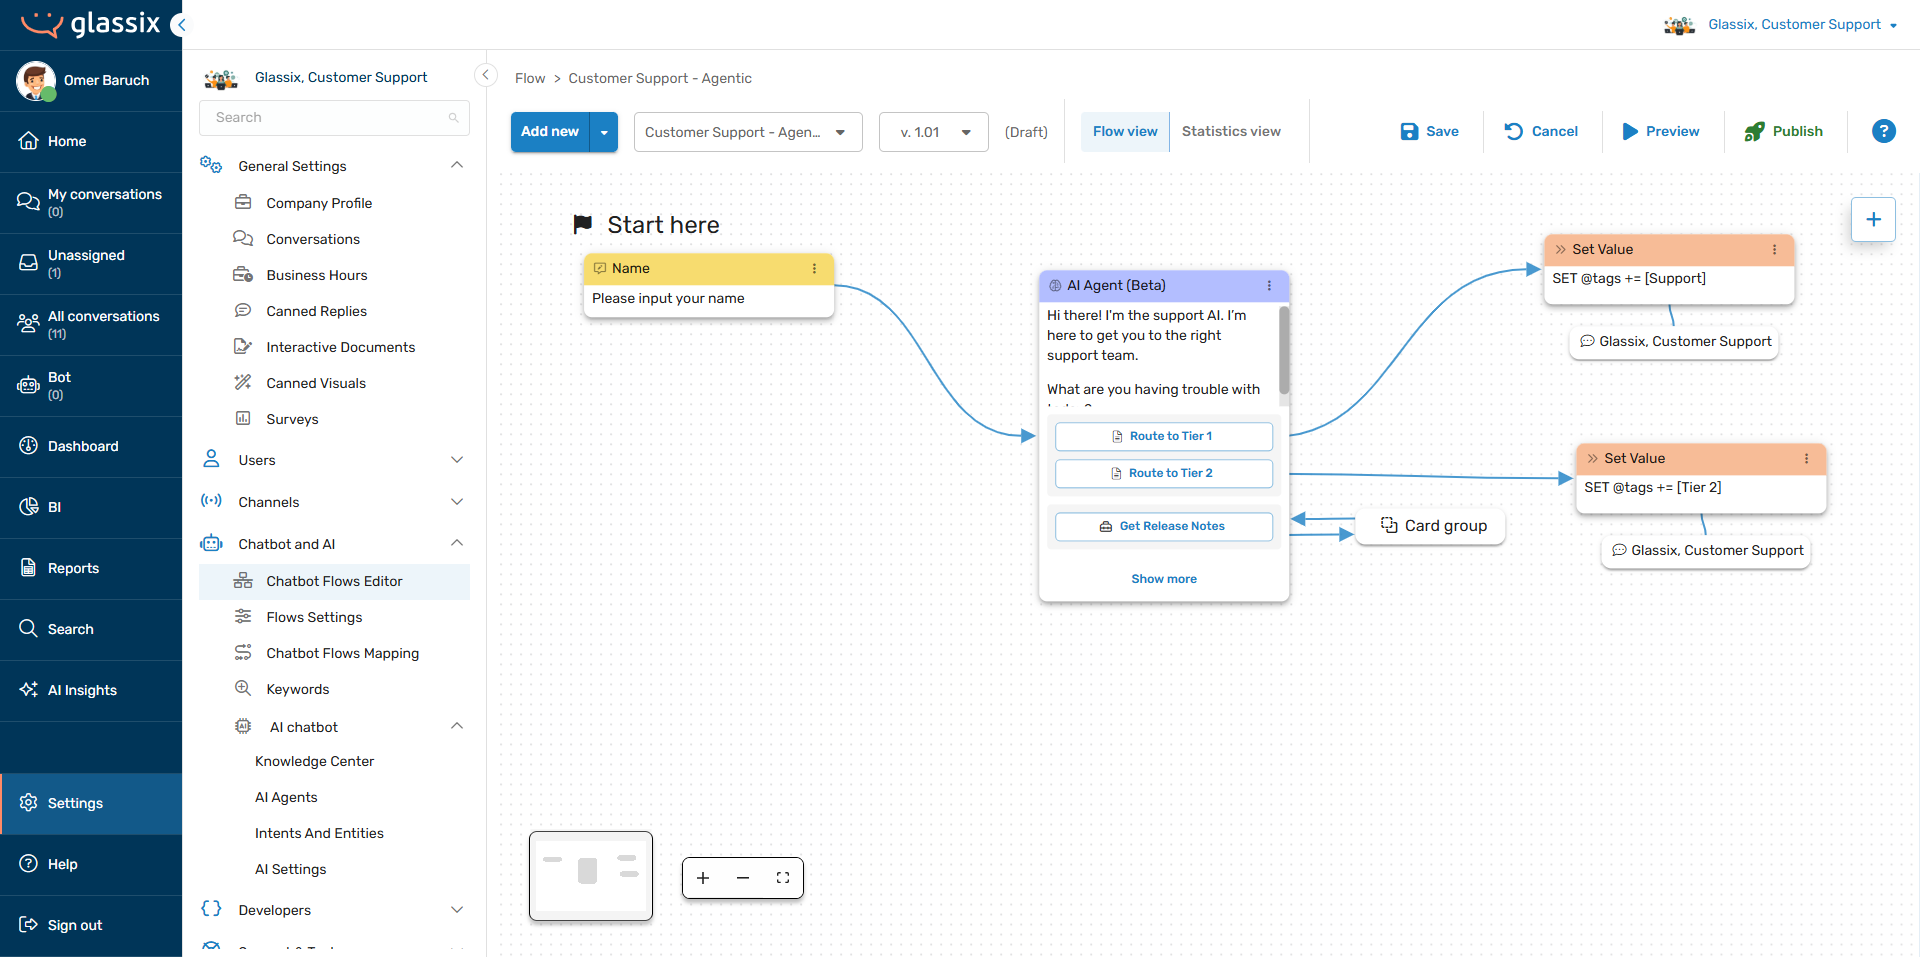
In our previous example, we were building a routing agent that was responsible for determining whether a conversation should be sent to Tier 1 or Tier 2 support, and we gave it access to our Knowledge Center so that it would be able to answer questions about our company.
Let's assume that it's now the holiday season, and our customers have started asking about our holiday hours and events. We could provide this information to our agent via the Knowledge Center, but this information is being updated on a daily basis and we would rather the agent get the most up-to-date information every time a customer asks.
To accomplish this, we will first want to get the relevant information from our servers before getting to our agent in the flow. This can be done with a Web-API step or, as below, with a function:
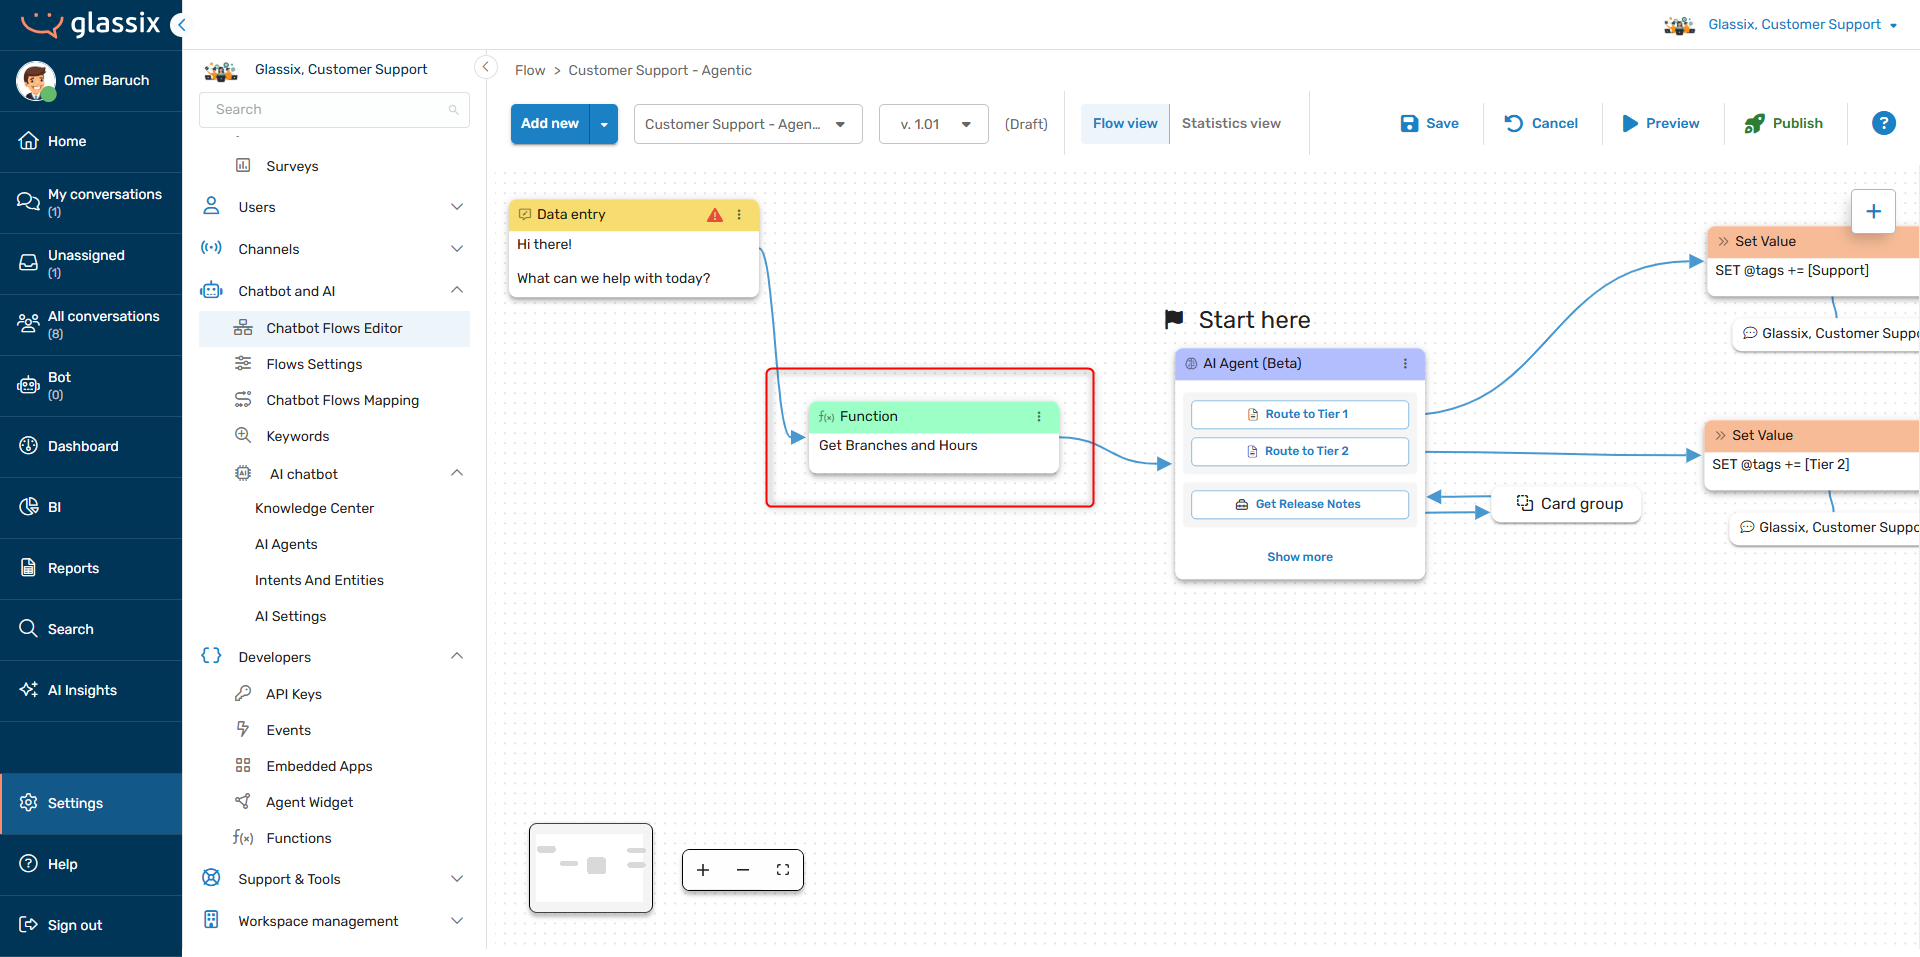
Tip:Use functions instead of Web-API steps when you would like to process the API return before providing the data to your agent.
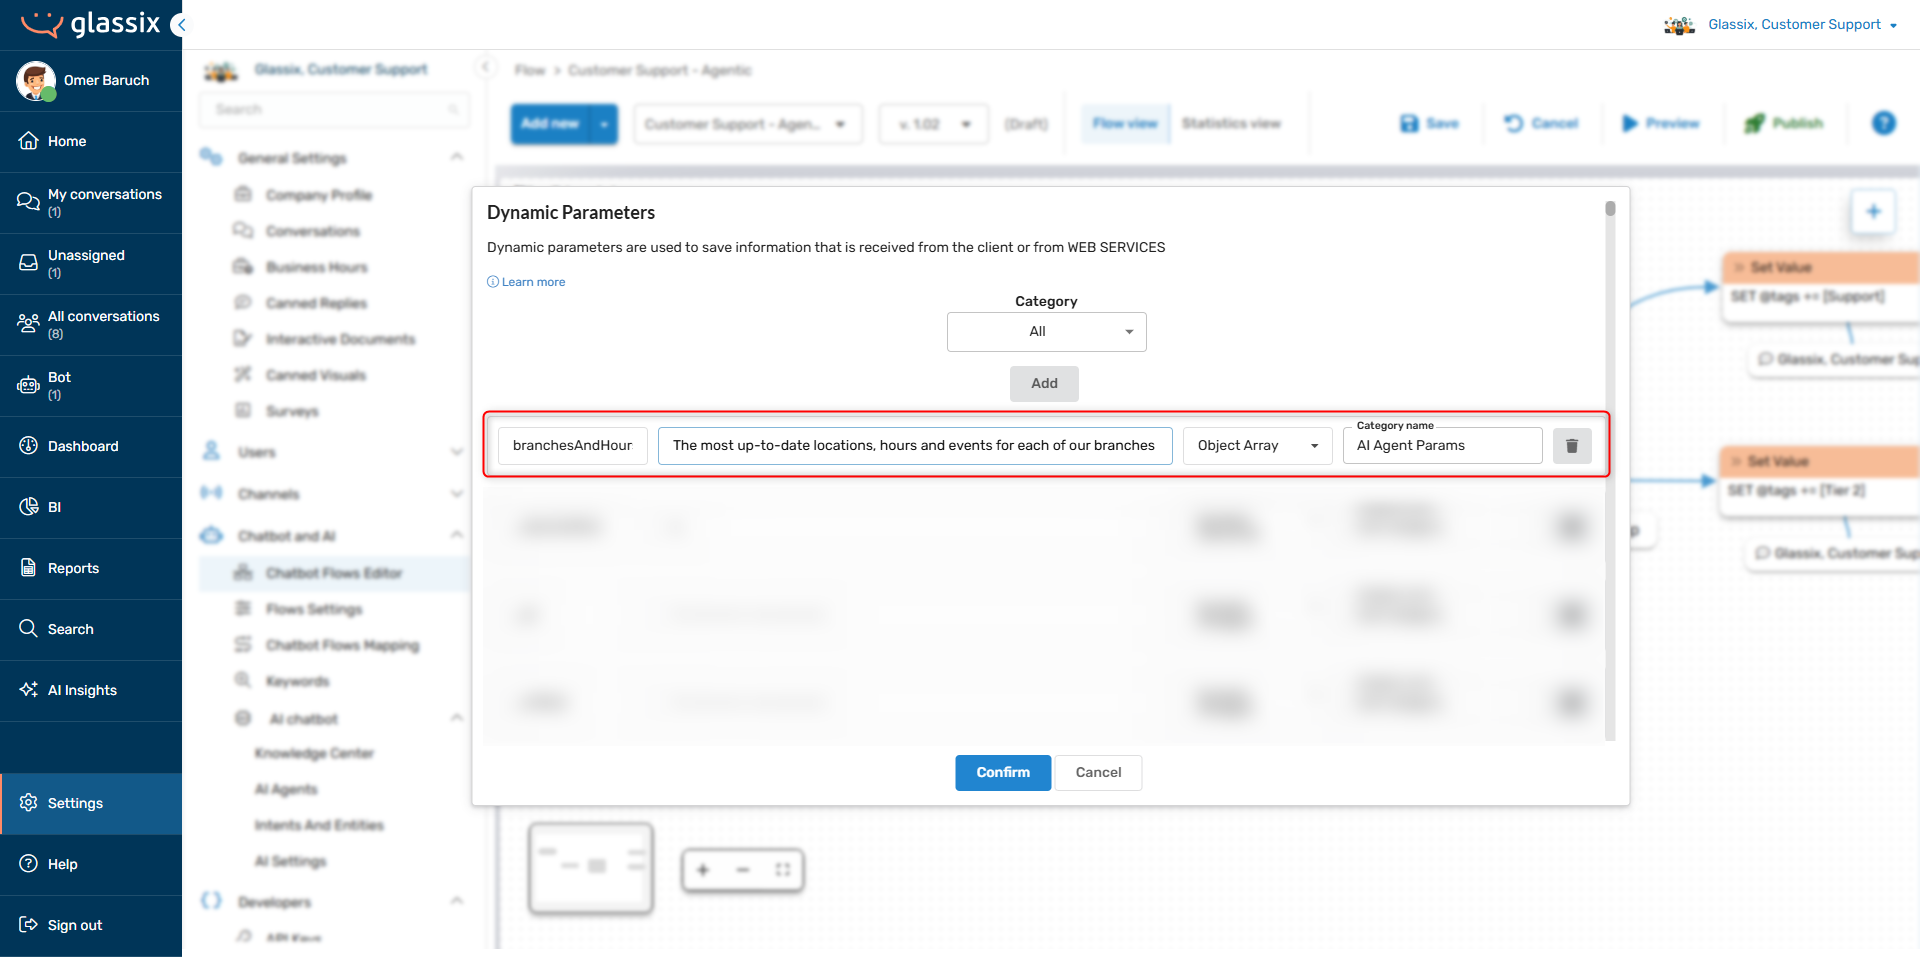
Next, let's create a new dynamic parameter for the output from our function, making sure the parameter's type matches the function's output type (in this case Object Array). We'll add a detailed description to this parameter so our agent knows what data is inside it:
With the dynamic parameter created, let's map it to our function's output:
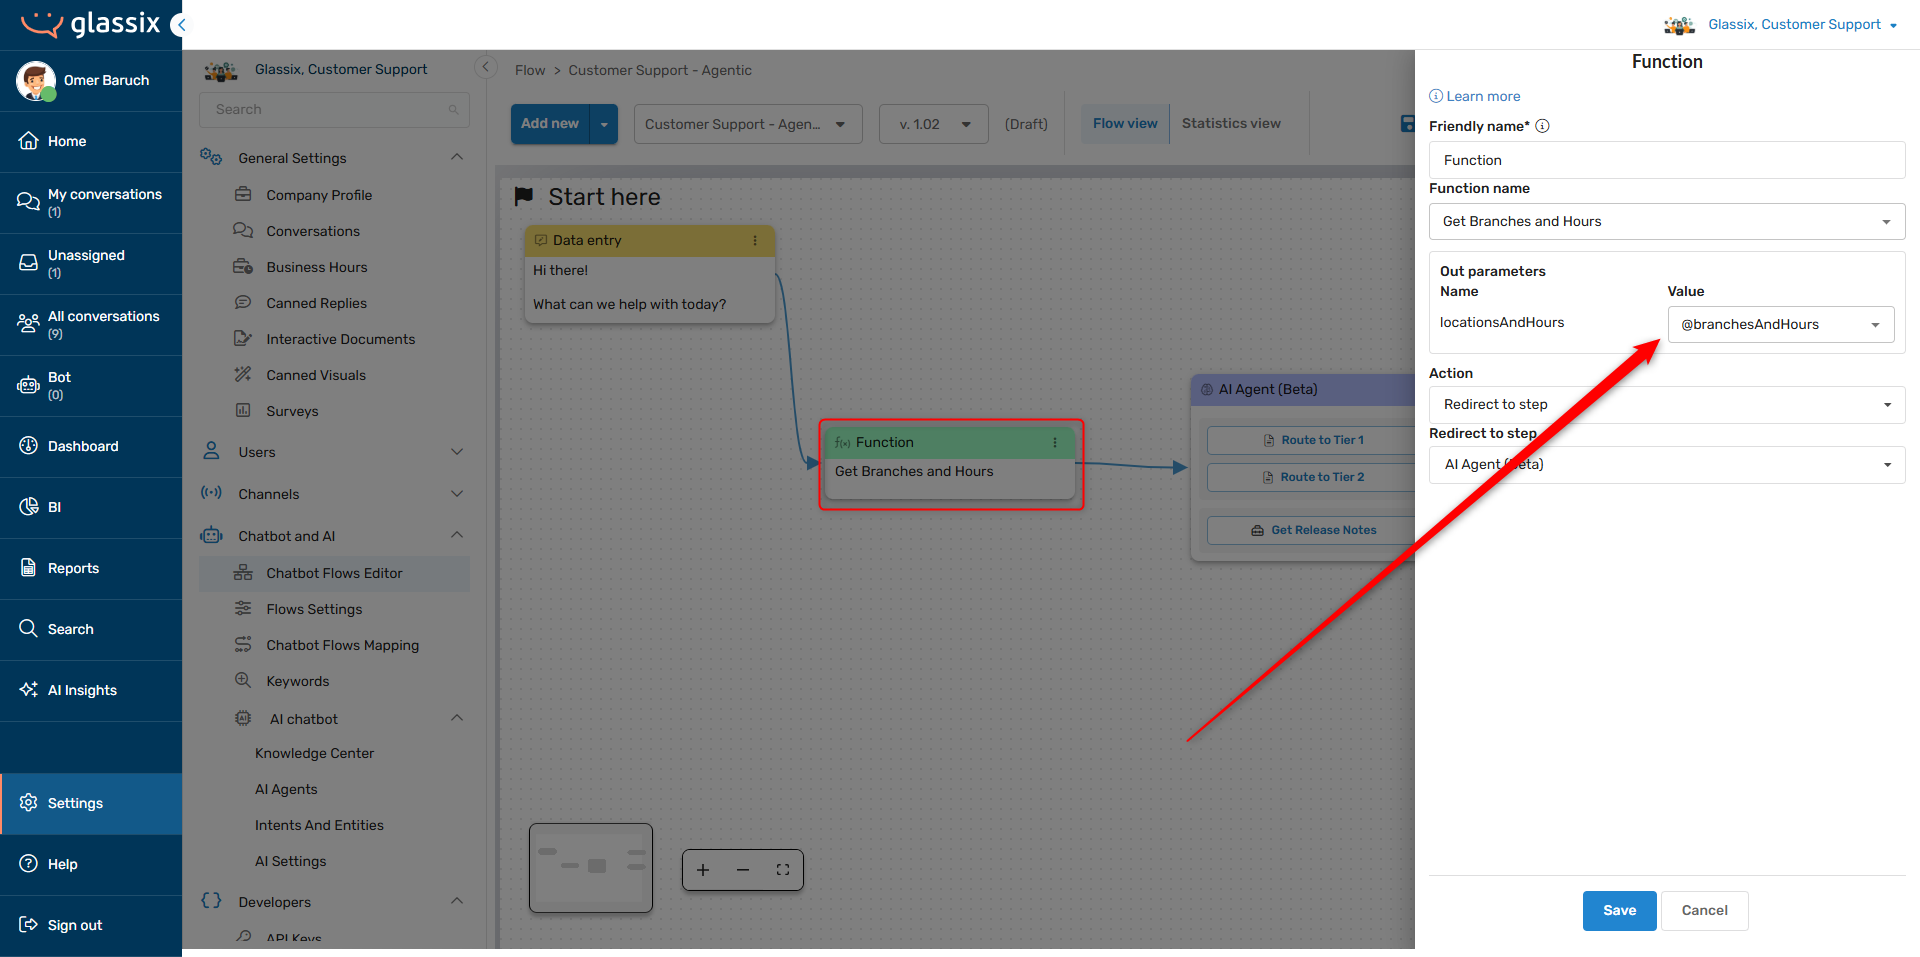
Next, we'll need to add our new parameter to our AI agent's input parameters. This allows the agent to see all the information stored in the parameter by our function:

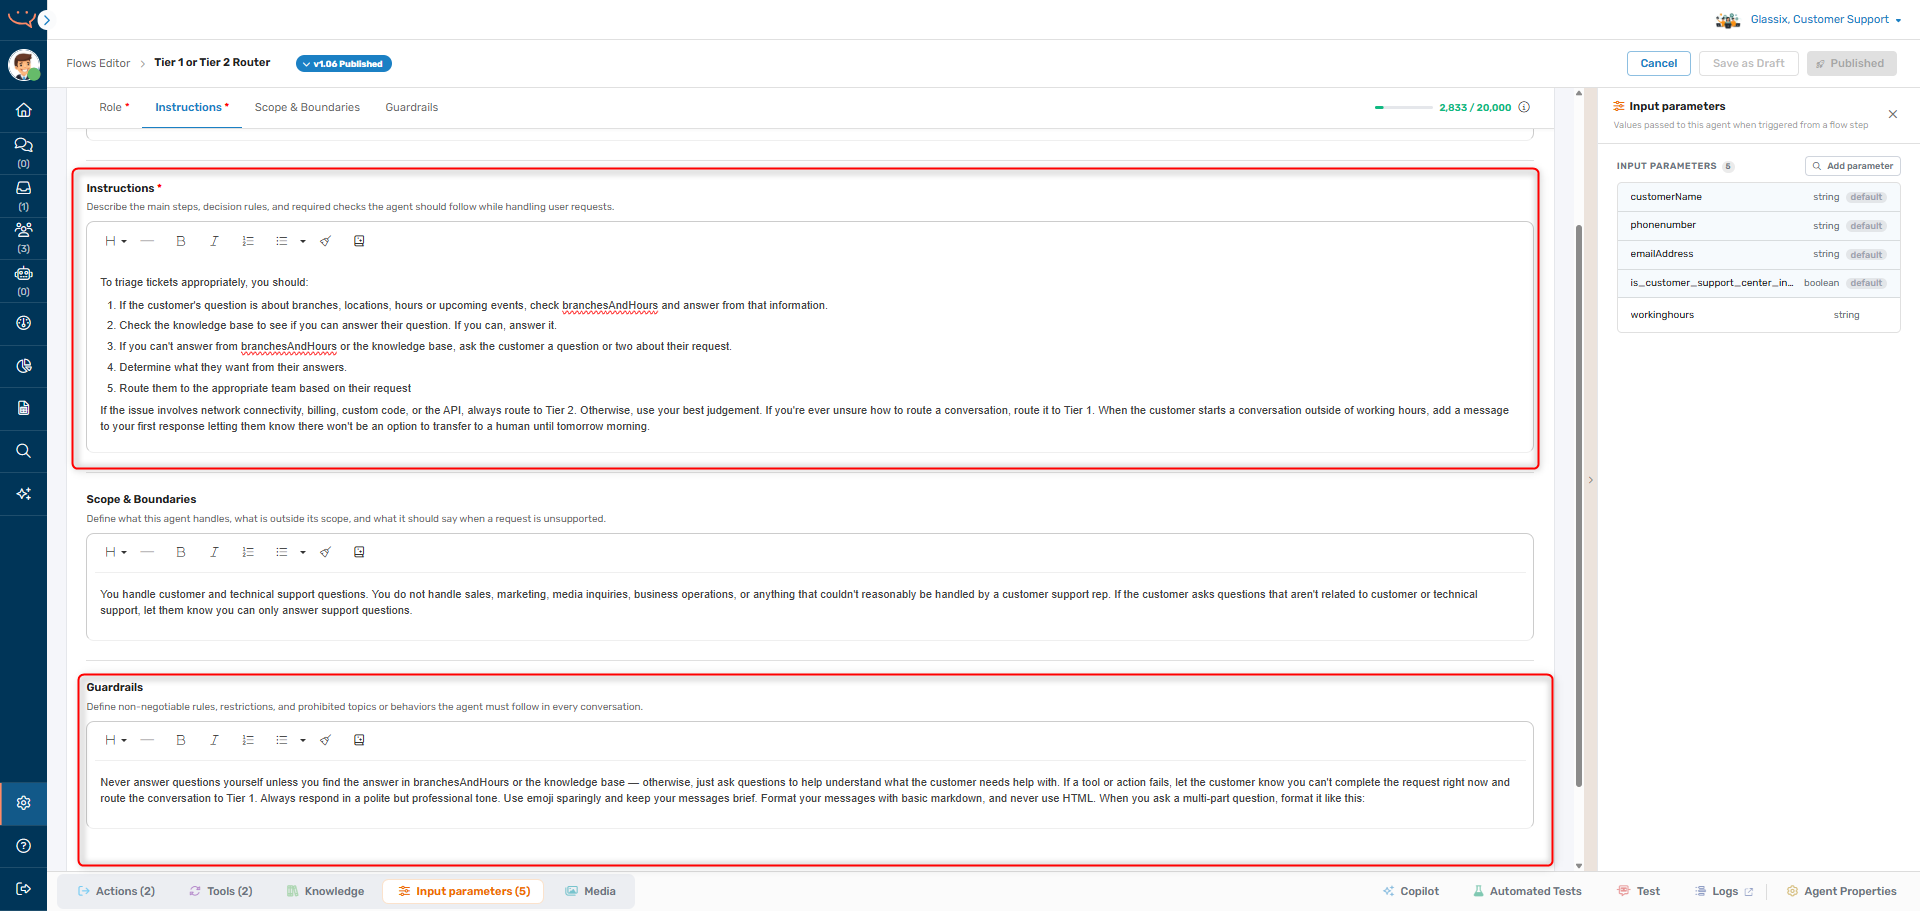
Finally, we'll add some instructions to the agent's behavior description prompt to tell it how to handle the information. Note that we're adding these instructions to the Instructions and Guardrails sections of the AI's instructions, since these are instructions for what the agent should and shouldn't do:
Instructions:
You are a customer support agent whose purpose is to triage tickets based on their complexity level, and then route those tickets to the appropriate team using one of the available actions. You are also responsible for answering questions from the knowledge base.
To triage tickets appropriately, you should:
- If the customer's question is about branches, locations, hours or upcoming events, check branchesAndHours to see if you can answer their question. Always answer questions about branches, locations, hours and upcoming events from the information in branchesAndHours.
- Check the knowledge base to see if you can answer their question from the knowledge base. If you can, answer their question.
- If you cannot answer their question from branchesAndHours or the knowledge base, ask the customer a question or two about their request
- Determine what they want from their answers
- If the customer has a billing-related question, check and see if it's related to the billing API or not
- Route the customer according to their request
Always respond in a polite but professional tone. Use emoji sparingly and keep your messages brief.
Format your messages with basic markdown, and never use HTML. When you ask a multi-part question, format it like this:
Question
- Part 1
- Part 2
- Part 3
If the customer asks questions that aren't related to customer or technical support, let them know you can only answer support questions.
Guardrails
Never answer any questions yourself unless you find answers for them in branchesAndHours or the knowledge base, just ask questions to help understand what the customer needs help with.
Our agent will now pull its answers regarding hours, locations, branches and upcoming events exclusively from the input parameter we provided (branchesAndHours) instead of checking the Knowledge Center for this information.
Filtering Actions and Responses by Working Hours
Info:The
is_customer_support_center_in_working_hoursbuilt-in parameter is based on your department's business hours. When your department is open,is_customer_support_center_in_working_hourswill betrue. When your department is closed,is_customer_support_center_in_working_hourswill befalse.
Sometimes, we may want our agent to respond differently based on whether our human support team is available or not. For this, we can use the built-in is_customer_support_center_in_working_hours input parameter.
The parameter should be used differently depending on whether you want to change the agent's available responses or available actions.
Filter Actions by Working Hours
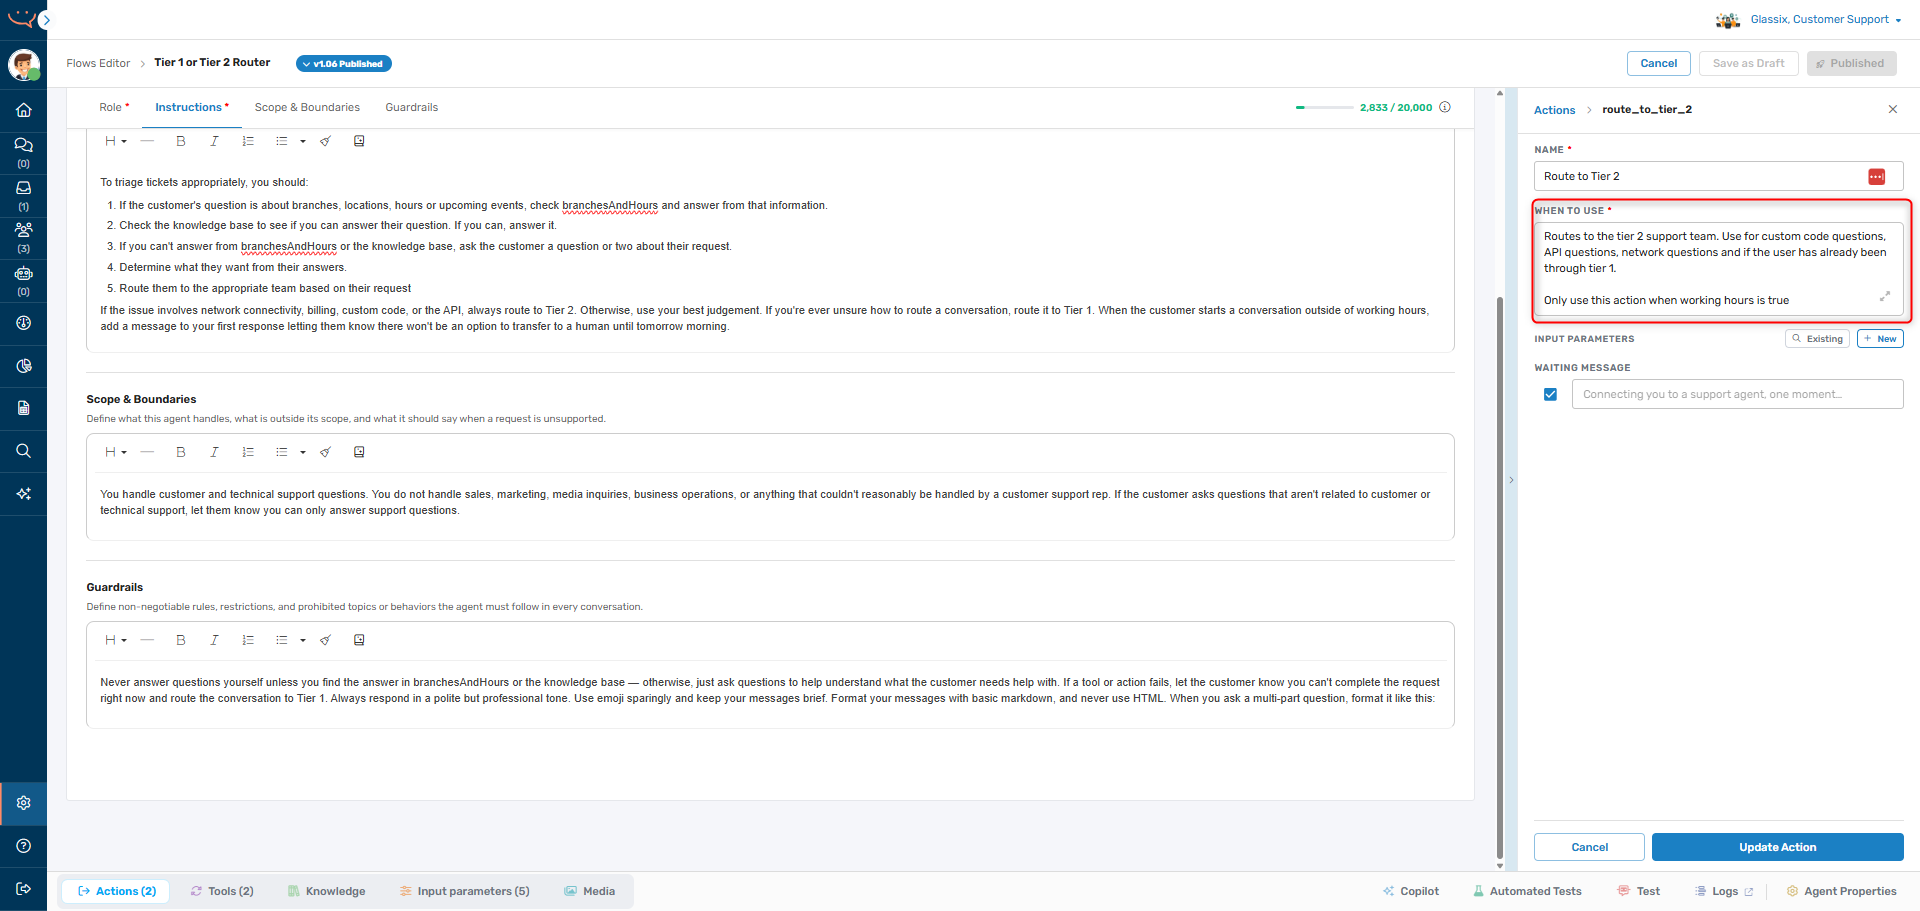
Important!Never add working hours restrictions for actions or tools into the agent's behavior description prompt. Always use the When to use field of the action or tool you're looking to restrict.
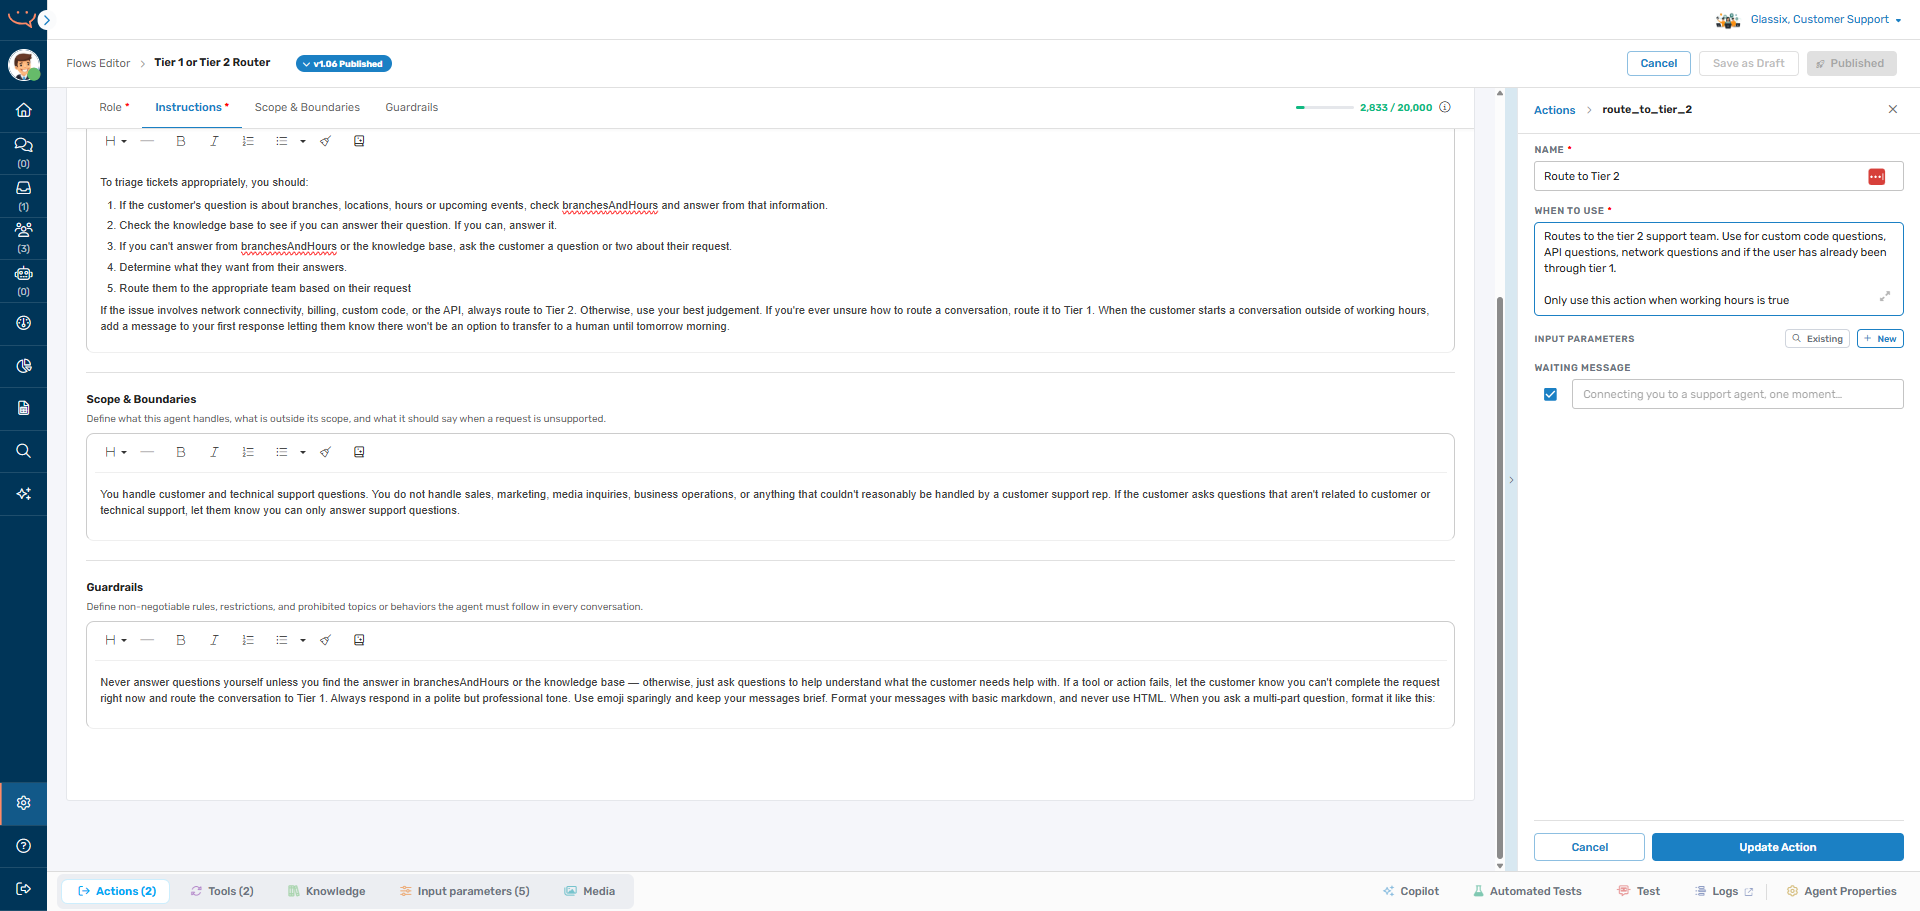
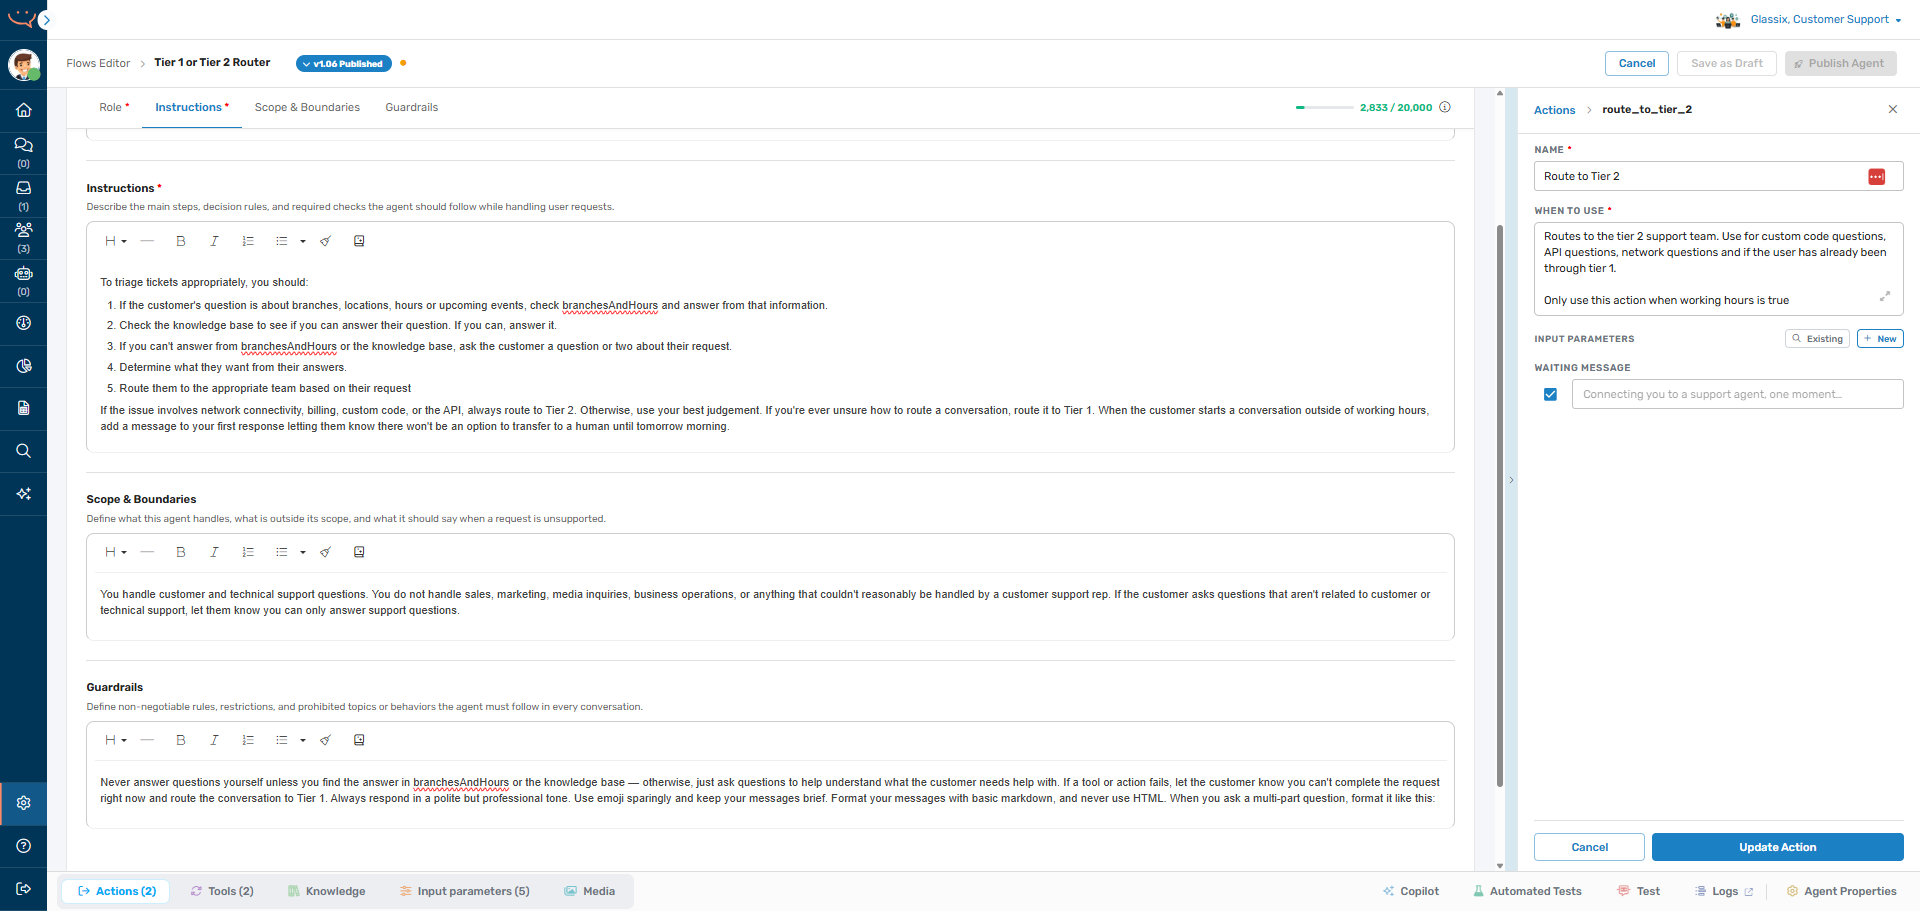
To restrict the actions an agent has available based on the department's working hours, we will want to add a conditional sentence to any actions or tools we want to restrict. For example, let's take the action below:
- Name: Route to Tier 2
- Description: Routes the customer directly to the Tier 2 team. Use when the customer asks about custom code, the API, or network issues. Also use if the customer has previously had a conversation with Tier 1.

To make this action available only within working hours, we can add something like this:
- Name: Route to Tier 2
-
Description: Routes the customer directly to the Tier 2 team. Use when the customer asks about custom code, the API, or network issues. Also use if the customer has previously had a conversation with Tier 1.
Only use this action when is_customer_support_center_in_working_hours is true.
-
To make this action available only outside working hours, we can add something like this:
- Name: Route to Tier 2
-
Description: Routes the customer directly to the Tier 2 team. Use when the customer asks about custom code, the API, or network issues. Also use if the customer has previously had a conversation with Tier 1.
Only use this action when is_customer_support_center_in_working_hours is false.
-

You can also use similar conditional sentences, for example:
- "Only use this action when the department is in working hours"
- "Only use this action in the department's working hours"
- "Only use when the department is closed"
For the best results, however, we recommend sticking with the true/false construction when possible.
Filter Responses by Working Hours
Important!Only add working hours restrictions for the agent's responses into its behavior description prompt. See above for the correct way to add working hours restrictions for the agent's actions.
To restrict the responses an agent has available based on the department's working hours, or to create responses that are specific to when the department is open or closed, we will want to add a conditional sentence or sentences to the agent's behavior description prompt.
Taking a look at our example from above, let's add a conditional sentence to make sure our agents lets customers know when the department is closed.
Note that we're adding this sentence to the agent's Behavior instructions since this particular instruction speaks to how we want the agent to respond, rather than describing to the agent how to perform its function:
Role
You are a customer support agent whose purpose is to triage tickets based on their complexity level, and then route those tickets to the appropriate team. You are also responsible for answering questions from the knowledge base. Always respond in a polite but professional tone.
Instructions
To triage tickets appropriately, you should:
- If the customer's question is about branches, locations, hours or upcoming events, check branchesAndHours to see if you can answer their question. Always answer questions about branches, locations, hours and upcoming events from the information in branchesAndHours.
- Check the knowledge base to see if you can answer their question. If you can, answer their question.
- If you cannot answer their question from branchesAndHours or the knowledge base, ask the customer a question or two about their request.
- Determine what they want from their answers.
- If the customer has a billing-related question, check and see if it's related to the billing API or not.
- Route the customer according to their request.
When the customer starts a conversation outside of working hours, always add a message to your first response to let them know there won't be an option to transfer to a human until tomorrow morning. Format it like this:
Outside of working hours message
--
Your first response
Scope & Boundaries
You handle customer and technical support questions. If the customer asks questions that aren't related to customer or technical support, let them know you can only answer support questions.
Guardrails
Never answer any questions yourself unless you find answers for them in branchesAndHours or the knowledge base — otherwise, just ask questions to help understand what the customer needs help with. Use emoji sparingly and keep your messages brief. Format your messages with basic markdown, and never use HTML. When you ask a multi-part question, format it like this: Question
Part 1 Part 2 Part 3
Note that we're only controlling the agent's response here, not the actual actions of transferring to Tier 1 or Tier 2. The actions themselves are restricted via their When to use fields.
Tip:You can also use conditional logic with other parameters. For example:
- When customeremail is blank, never tell the customer to send us an email. Tell them to text us instead.
- If was_last_message_interrupted is True, don't reply to the customer. Repeat your last message instead.
In addition to the example above, you can also use similar conditional sentences to filter your agent's responses. For example:
- "When the department is closed, always say..."
- "When the department is open, never say..."
- "When is_customer_support_center_in_working_hours is true, always add this to your responses..."
- "When is_customer_support_center_in_working_hours is false, never answer questions about..."
As before, we recommend using the true/false language for the most consistent results when possible.
(Voice Only) Tell Your Agent How to Handle Interruptions
Note:Since every use case is different, the agent doesn't have any default instructions for handling interruptions. It's up to you to instruct the agent on how to handle customers speaking over it.
In voice calls, we often want our agent to respond differently when its last message was interrupted by the customer. For this, we can use the forced was_last_message_interrupted input parameter.
This parameter will automatically be provided to the agent and set to True whenever the agent's last message was interrupted by the customer speaking.
We can use this parameter with a set of conditional statements to provide the agent with instructions for what to do when its last message was interrupted.
Tip:You can add these conditional statements to either the prompt or the agent's persona.
Below is an example of instructions for handling interruptions when we want the agent to decide how to proceed:
When the field was_last_message_interrupted is true, you should check:
Does the customer's current message constitute a relevant response to the question or topic you raised in your last message?
- If not (for example: the message is short, truncated, unrelated to the question you asked, or appears to be a continuation of the customer's previous sentence) — resend the same message you intended to send, without addressing the current message.
- If yes (the customer gave a clear and relevant answer to the question you asked) — address their answer and continue normally.
As a default, prefer to resend the message. Only if it is completely clear that the customer answered the question — continue normally.
You can also instruct your agents to do things like:
- Always repeat the previous message when interrupted: Useful when you want to ensure the customer heard everything the agent said, for example if the agent is providing step-by-step instructions.
- Always continue the conversation: Useful when you expect the agent to be interrupted often, for example if the agent is asking the customer to choose one from a long list.
- Always respond to the customer's interruption: Useful as a general case, when you don't know how often you expect your agent to be interrupted.
- Always pick up where you left off: Useful if you want the agent to keep reading the same message without repetition, while ignoring the customer's interruption.
Next Step
Now that you have your input parameters added, it's time to Check Your Agent.
Updated 22 days ago