Create Actions and Tools
Give your agent functionality and exit points.
Overview
In this article, we cover creating actions and tools for your AI agent.
This article is part of a series covering setting up and deploying AI agents. See the other parts in the series:
- Create an AI Agent
- Write a Behavior Description (Prompt)
- Create Actions and Tools - this article
- Add Your Knowledge Center
- Add Input Parameters
- Test Your Agent
- Security in AI Agents
- Integrate Into a Flow
- Use Multiple Agents
Creating Actions and Tools
Note:AI agents don't actually perform the actions you set up for them.
Actions and tools are both ways for your agent to exit the conversation and pass the customer onto a flow step which takes the actual action you want.
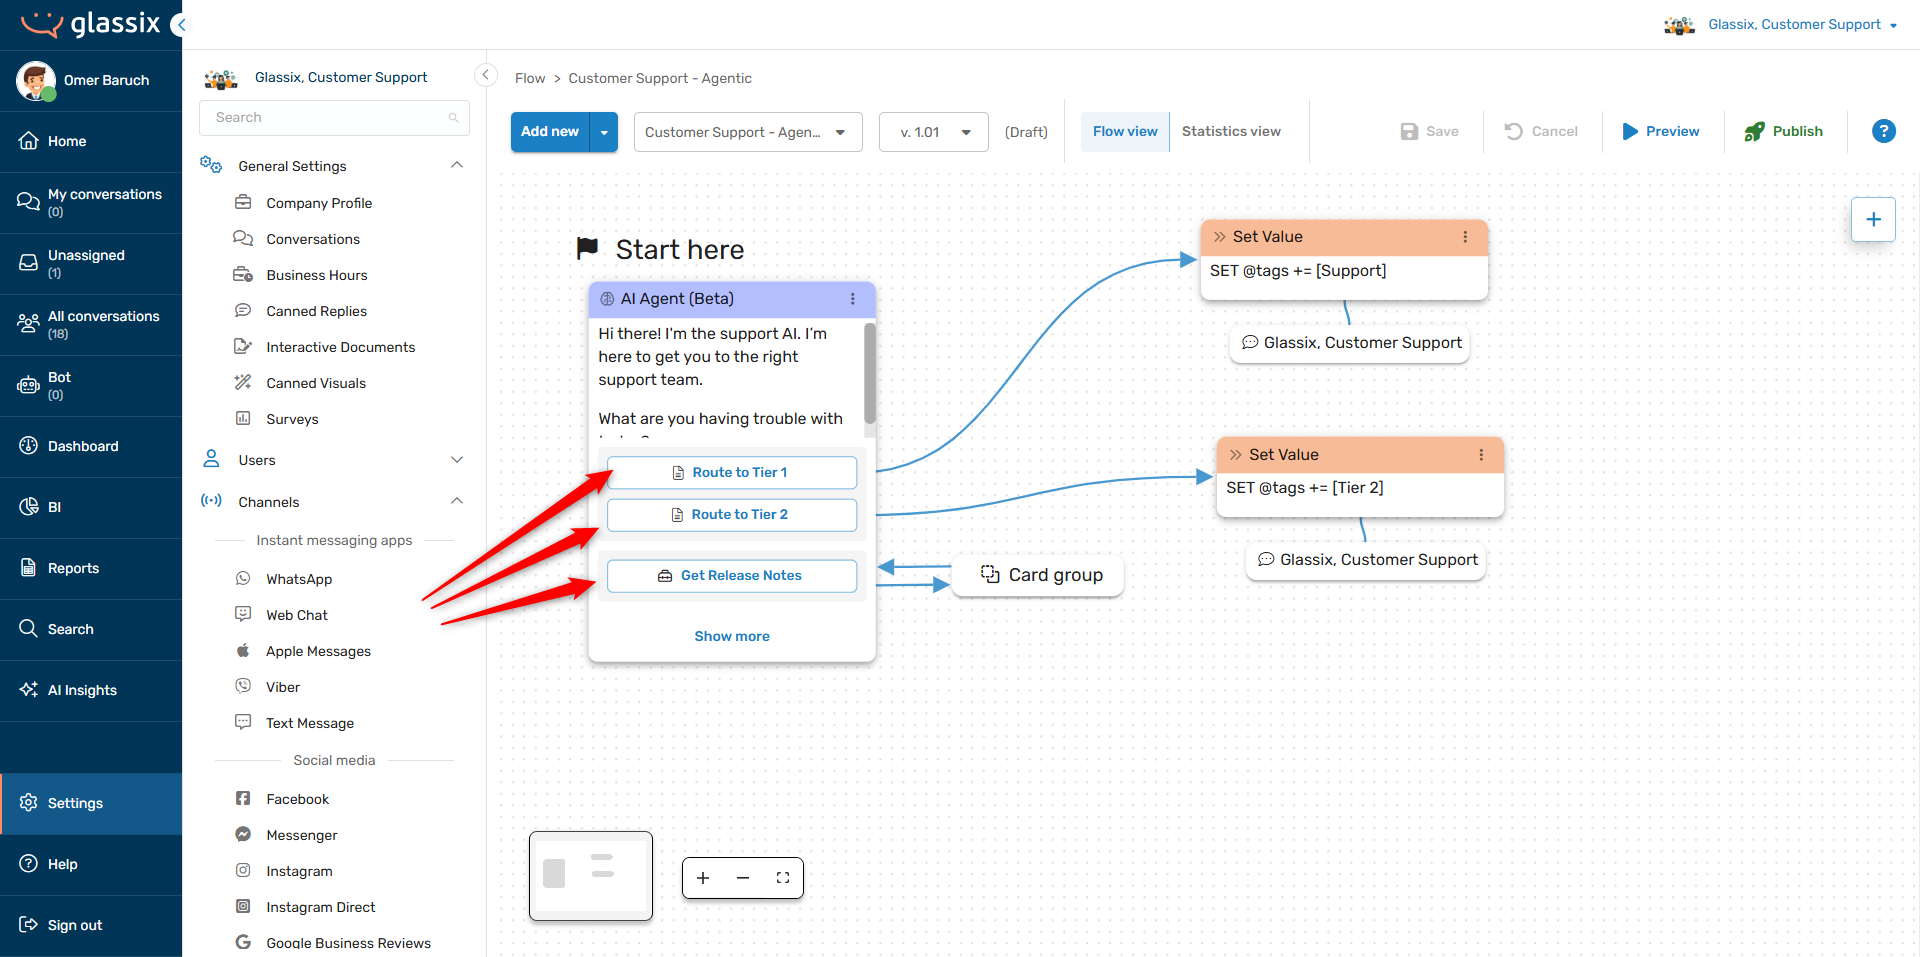
Actions and tools are how your agent exits the conversation and passes your customer onto another step in your flow. Whenever you set up an action or tool, it will show up in the Flows Editor on the AI agent's flow step:
Create one action or tool for each thing you would like your agent to do.
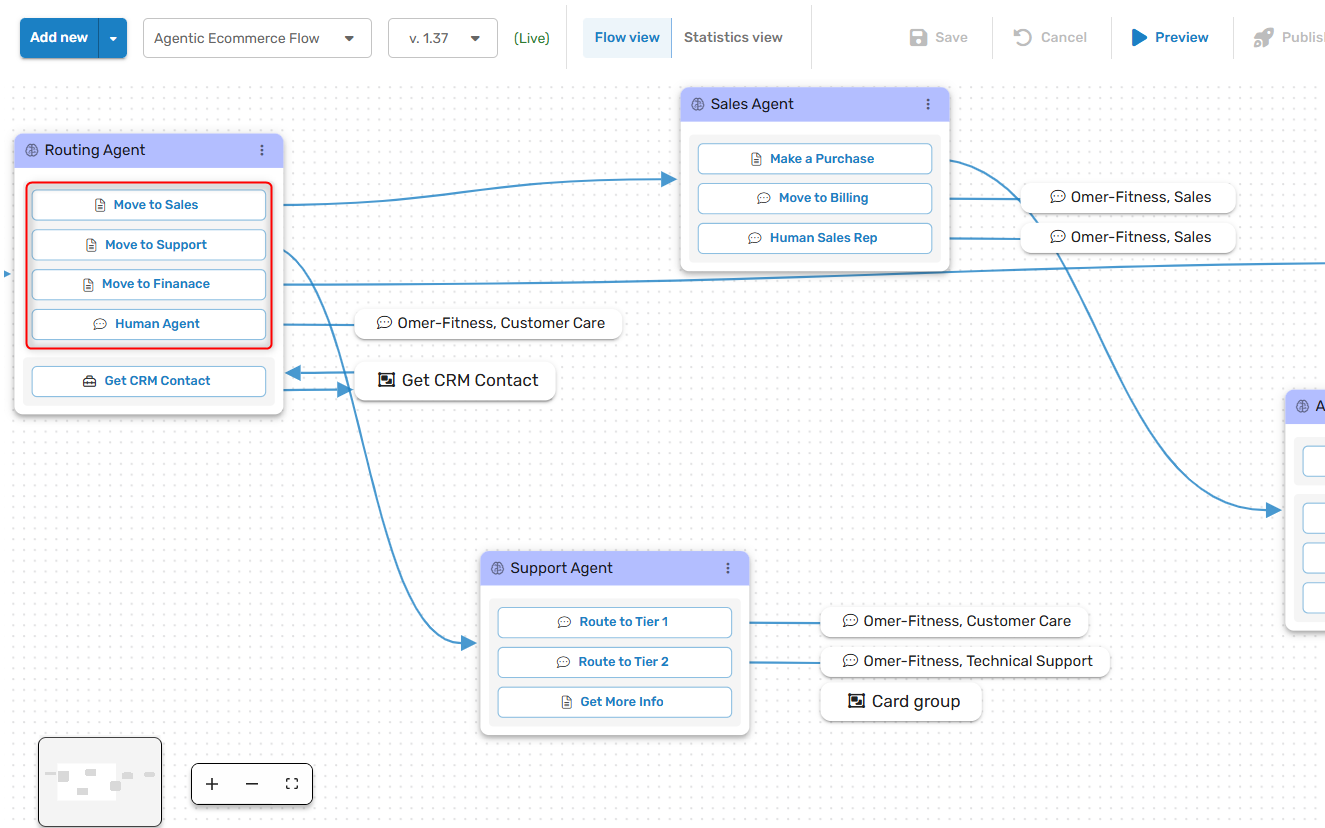
For example, if you're building a routing agent, you should have a number of routing actions, one for each flow step you want the agent to be able to route to:
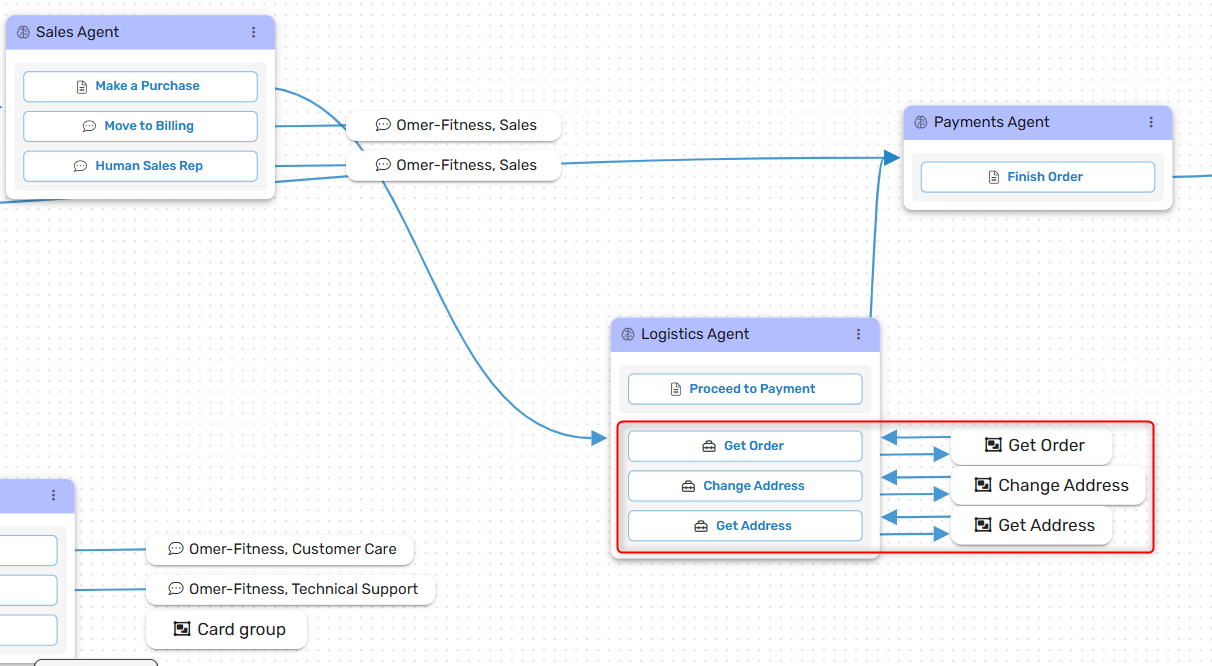
On the other hand, if you're building a specialist agent, you should have a number of tools, each performing one task you want the agent to be able to handle:
Every agent needs at least one action or tool, and the reason for this is simple: without a way to exit the conversation, your agent would keep on chatting with your customer forever (like ChatGPT) and nothing would get done.
Actions vs. Tools
Actions and tools are both ways for your agent to exit the conversation to another step in your flow. The primary difference between the two is that actions are one-way, while tools are round-trips.
This means that:
- Actions are for making final decisions
- Tools are for gathering information
When you want to send someone to a human agent, for example, this is a final decision. You don't expect the customer to come back to the AI agent for anything. This is an action.
On the other hand, when you send a customer to an identity verification flow, you want the customer to come back to the AI agent after their identity is verified. This is a tool.
Naming Actions and Tools
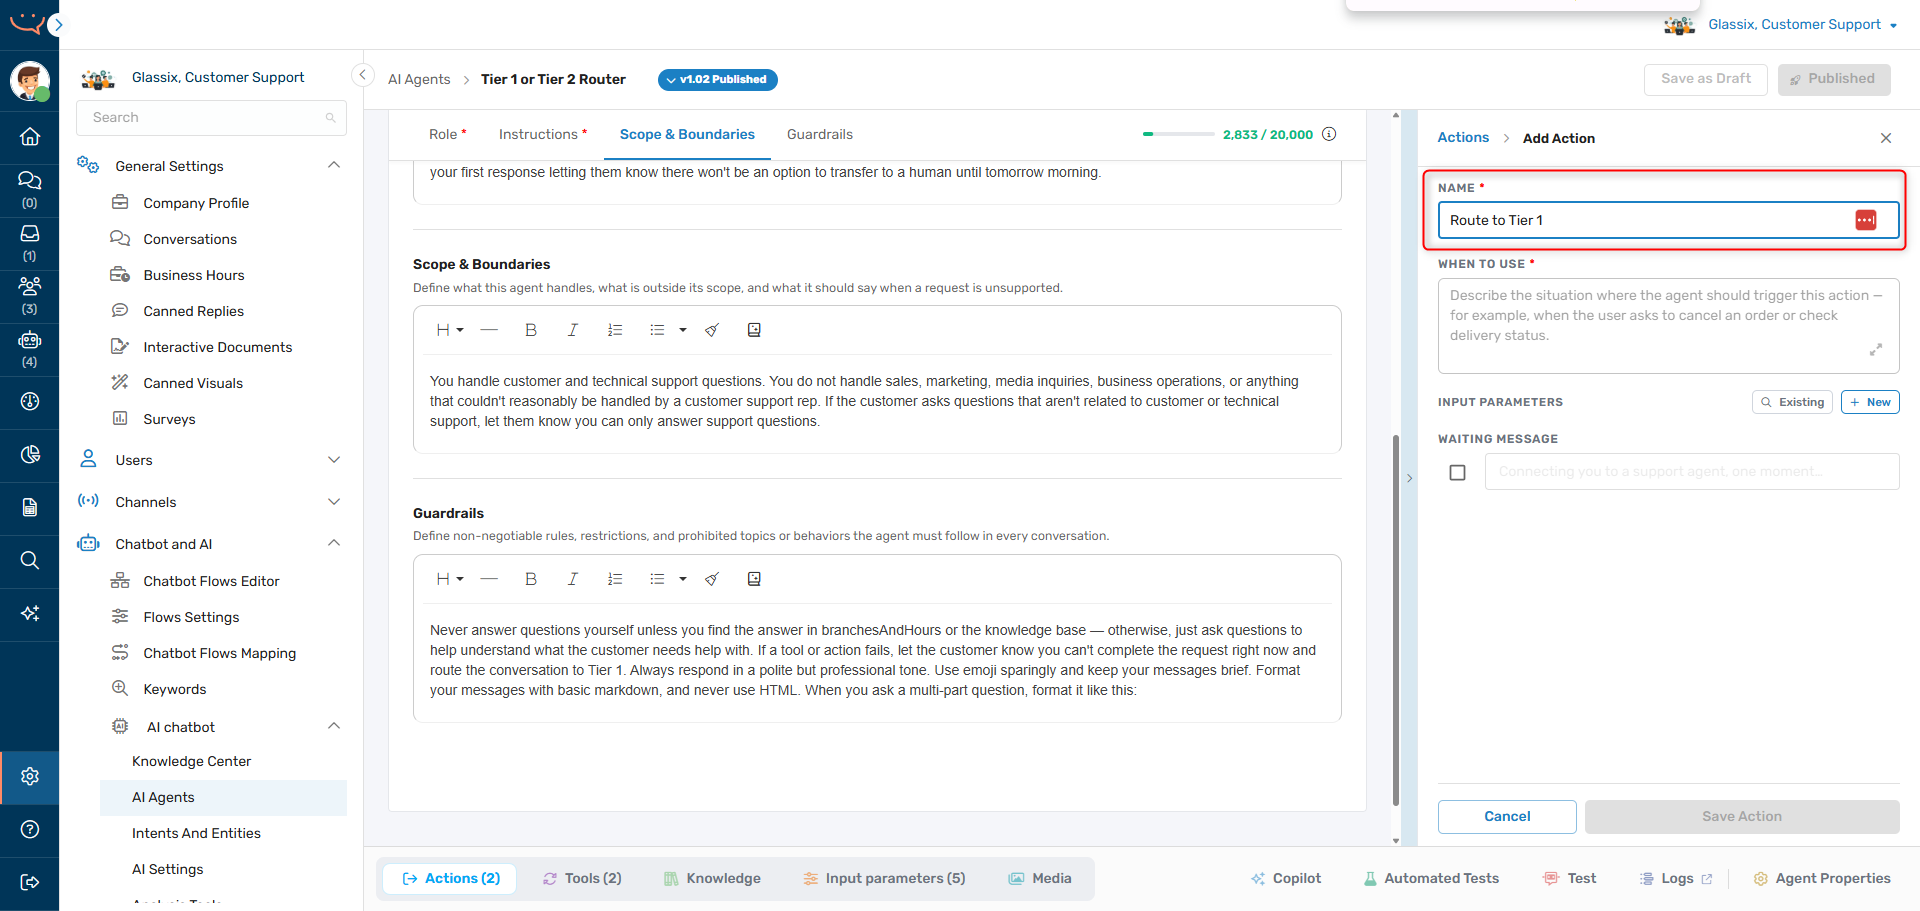
When naming actions and tools, keep in mind that this will be the only descriptor you will see for this action or tool in the Flows Editor:
Tip:Your action's or tool's name should clearly describe its purpose.
After choosing a name for your action or tool, it will be automatically translated into a format the AI can understand. You can reference your actions and tools by name to your agent.
Writing Action and Tool Descriptions
Important:Never include behavior instructions in the When to use section of actions or tools. Thigs like "greet the customer before taking this action" should be defined in the agent's behavior description.
Note:Your actions, tools and behavior description prompt all share a combined character limit of 20,000 characters. This limit is shared across all your actions, tools, MCP Tools, and the behavior description.
For example, if your behavior description is 5,000 characters long, then you have 15,000 characters left for all of your actions and tools.
Whenever you create an action or tool, you'll be required to provide a description regarding when to use the action:
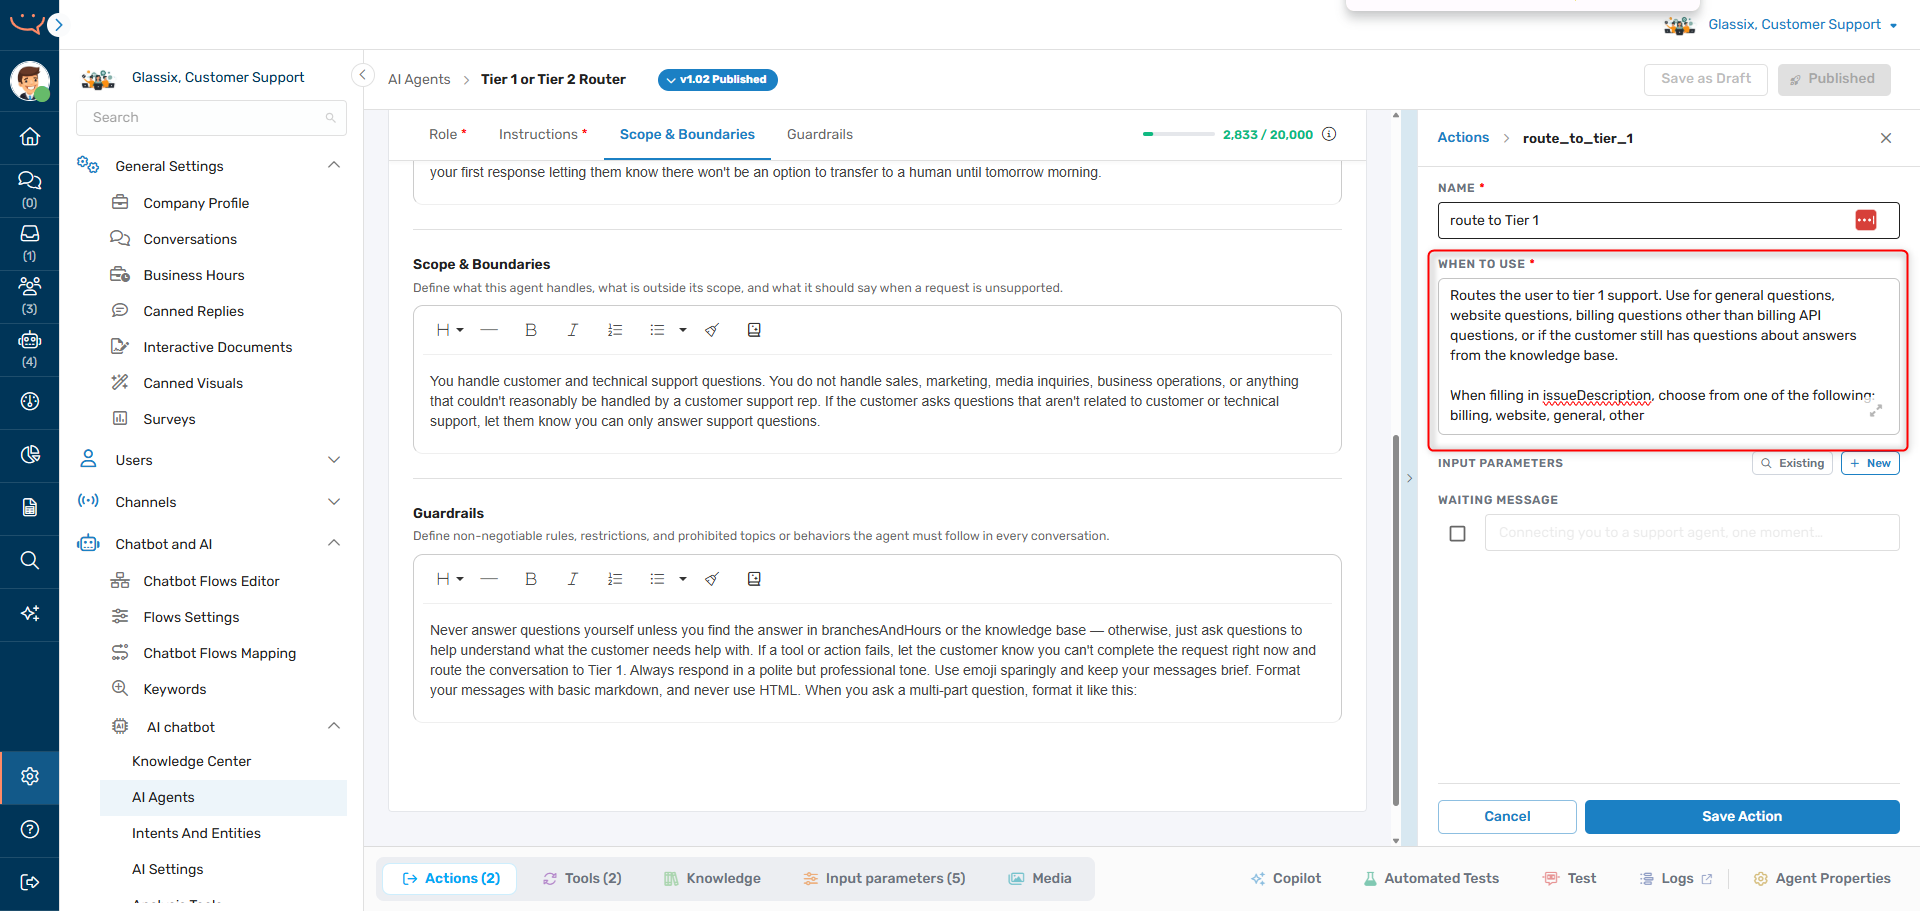
Action and tool descriptions should have information about when to use the action or tool and what the action or tool does.
Action and tool descriptions are also the place to add any additional instructions for the agent about how it should fill in its parameters. While the agent can read the parameter descriptions, it's sometimes helpful to tell it exactly what to fill in. For example:
It's important to remember that you are describing to the agent when it should use this action.
Example Action Descriptions
Below are some examples of action descriptions. Note that their length and contents are representative of what we would generally recommend for an effective action:
Routing:
- Name: Route to the purchasing AI
- Description: Routes the customer to the purchasing AI. Use when the customer wants to make a purchase or wants to update their billing info. Also use if the customer asks for a refund.
- Name: Route to Router
- Description: Routes the customer to the routing agent. Use when the customer has questions unrelated to Tier 1 or Tier 2 support. Also use if the customer requests to speak with the Sales team. Also use if the customer indicates they would like to make a purchase.
- Name: Move to the Tier 2 support team directly
- Description: Routes the customer directly to the Tier 2 team. Use when the customer asks about custom code, the API, or network issues. Also use if the customer has previously had a conversation with Tier 1.
Tasks:
- Name: Change payment information
- Description: Sends the customer to a form for changing their payment information. Use when the customer wants to update their payment or billing information.
- Name: Settle an invoice
- Description: Sends the customer to the invoice processing flow. Use when the customer wants to settle an outstanding invoice, indicates they want to make a payment or mentions closing out an invoice.
Example Tool Descriptions
Below are some examples of tool descriptions. Note that their length and contents are representative of what we would generally recommend for an effective tool:
- Name: Identify the customer
- Description: Checks whether the customer is verified. Use after your introduction and before proceeding with the conversation. Returns the customer's verification status.
- Name: Get order
- Description: Gets the details of a customer's order. Use when the customer has questions about their order or specifically asks to check the details of an order.
- Name: Check the catalogue
- Description: Gets information about a product from the catalogue. Use when the customer has questions about a specific product.
- Name: Place an order
- Description: Accept a payment and logs an order. Use when the customer indicates they would like to make a purchase.
What This Action/Tool Needs
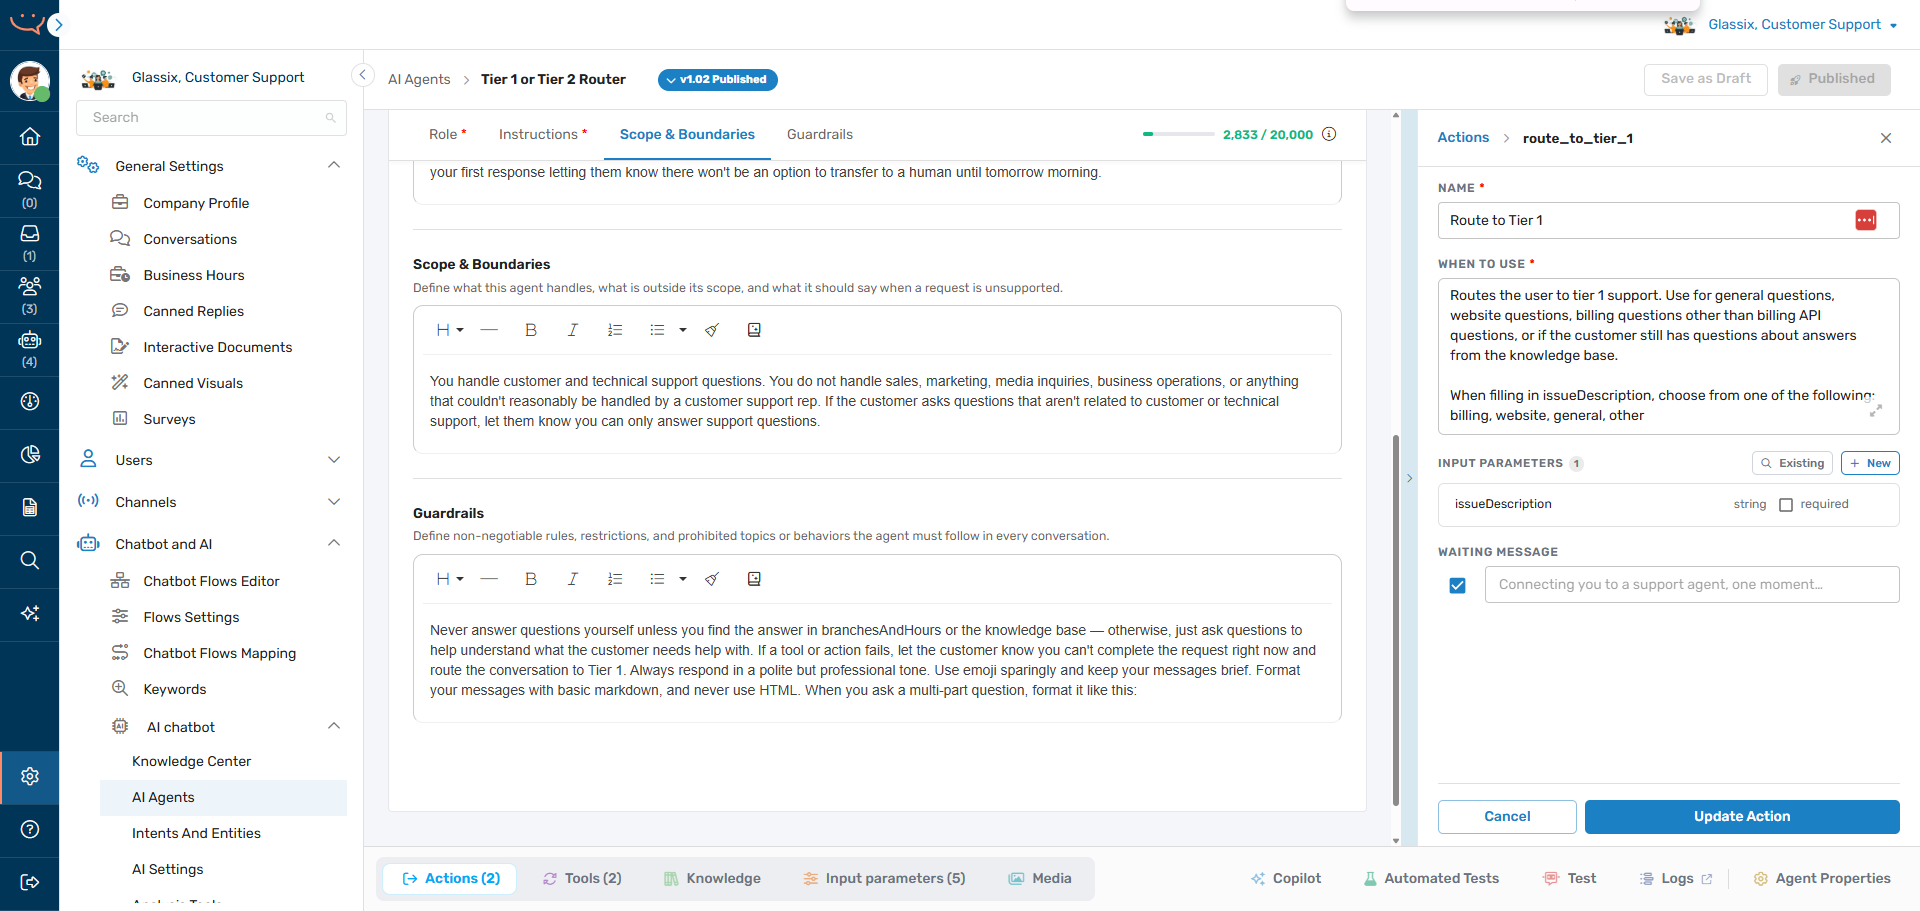
Input parameters allows you to define dynamic parameters which you would like the agent to fill in automatically before using the action or tool:
For both required and non-required parameters, the AI agent will try to fill these parameters before taking the specified action or using the specified tool.
Tip:AI agents can and will read the dynamic parameter descriptions.
You can help your agent understand what data should go in each parameter by giving each parameter a description which tells your agent how to fill it in.
Agents also accept instructions about how to fill parameters in the When to use field of actions and tools.
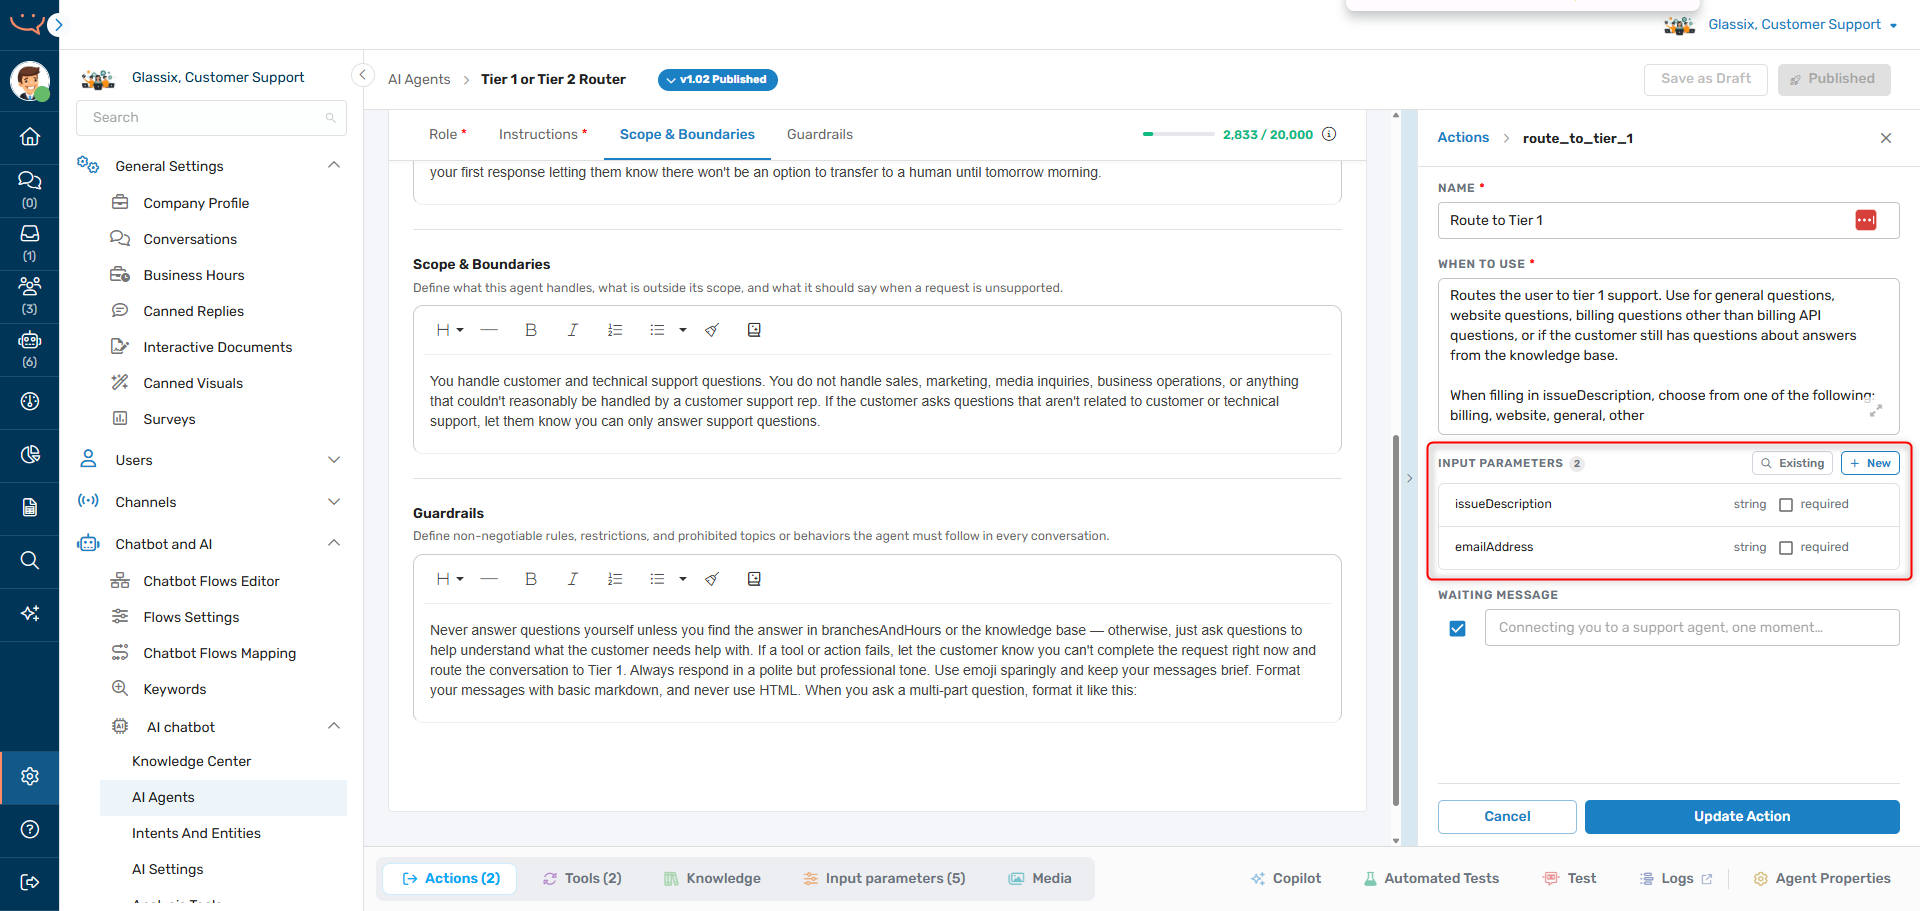
If the agent determines that it will need information from the customer to fill in any of these parameters, it will automatically ask the customer leading questions to try and get the information before proceeding with using the action or tool.
For example, if you set email address as one of the parameters, an agent might ask "Before I pass you onto the support team, would you mind giving me your email address?" before using the action:
If it's clear from either the parameter's description or from the instructions provided in the When to use section that the agent should fill in the parameter value on its own, it will do so automatically without asking the customer.
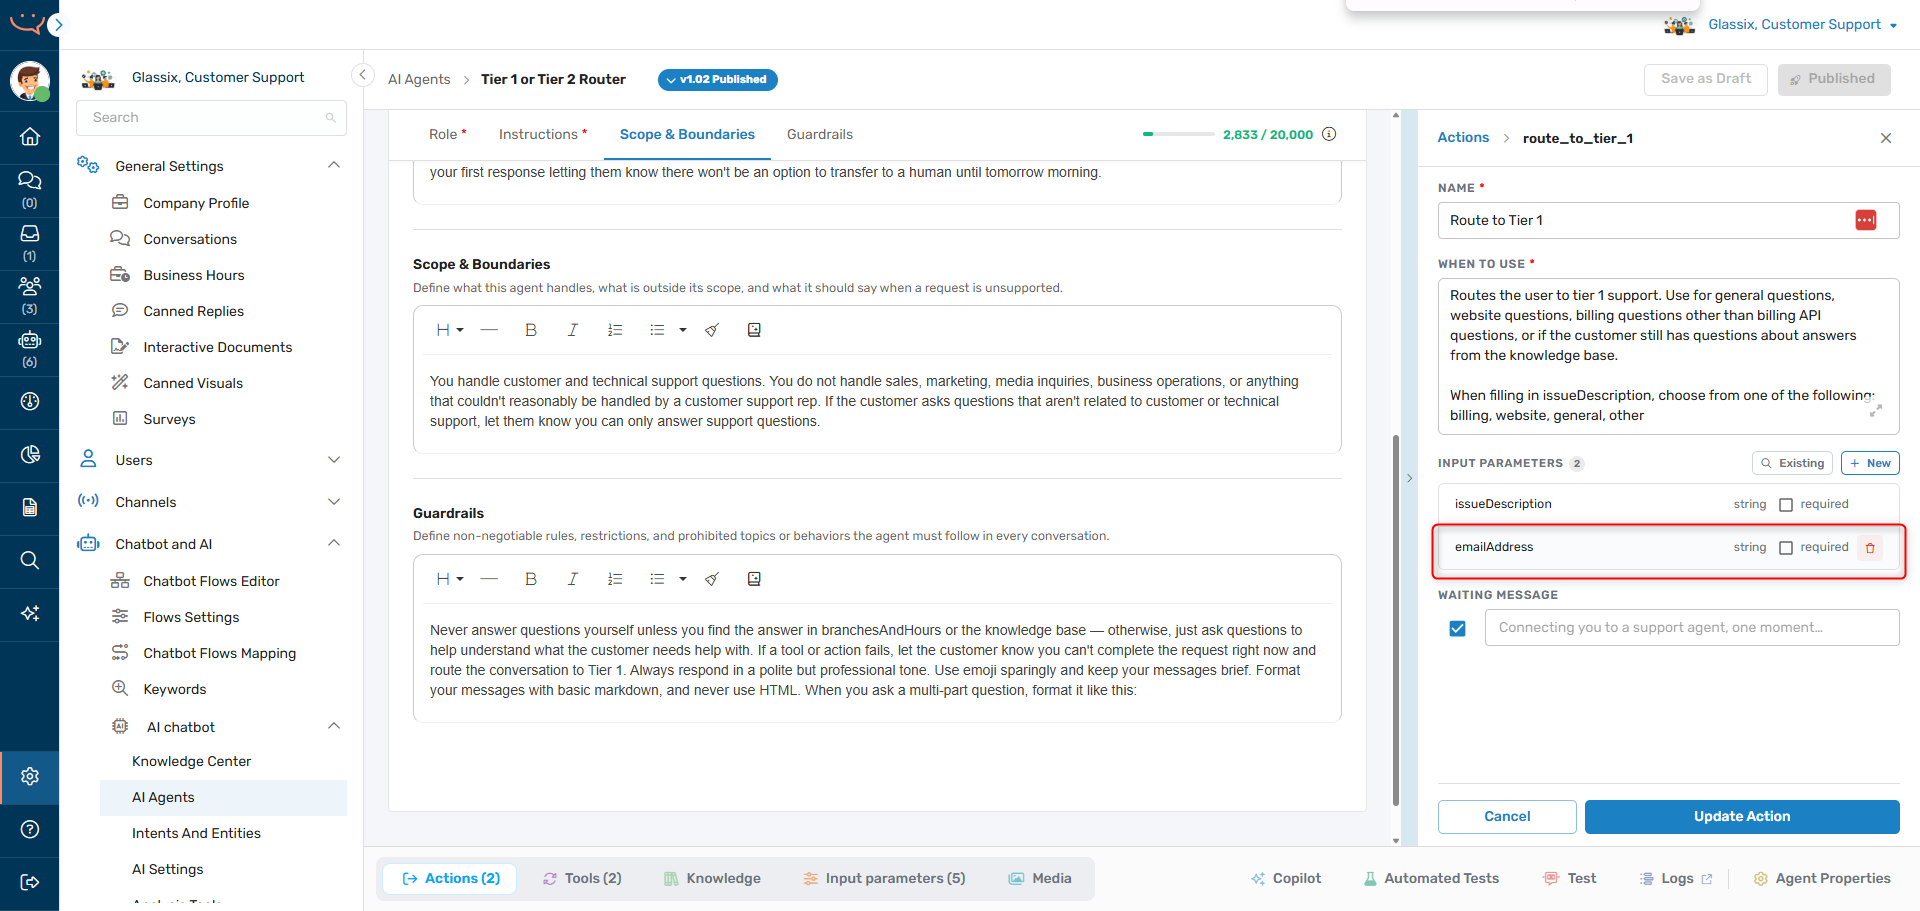
Required vs. Not Required Parameters
If the parameter is marked required, the AI agent won't take the action or use the tool until the parameter is filled. We recommend using required parameters for information that is mandatory. For example:
- Customer ID
- Order number
- KYC data
- Information required by the rest of your flow
If the parameter is not required, the AI agent will try to fill it but will still take the action or use the tool. Use this for information you would like to have but don't need. For example:
- Additional contact information
- Delivery instructions
- Marketing consent
- Information you want but that isn't required by the rest of your flow
(Tools Only) Return Parameters
Note:Tool returns are limited to 5,000 characters by default. If you need more, get in touch with your implementation partner or Glassix contact to request an increase.
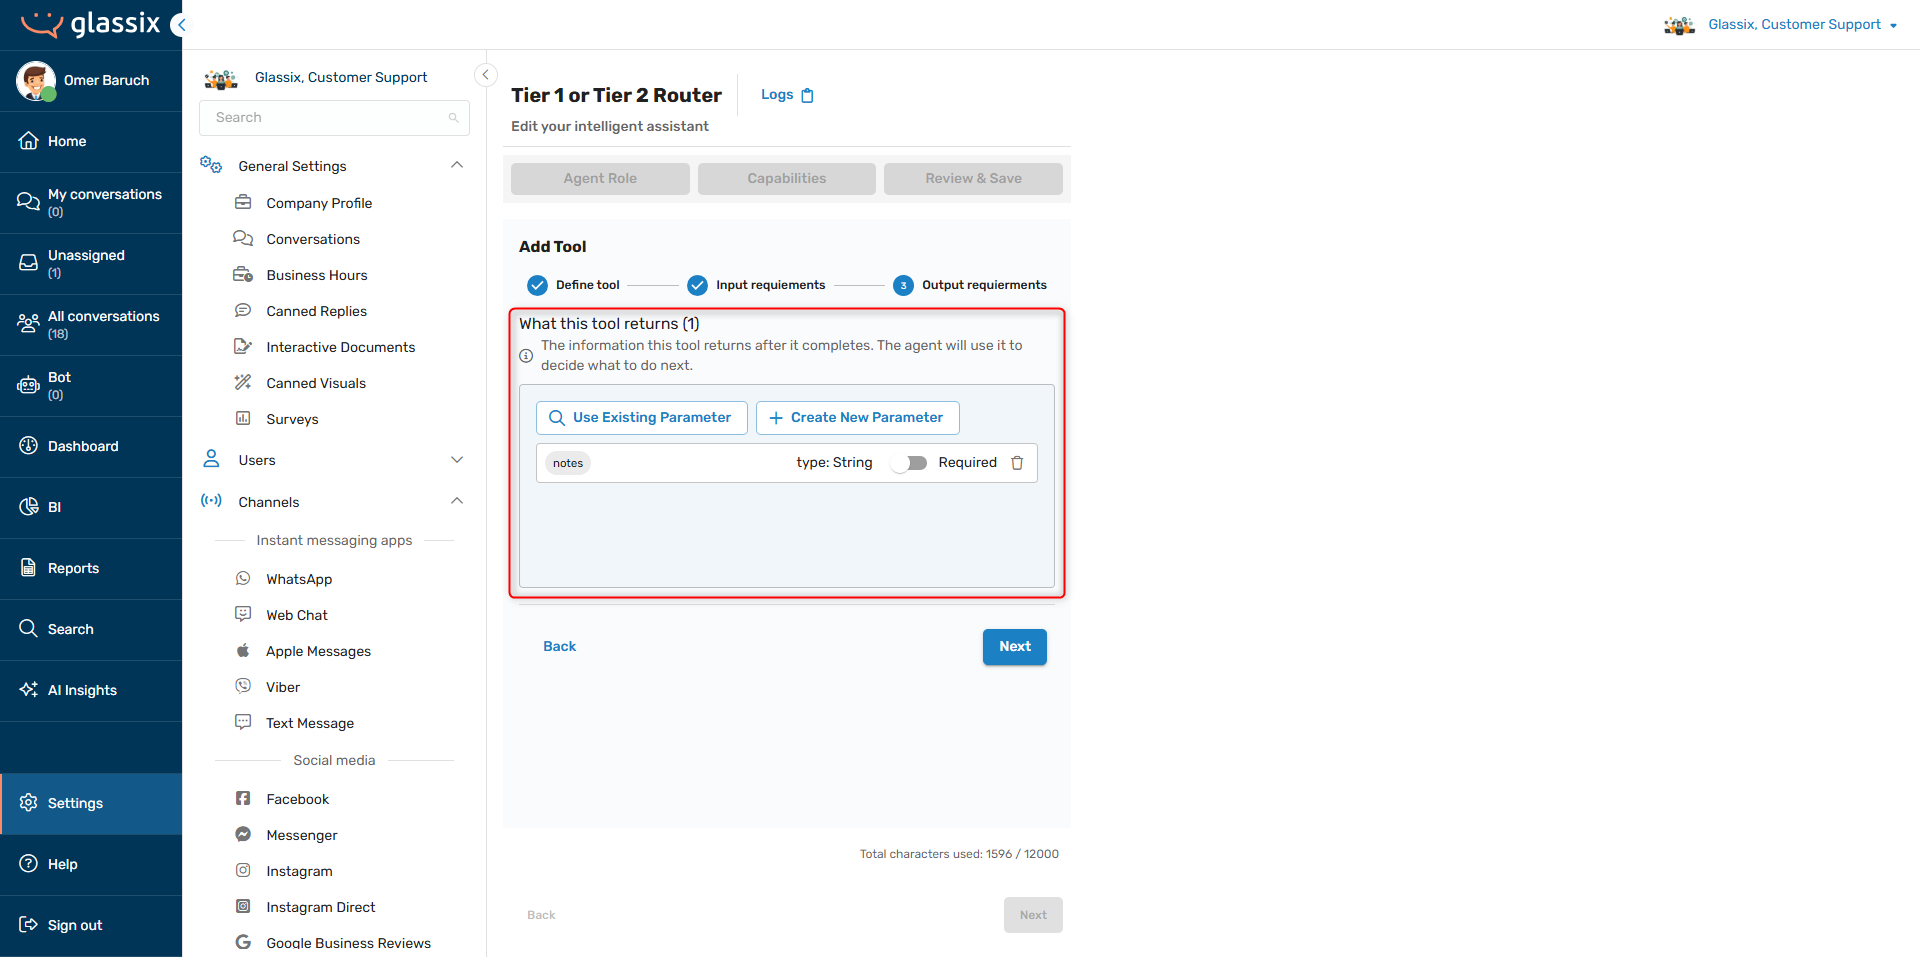
When building tools, you will also see an option to define Return Parameters. These parameters are the values that you want your tool's flow to return back to your agent:
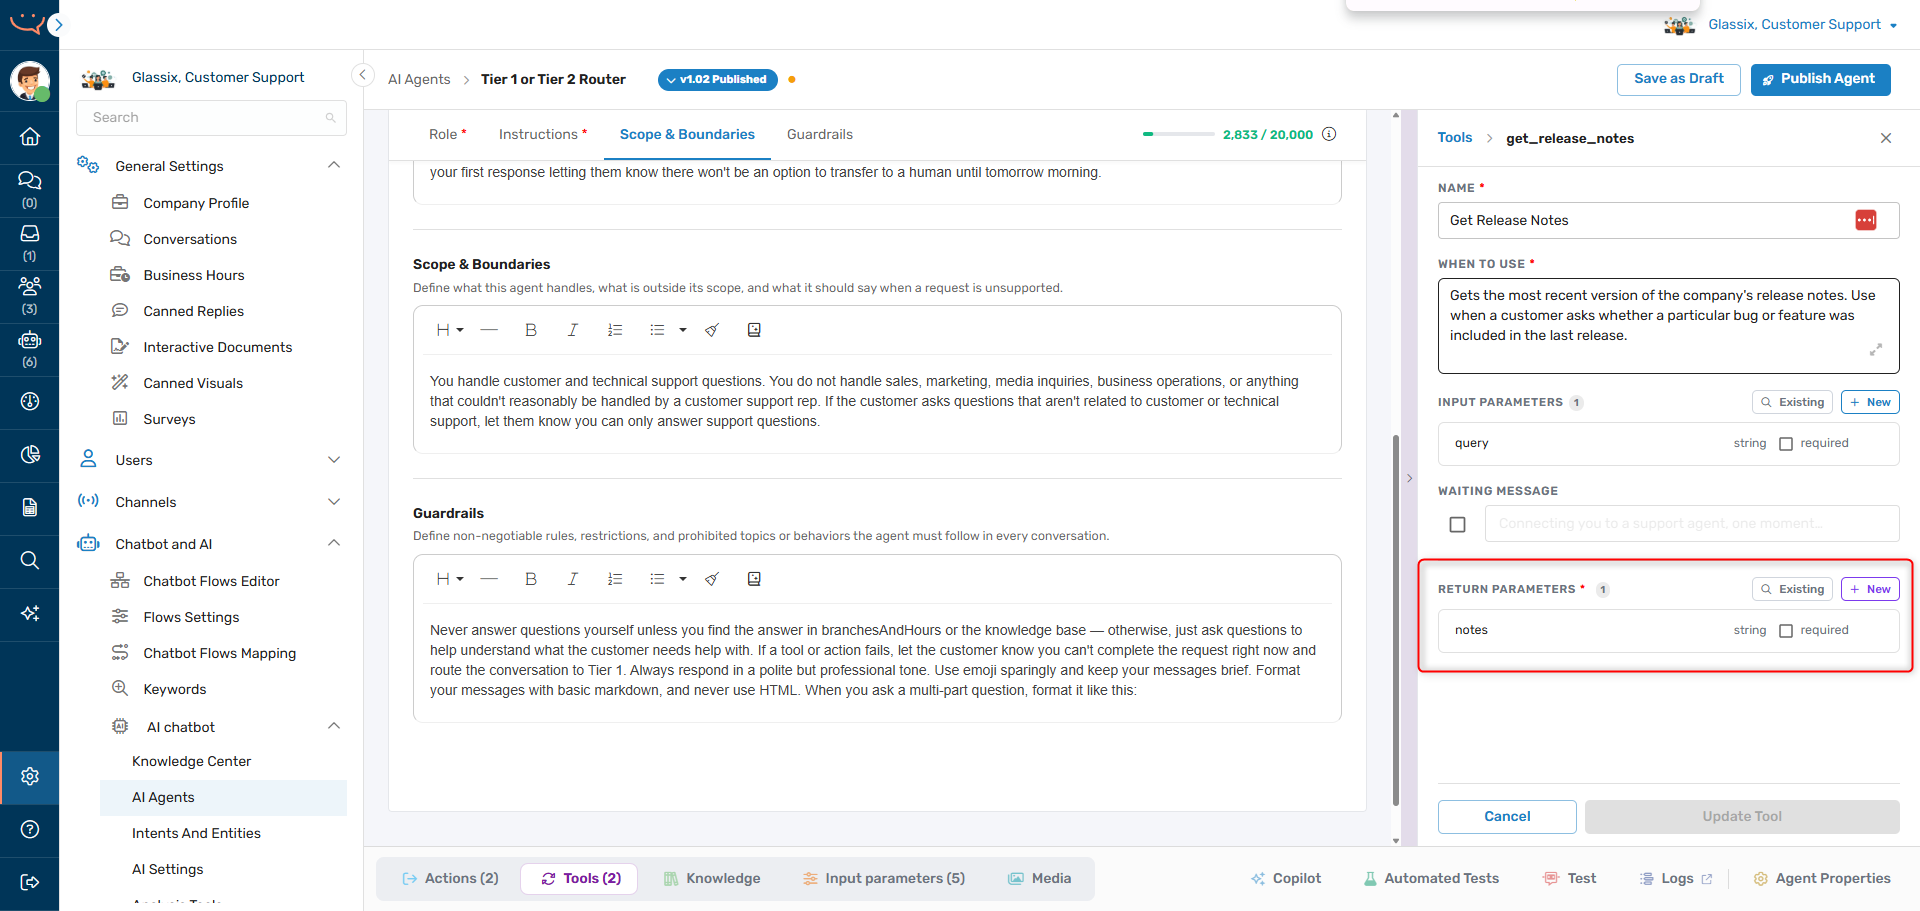
These parameters are used for storing the information you expect to receive from your tool and passing them to your agent. For example:
- If your tool checks customer identification, define an isCustomerIdentified parameter to collect a boolean value from your identification flow.
- If your tool gets order details, define orderDetails, orderAddress and deliveryDate parameters to collect strings or arrays of strings from your orders API flow.
- If your tool places an order, define a paymentSucceeded parameter to collect payment statuses from your payments flow.
(Tools Only) Building Tool Flows
Important!Tools require a tool flow to function. Defining the tool is not enough, you must navigate to the Flows Editor and build the tool's flow as well.
Tool flows start blank and must be built - just like regular flows.
Anytime an agent with a tool is added to a flow, a tool flow will be automatically added to the agent's flow step:
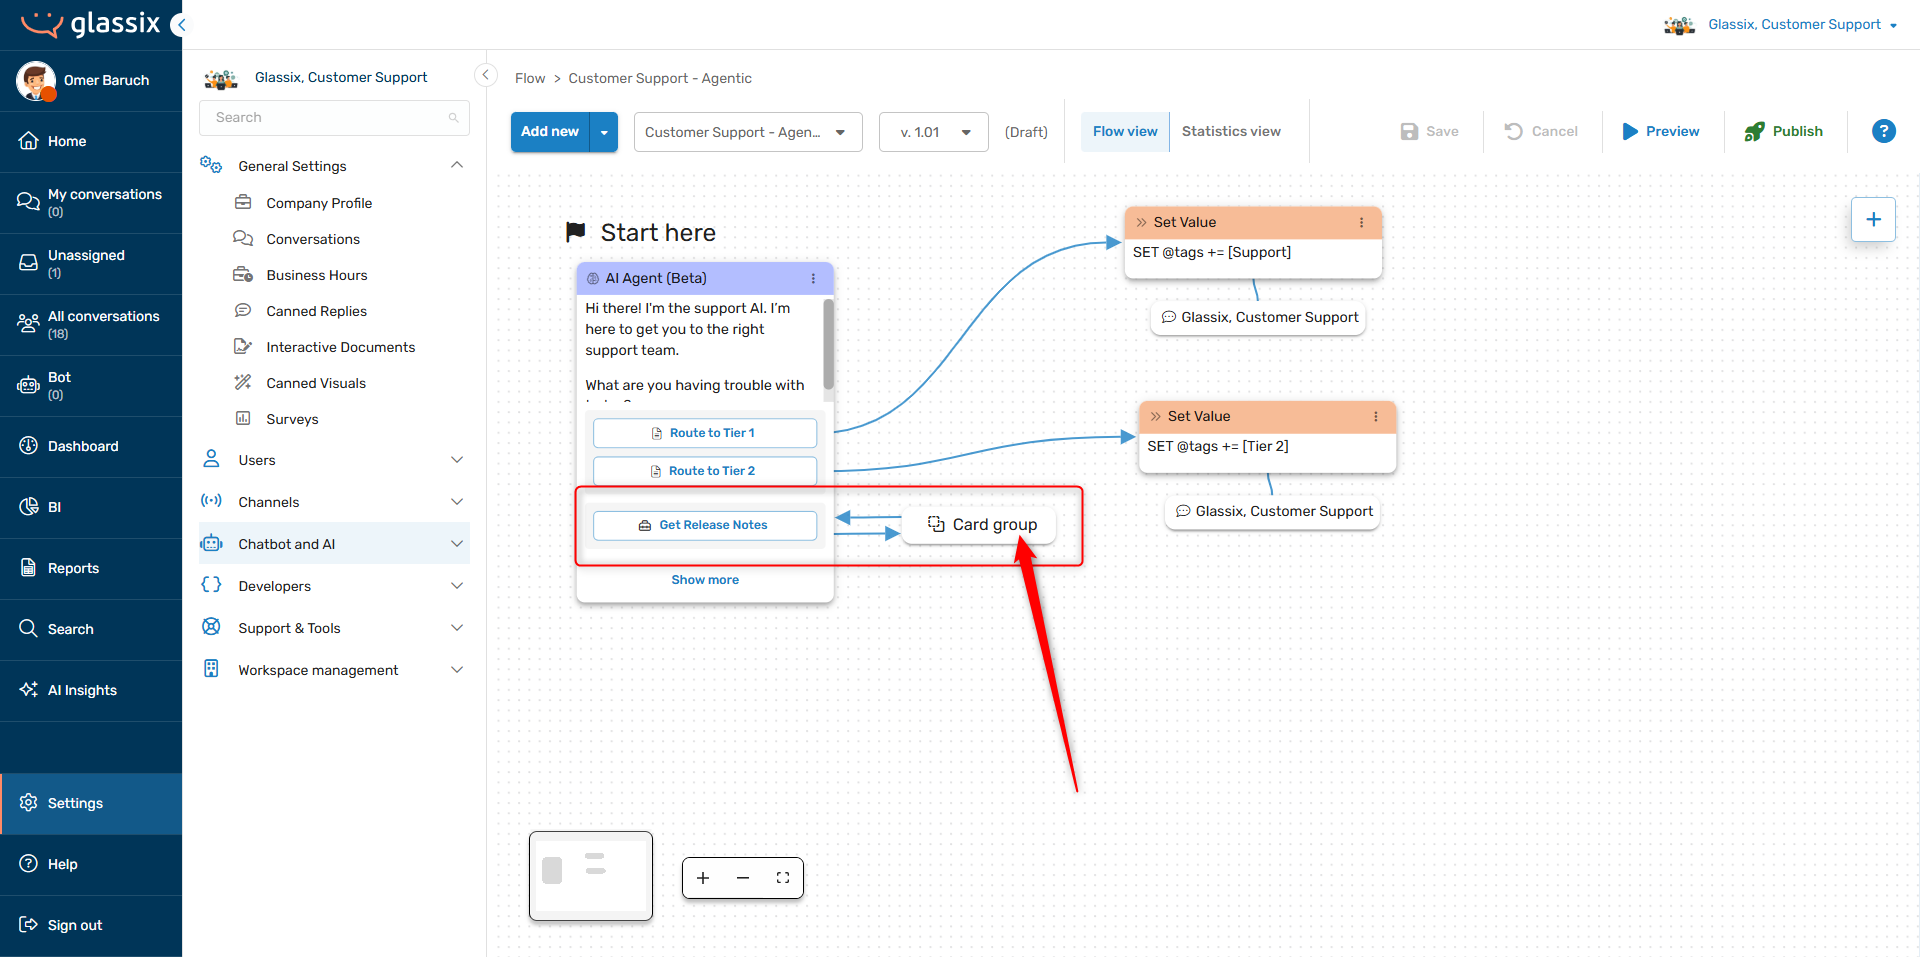
The tool flow starts blank and must be built to perform the action you want it to take. To edit your tool flow, navigate to the Flows Editor and click on the Card group icon:
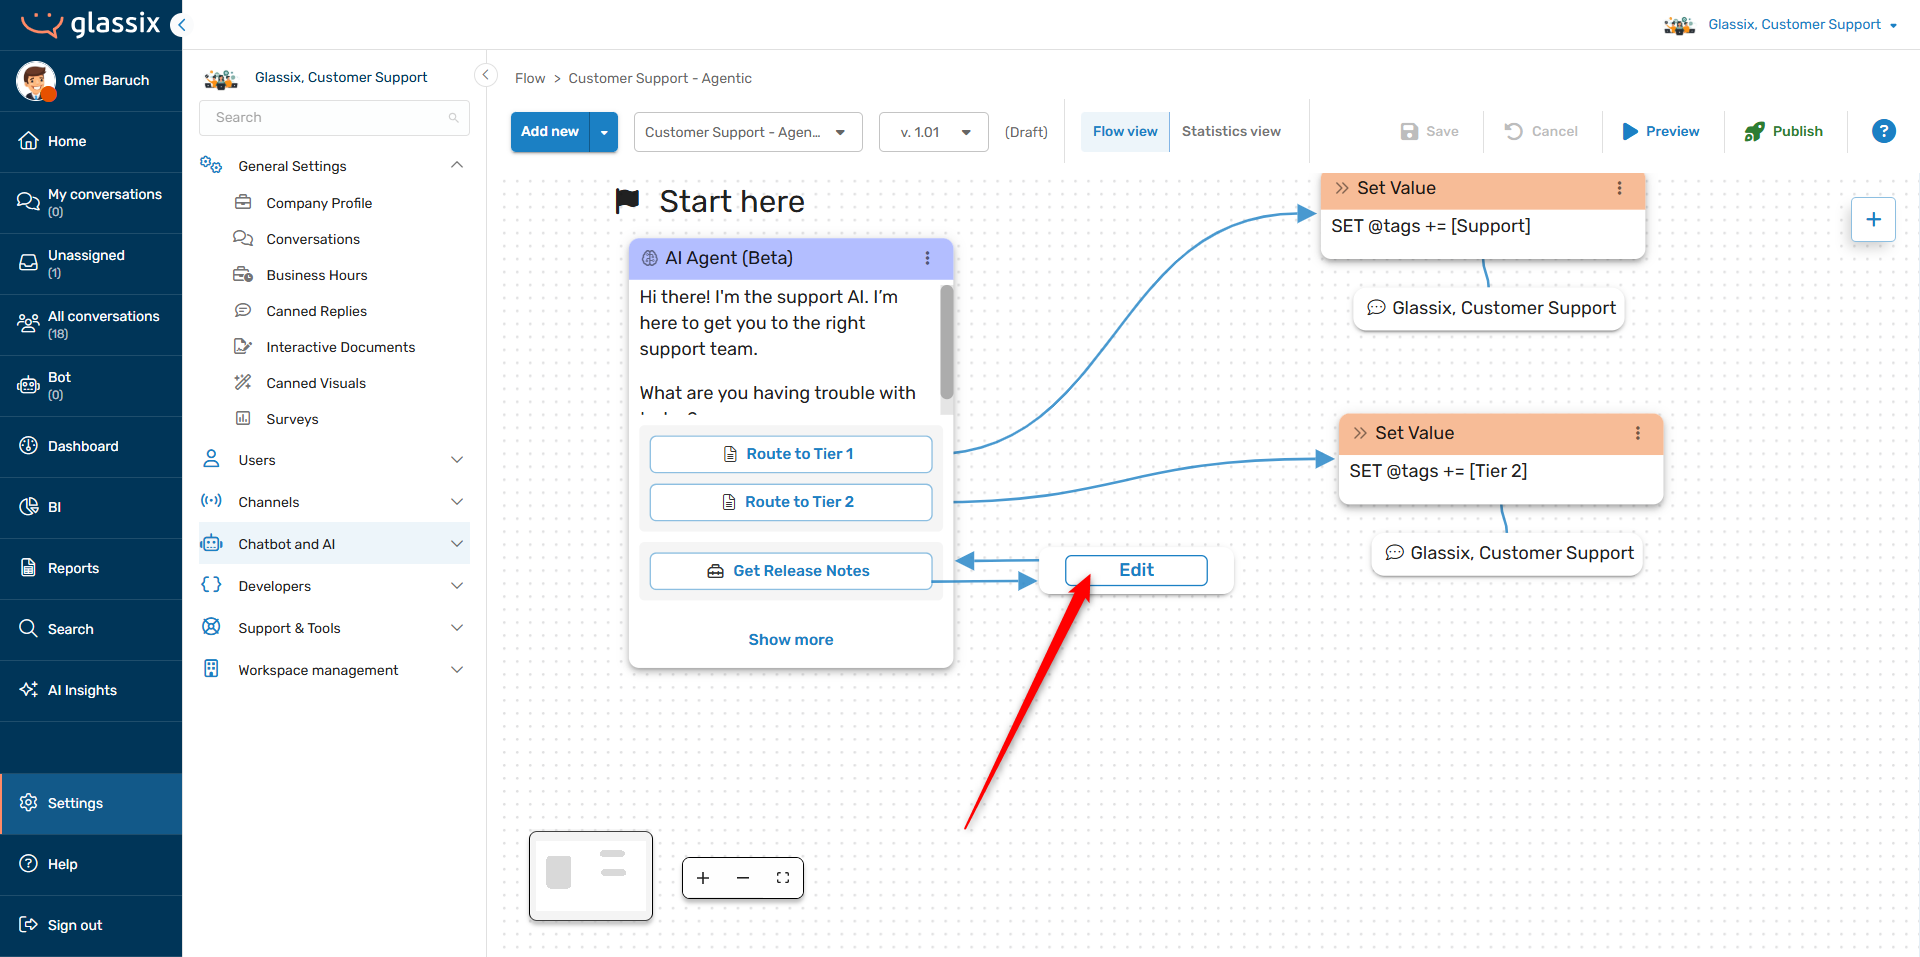
This will take you into the tool flow editor:
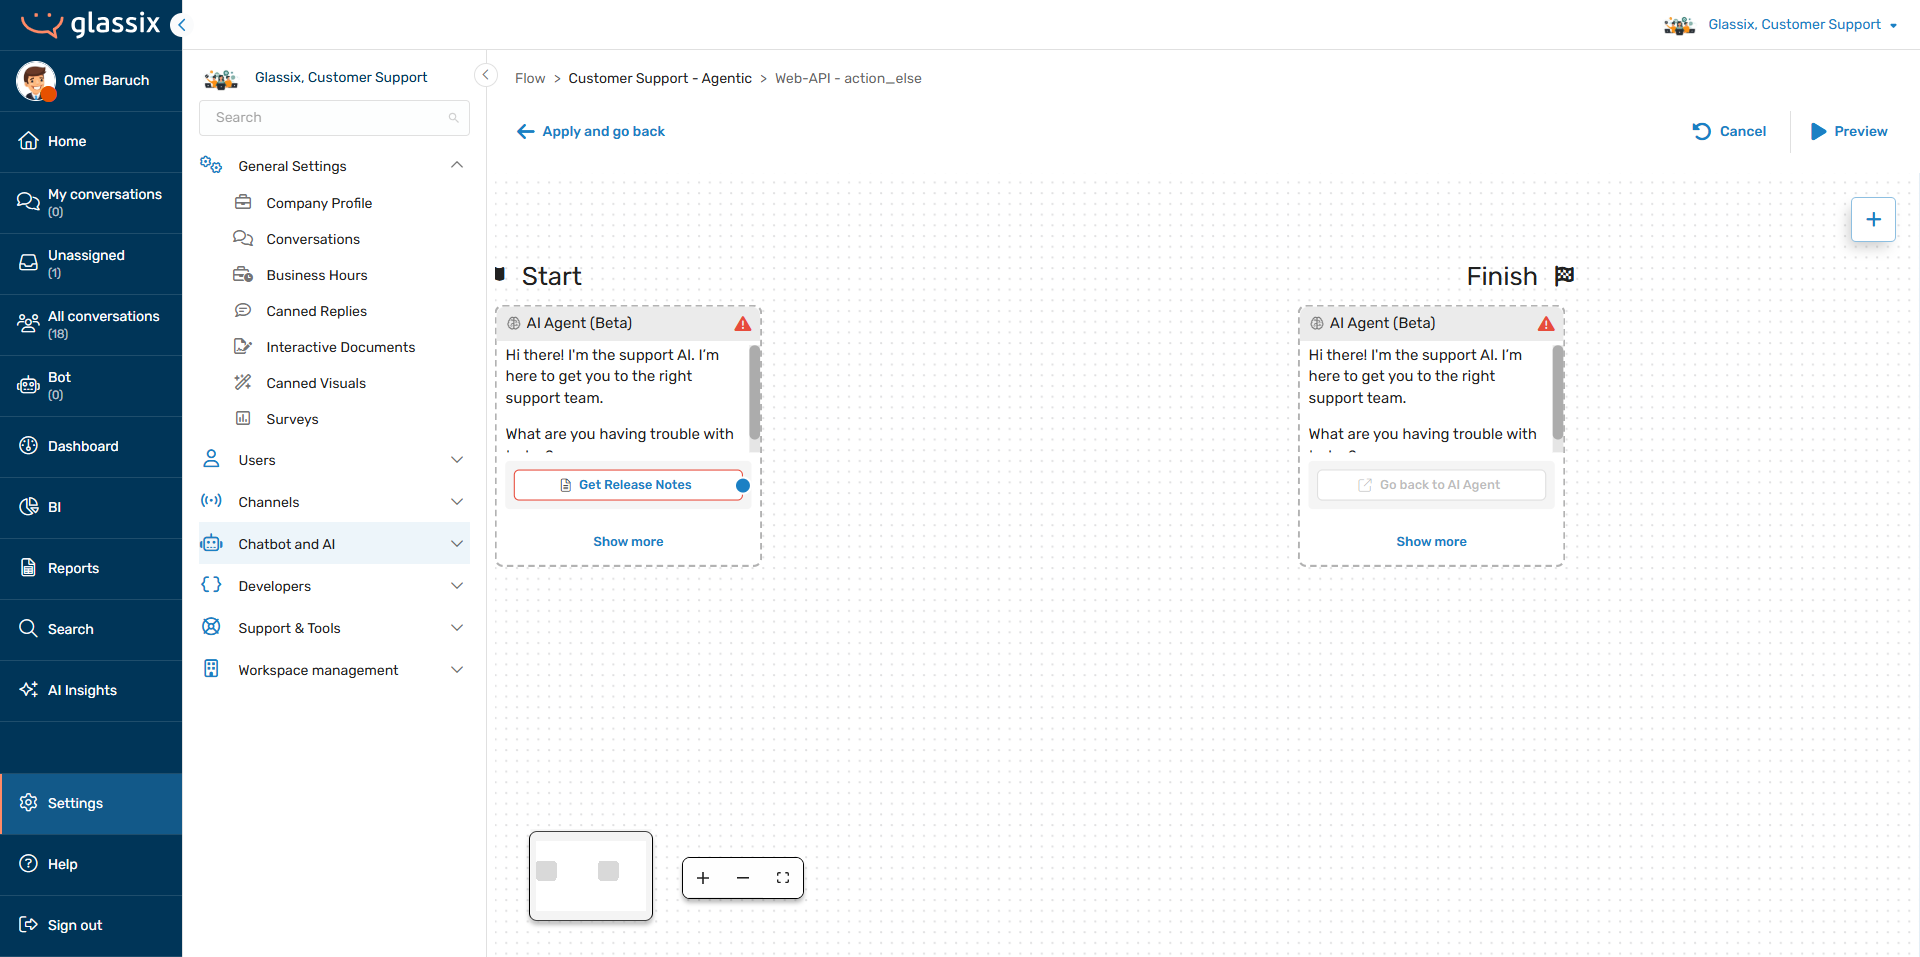
Here, add flow steps to complete the action you want the tool to perform. For example, if you want this tool to perform an API call, you would add a Web-API flow step:
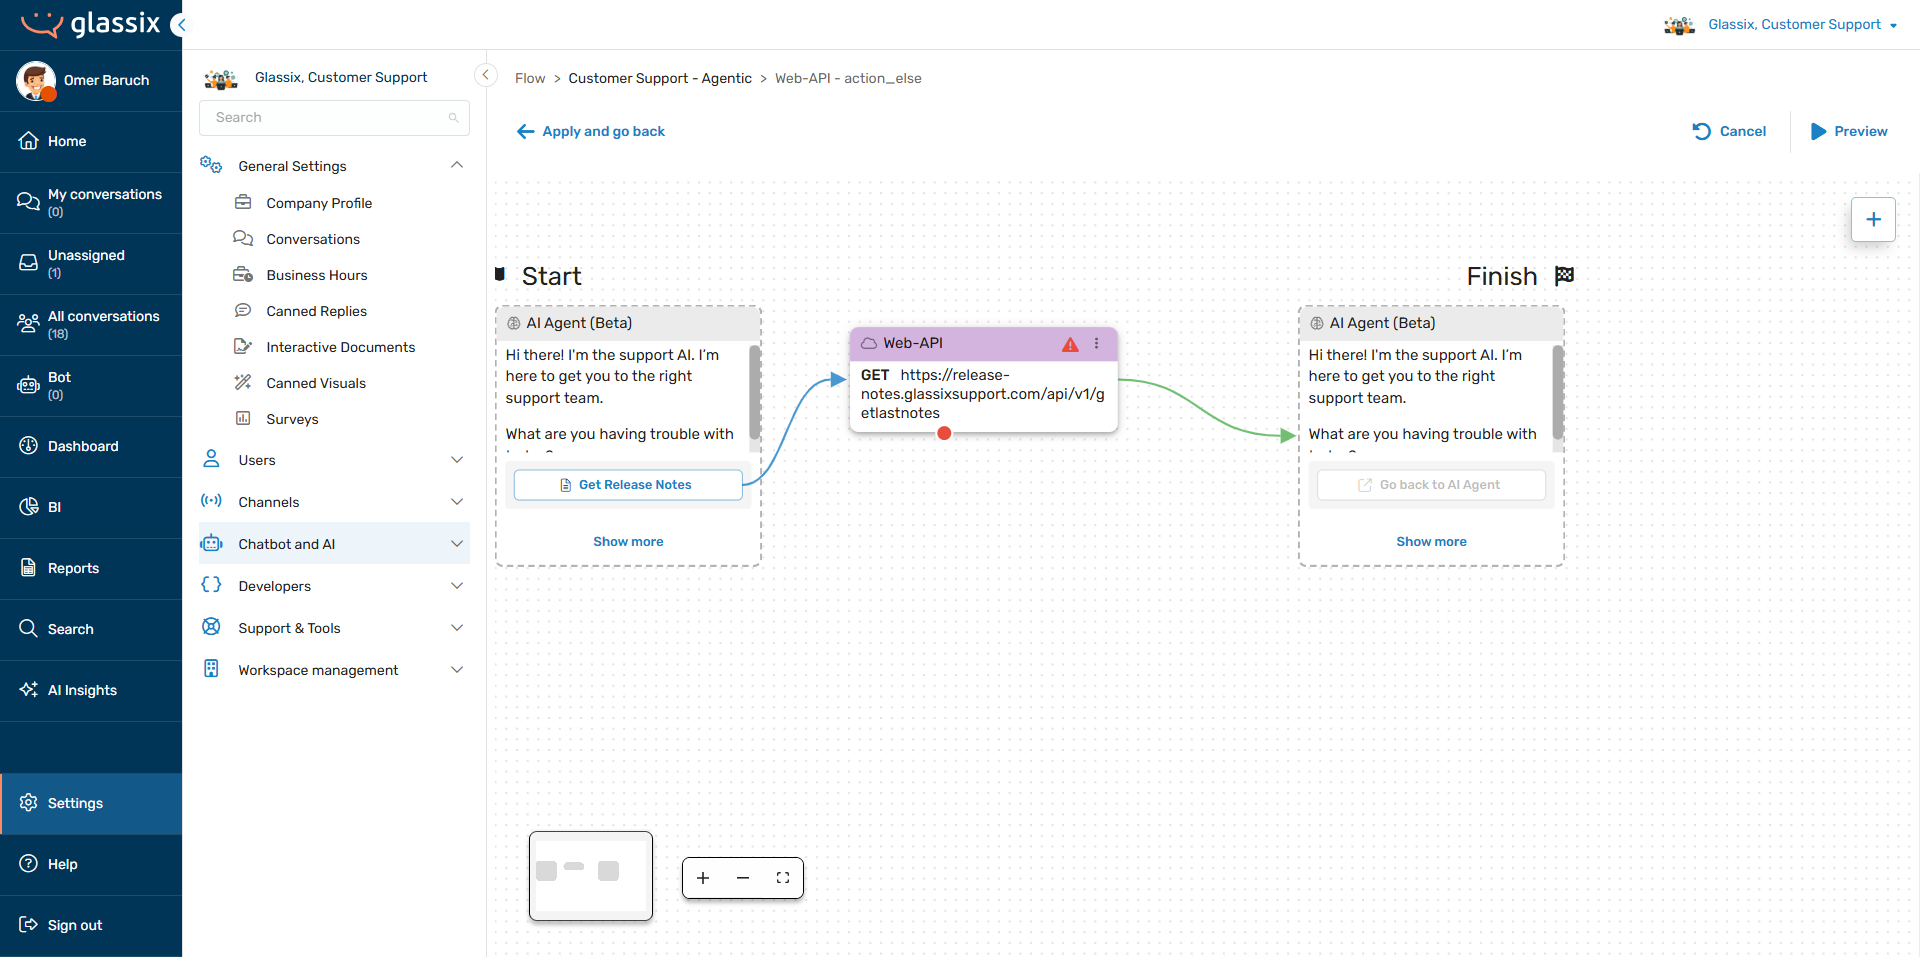
Whatever flow steps you add here will be run every time your agent calls this tool.
In order to send data back to the agent from the tool, you need to fill data into the parameter which you defined in the Return Parameters section of your tool:
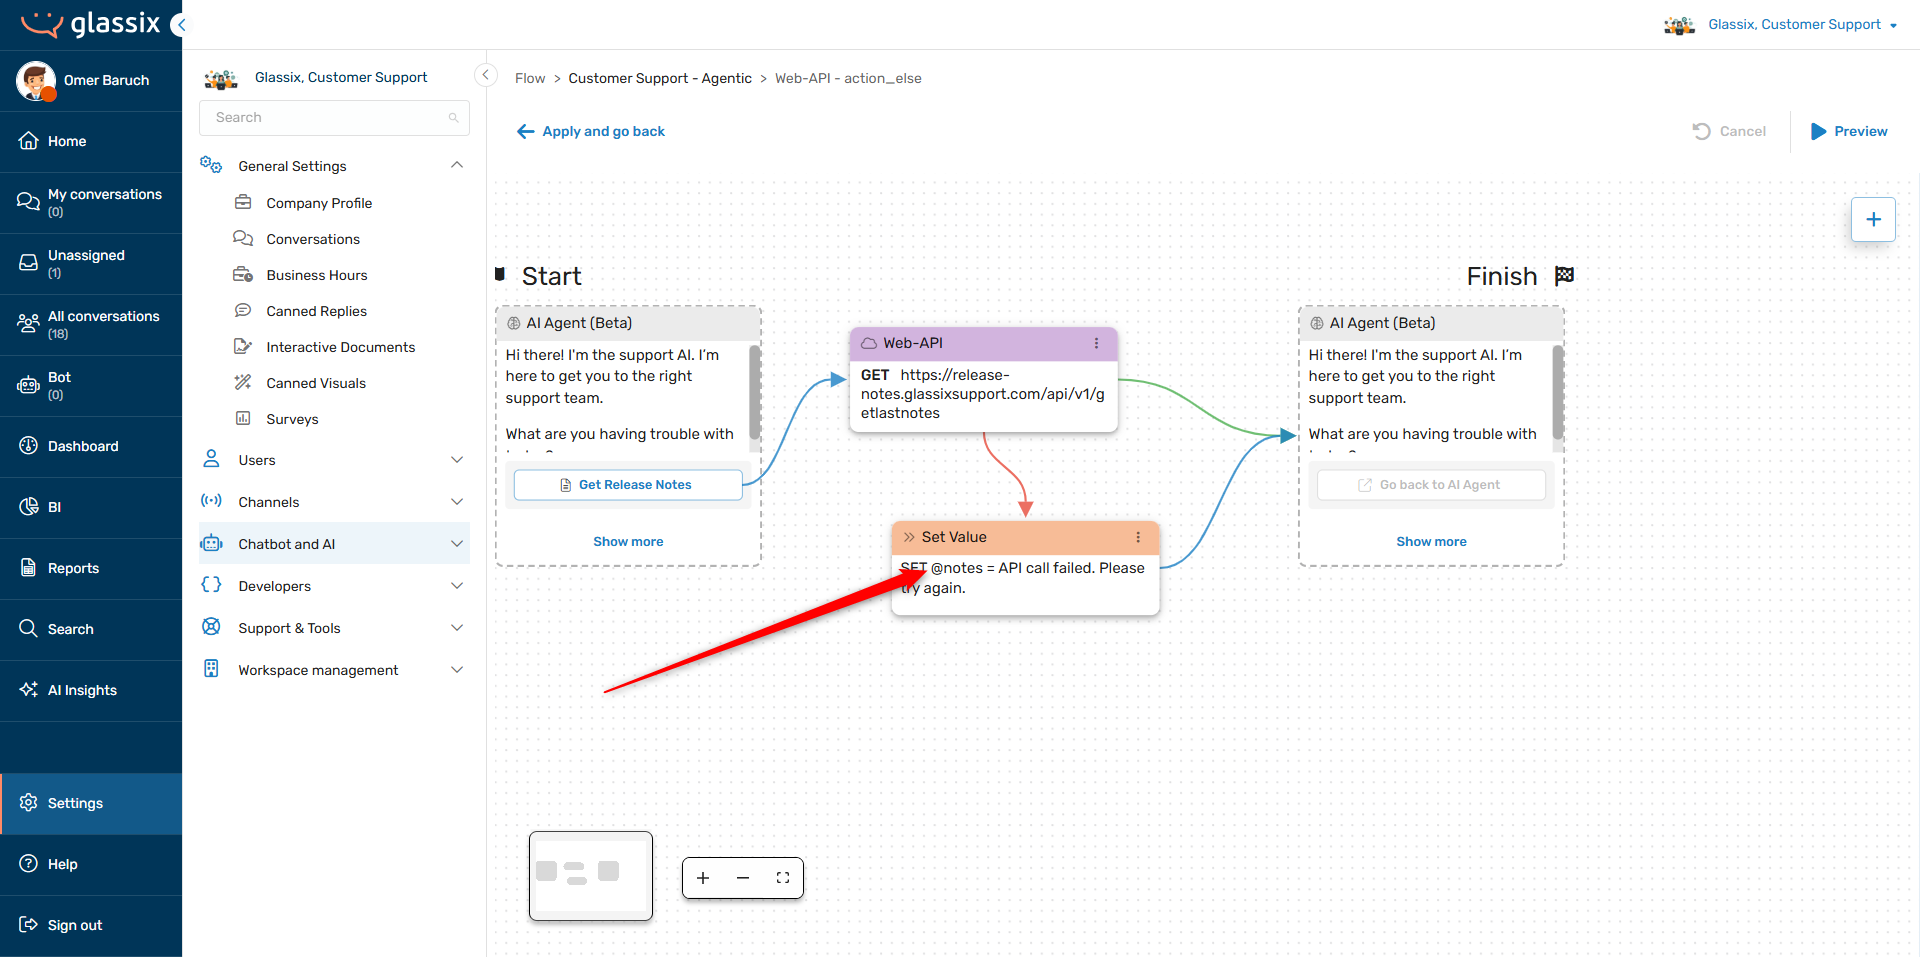
In the example above, the tool is listening for the notes parameter. The Web-API step fills its return into notes, and if the API call fails, the Set Value step fills in an error message into notes. The notes parameter is then returned to the agent at the end of the tool flow, and the agent then has either the API data or a relevant error message.
Tip:Agents know the names of their parameters. You can reference parameters by their names, and tell agents what to do with the data inside them.
In the agent's behavior description, you can reference these returned parameters directly, and tell your agent what to do with them. For the example above, we could add something like this to the agent's behavior description:
When you get data back in the notes parameter, display it to the user, formatted for readability. If it's an error message, let the user know they can try their question again.
You can also let the agent handle the tool return itself. If you don't provide the agent any instructions, it will automatically decide what to do with the information it has been provided in the tool's output parameters.
Tip:Agents will respond automatically after a tool finishes running, using the information in the tool's output parameters. While you can tell the agent what to do with a tool's output parameters, you don't have to.
In addition to the behavior description, the agent will also accept instructions for using a tool's output parameters in the output parameter's description.
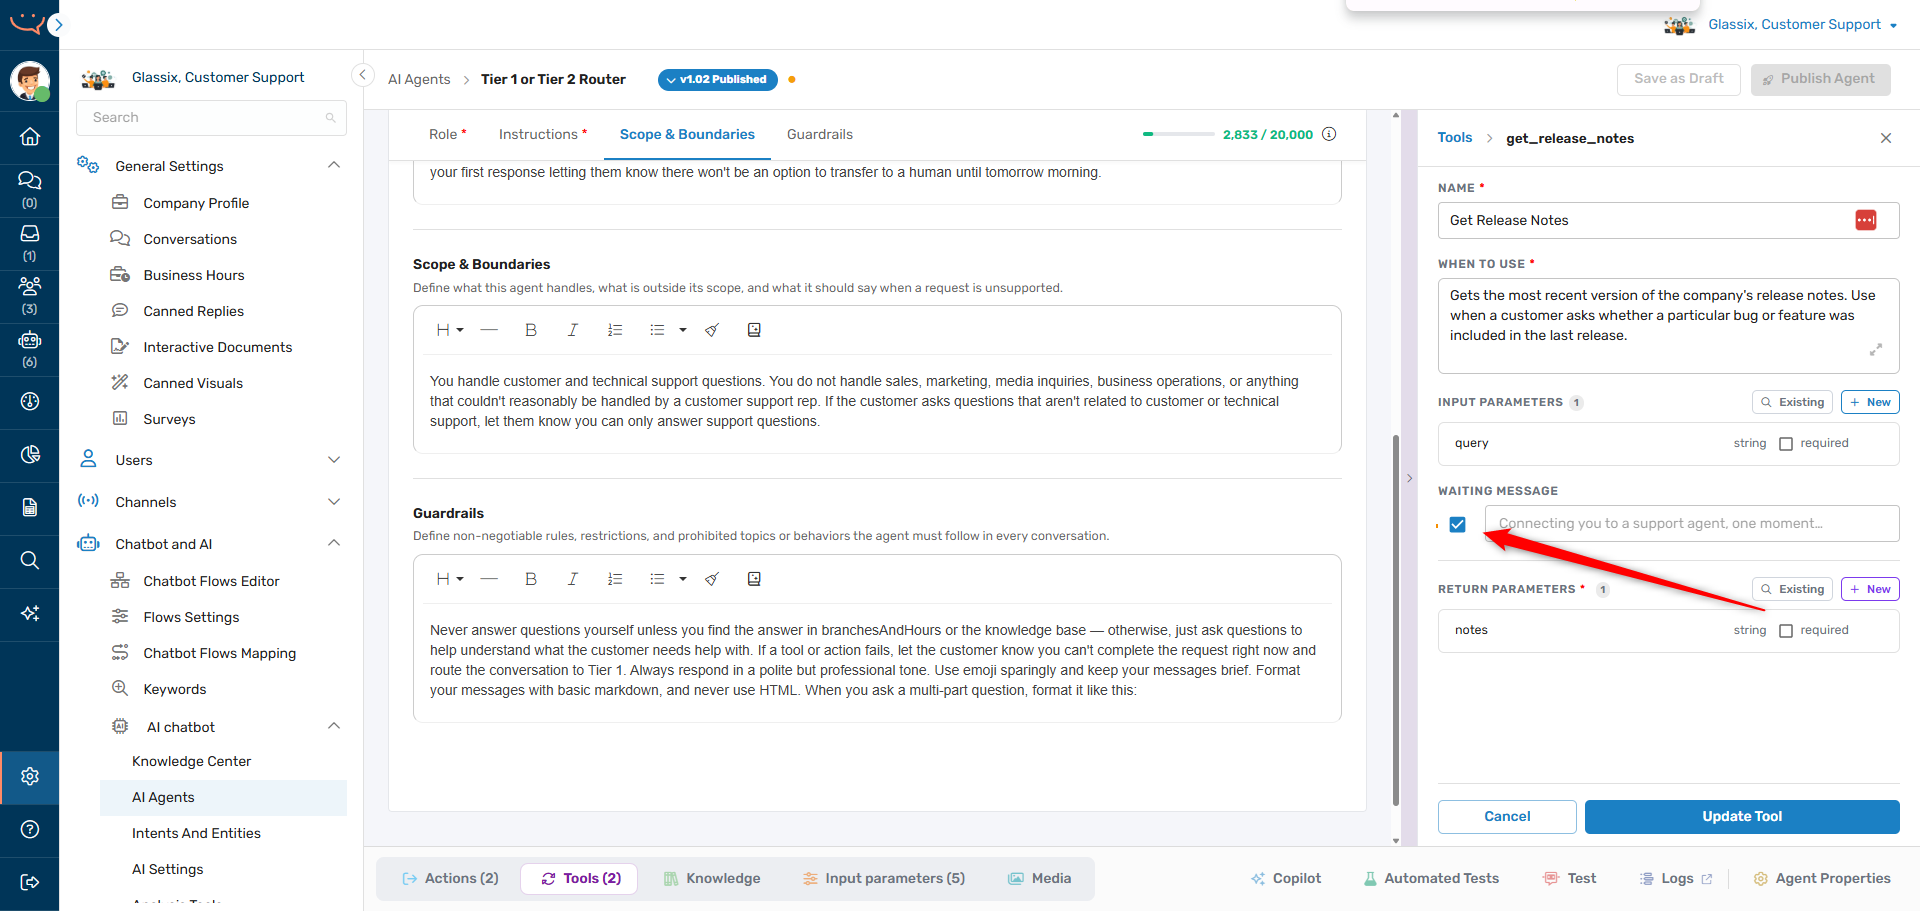
Send Waiting Message
The Send waiting message option on actions and tools lets you choose whether you want your agent to tell the customer when it's using an action or tool:
With the option turned on, your agent will send a context-relevant message to your customer when it uses an action. For example, if this option is turned on for the "Route to Tier 1" action in the screenshot above, the agent will send something like this when it decides to use the action:
"Routing you to our Tier 1 support team. Just a moment..."
With the option turned off, your agent will take actions and use tools silently.
Next Step
Now that you have your actions and tools created, it's time to Add Your Knowledge Center.