Connect a Number
Connect your VOIP or traditional telephony solution to Glassix
Tip:This article is about connecting Glassix Voice using a traditional phone number. If you would like to connect using a SIP address instead, see this article.
Overview
In order to receive voice calls in your department, you will first have to connect a phone number. You may connect phone numbers which are hosted with any SIP-compatible provider, including:
- Your local Internet Service Provider (ISP)
- Cloud carriers like Vonage
- Communications Platform as a Service (CPaaS) solutions like Twilio
Info:The phone number you connect will also be used to forward customer calls from your department back to you if you set up an agent handoff in your flows.
We support SIP credential-based authentication to securely connect your phone numbers, which provides the best balance of security and flexibility.
Step One: Create a SIP Trunk
Info:SIP (Session Initiation Protocol) is a technology which allows you to create virtual phone lines on the internet, primarily used for voice over IP (VoIP). This is how Glassix connects your customers to your department over the phone.
The first step in connecting a number is to create and configure a SIP trunk with your SIP-compatible provider.
While the required SIP trunk configuration is consistent among providers, the steps for performing the configuration are not.
Below, we provide general configuration information along with guides for two major SIP trunk providers, Twilio and Vonage:
General SIP Trunk Configuration Information
Tip:This section is only relevant for providers other than Vonage and Twilio. For Vonage click here and for Twilio click here.
In this first step, we will need to create a SIP trunk in order to get a termination URI. This value is generated by your provider.
Because a termination URI is required before creating SIP credentials in Glassix, we will choose authentication credentials when setting up the trunk and enter them into your department in Glassix later on.
After creating a SIP trunk or peer in your provider's portal, you will generally need to configure authentication and/or outbound calling before being provided with a termination URI.
The steps for getting a termination URI are different for each provider, so if you don't know where to get this value from your provider, we recommend reaching out to your provider for help.
In case your provider requires a full outbound configuration to generate a termination URI, the required outbound configuration is provided below. Please note that the region for your realm URL will be provided in the next step.
Outbound Configuration
In your provider's portal, add Glassix as an allowed termination destination. For the username and password, choose values according to your provider's specifications and note them down for later.
- Peer/Trunk Name: "Glassix Voice"
- Auth Type: Digest/Credential Authentication
- Username: Select a SIP trunk username and note it down for later
- Password: Select a SIP trunk password and note it down for later
- Realm: Your regional Glassix server address, provided in the next step
- Allowed Prefixes: Configure as needed for your dial plan
Once your SIP trunk is configured, copy your termination URI and proceed to Step Two: Create SIP Credentials in Glassix.
Vonage: Create a SIP Trunk
In this first step, we will need to create a SIP trunk in order to get a termination URI. This value is generated by Vonage and becomes available after creating your trunk.
Because a termination URI is required before creating SIP credentials in Glassix, we will choose authentication credentials when setting up the trunk and enter them into your department in Glassix later on.
Info:If you are setting up your first SIP trunk in Vonage, authentication credentials will be provided for you.
The setup process in Vonage is slightly different depending on whether or not you have already set up your first SIP trunk.
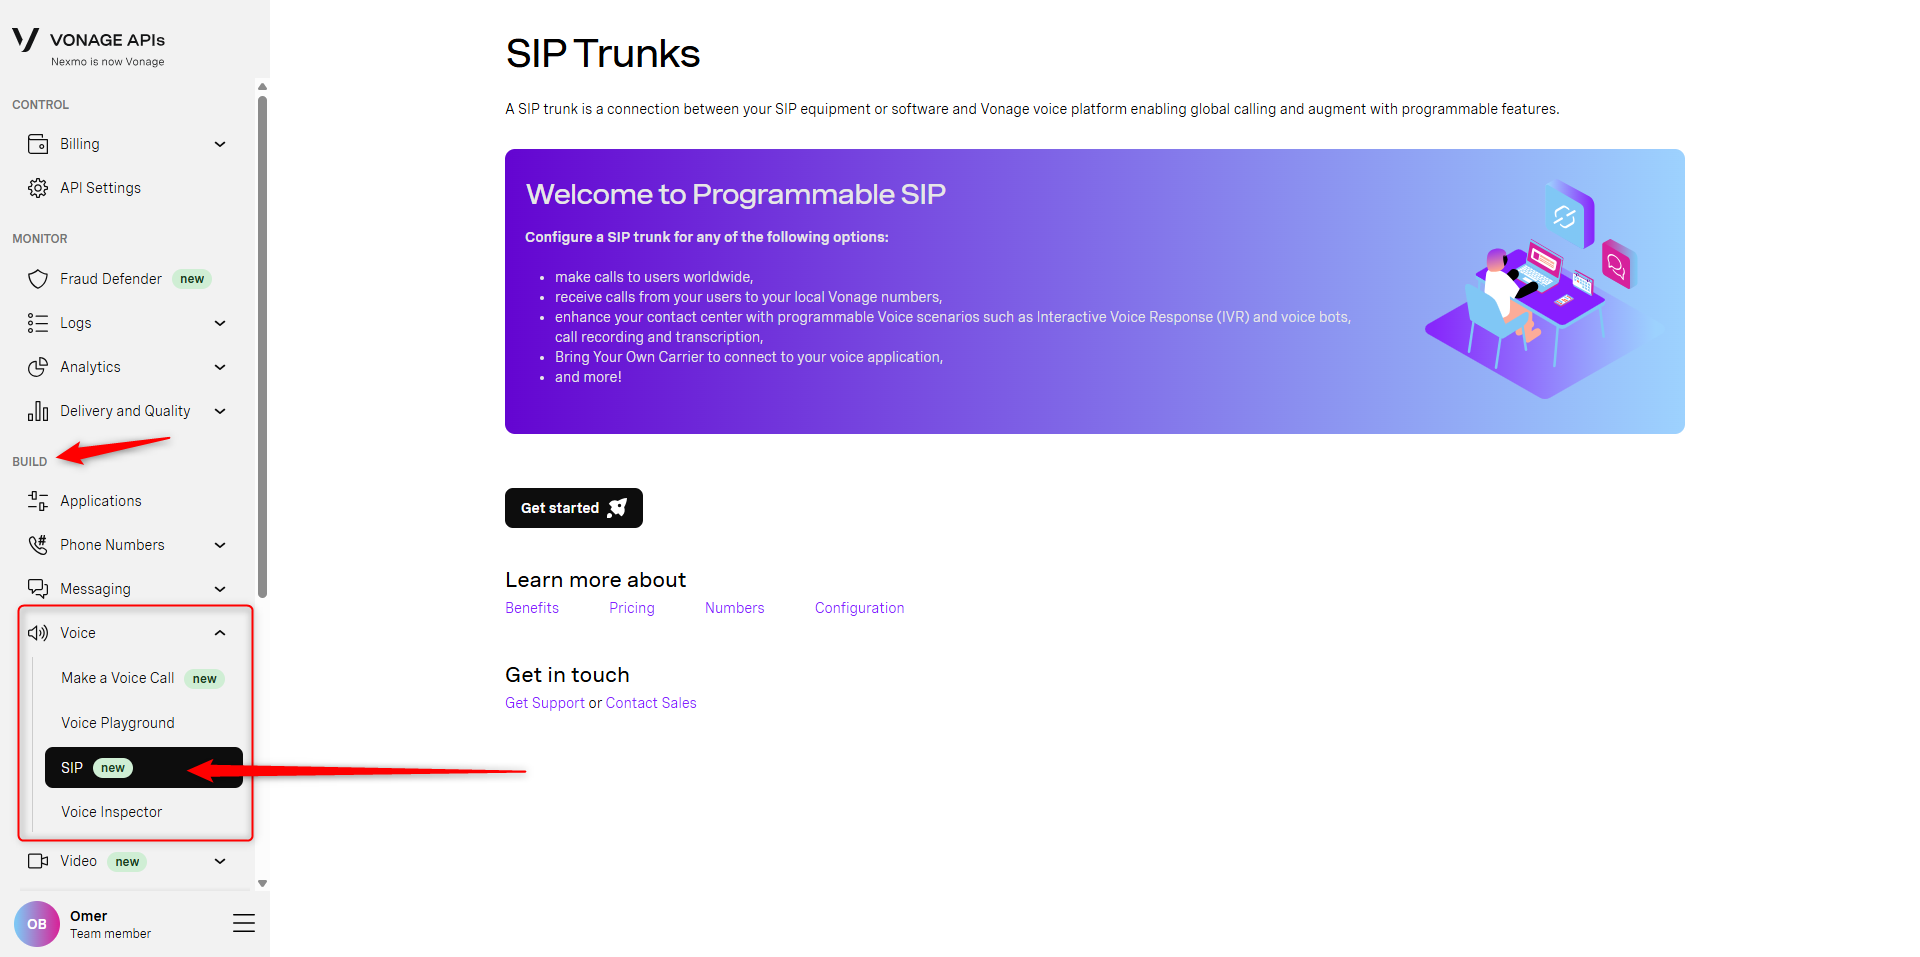
If This is Your First SIP Trunk in Vonage
-
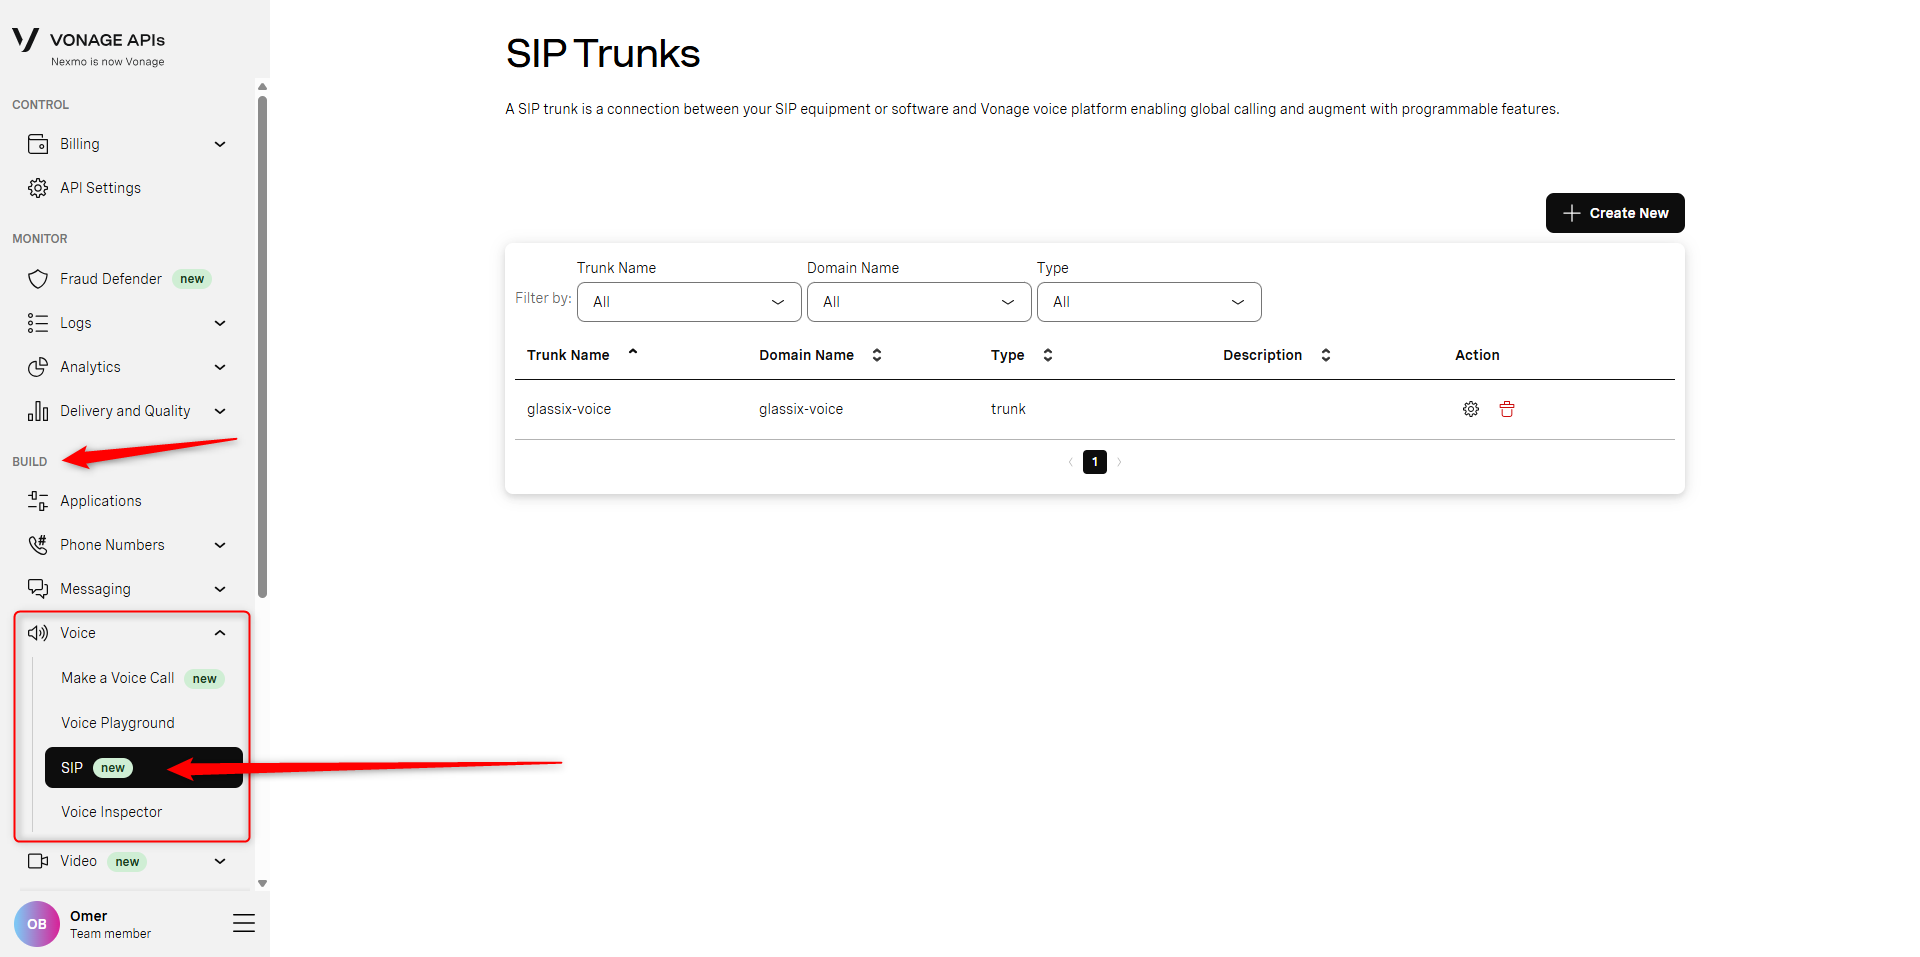
In your Vonage Dashboard, navigate to Build → Voice → SIP:
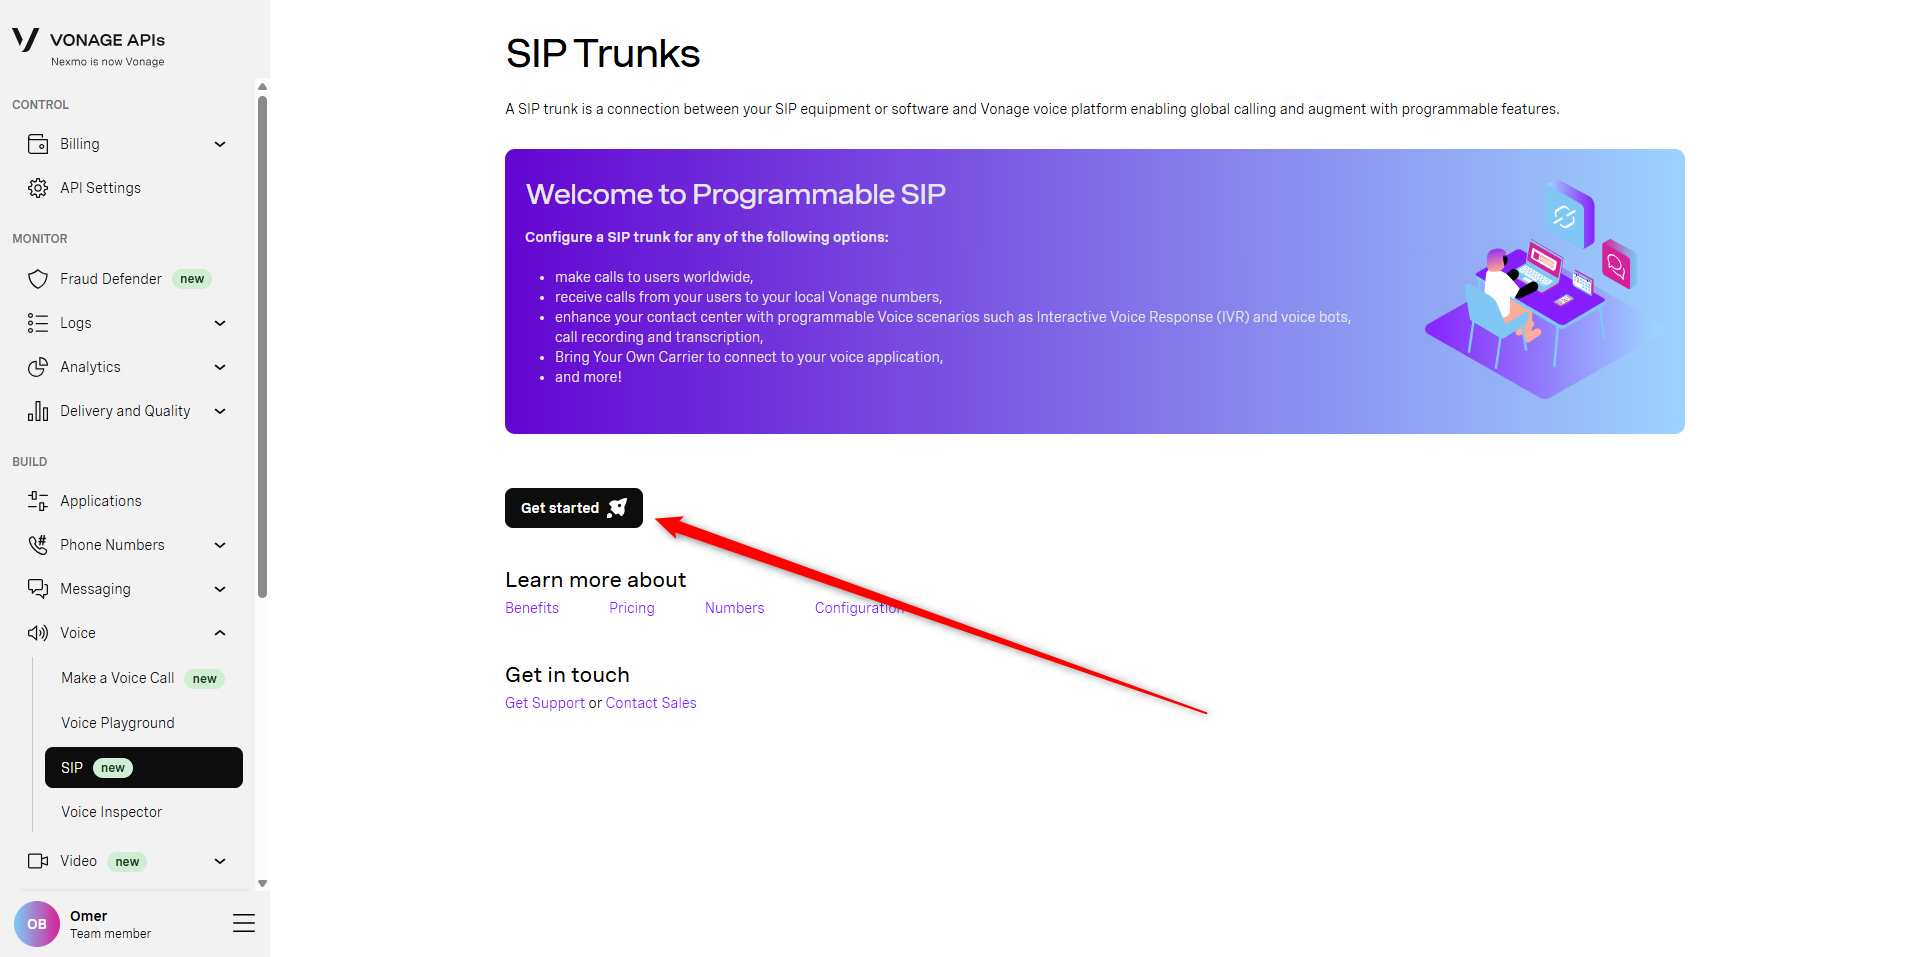
-
Click the Get started button:
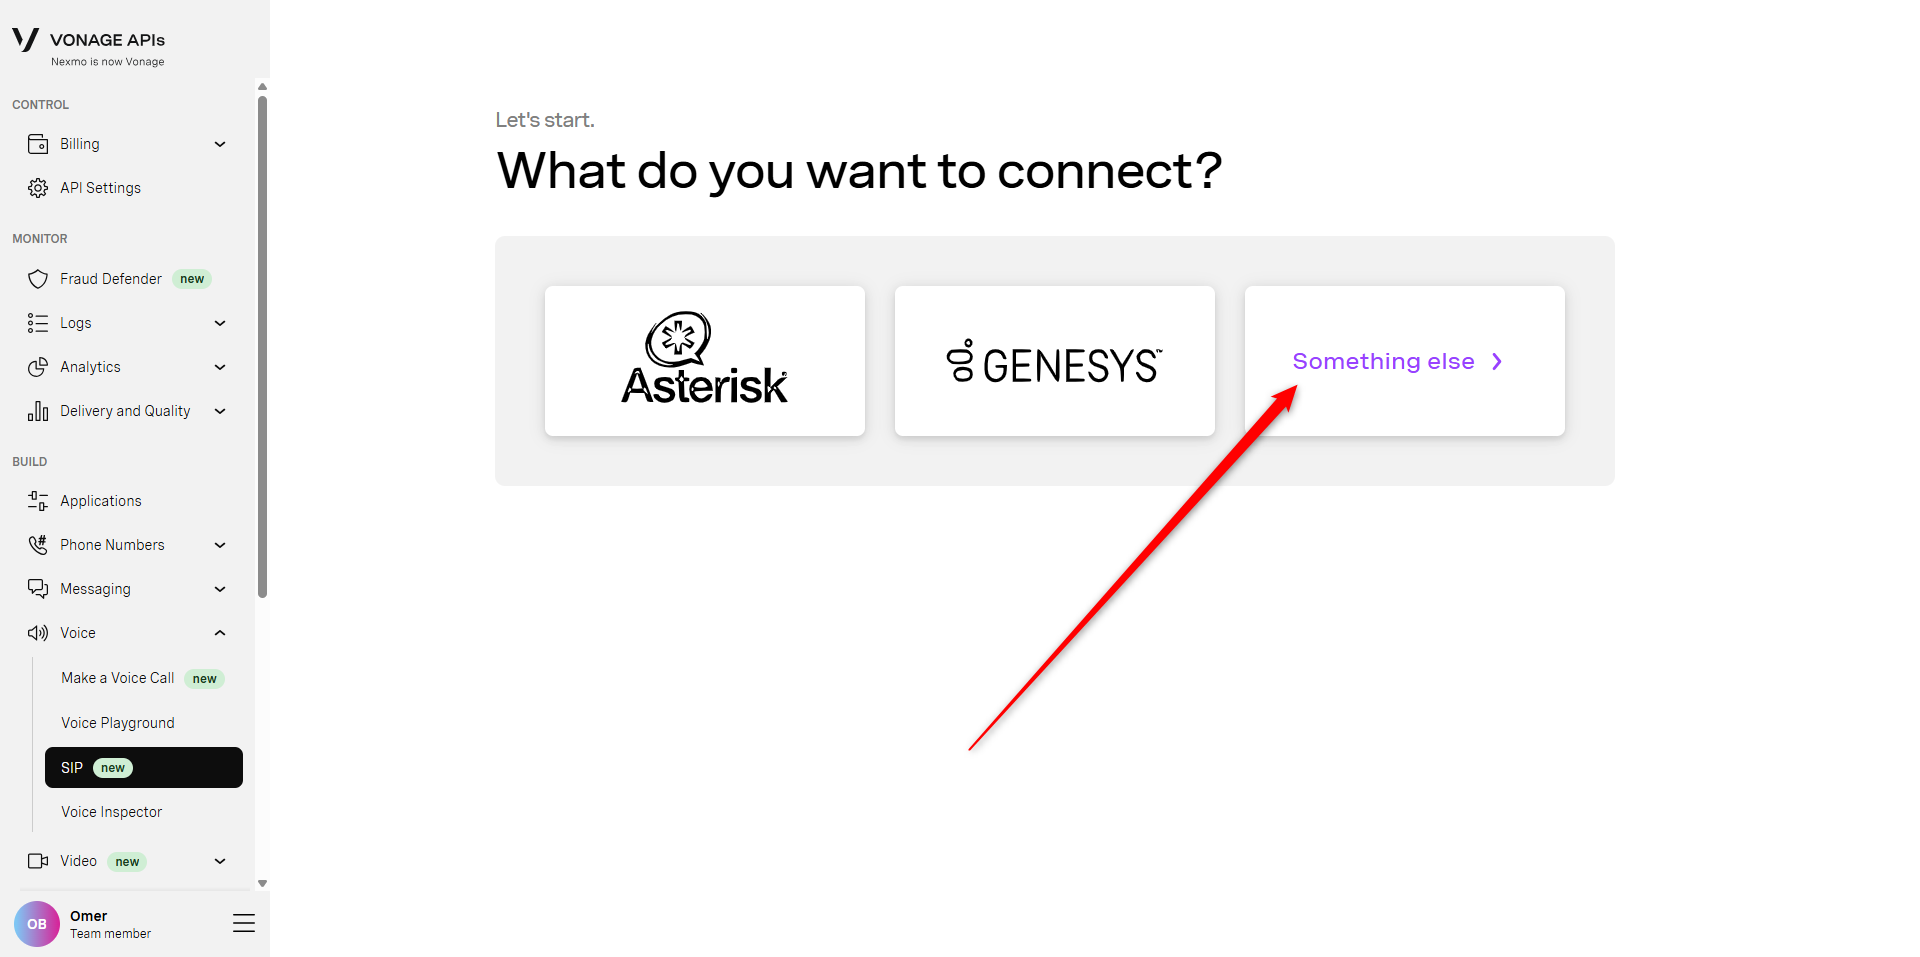
-
Choose Something else >:
-
Copy the provided SIP domain, username and password, and save these values for later. Note that you may edit these values if you want, but the default values provided by Vonage will be sufficient:
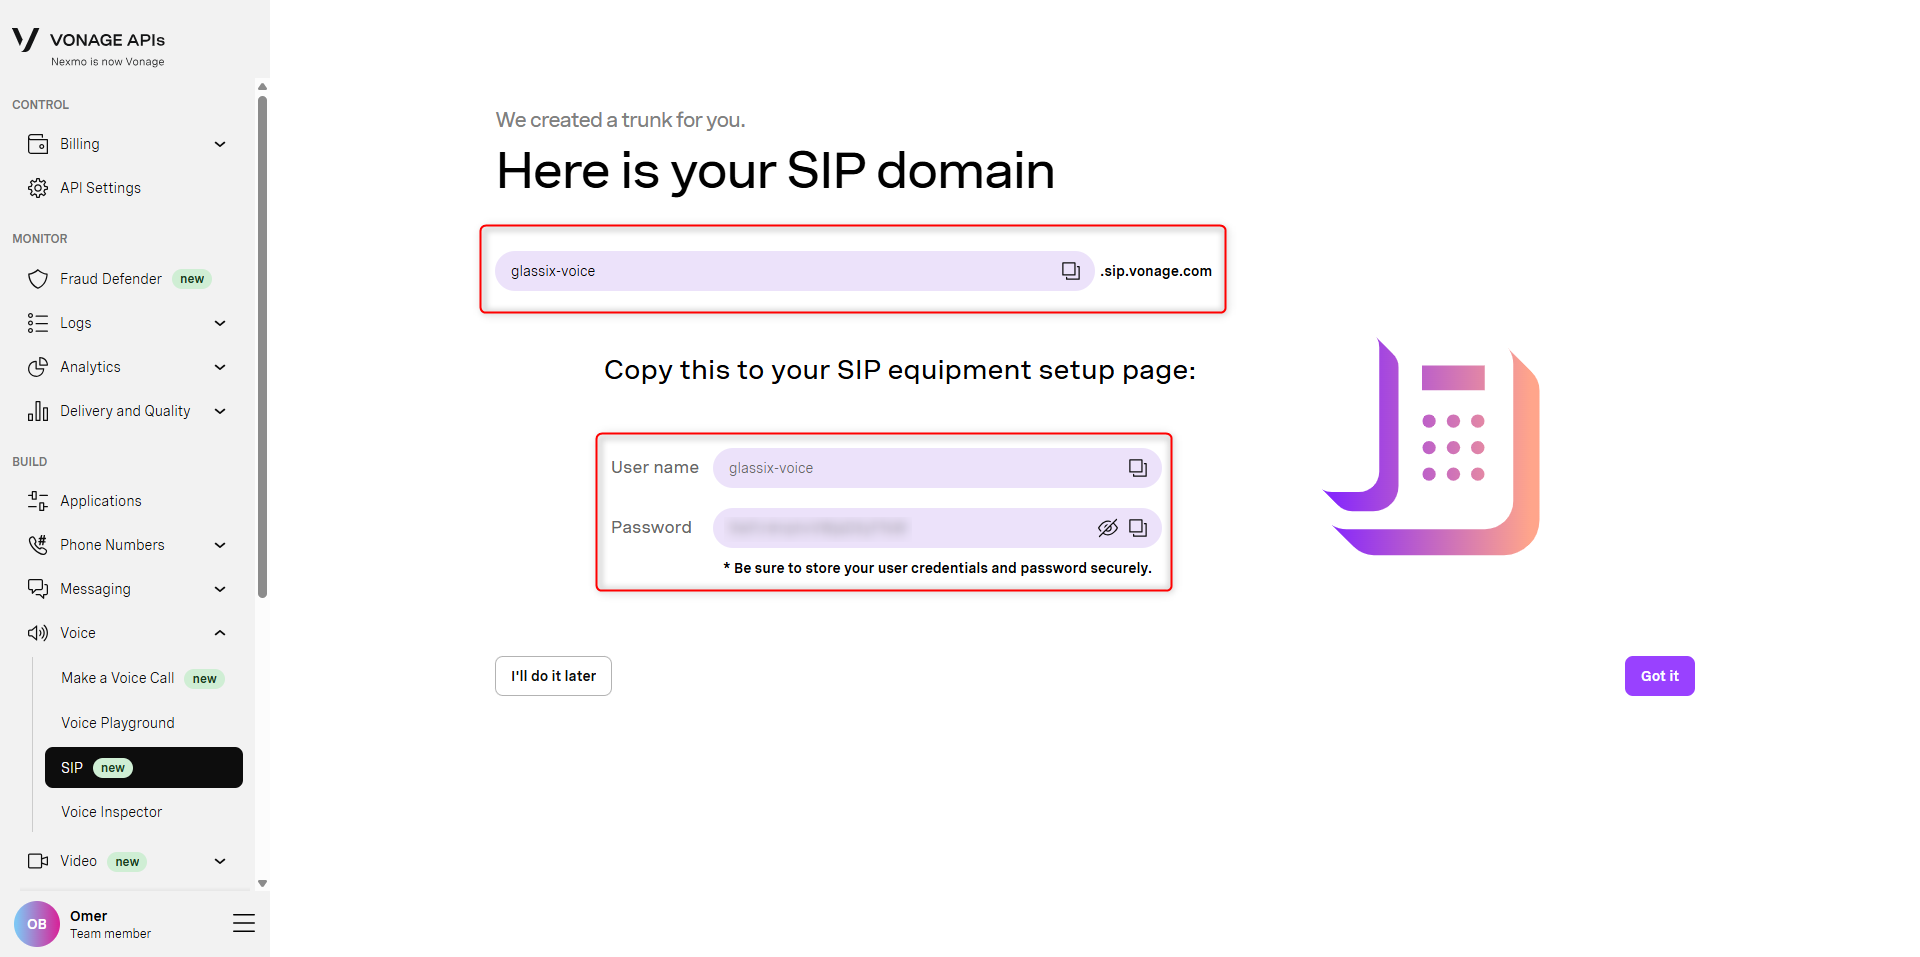
-
Once you have the domain, username and password stored somewhere, choose I'll do it later:
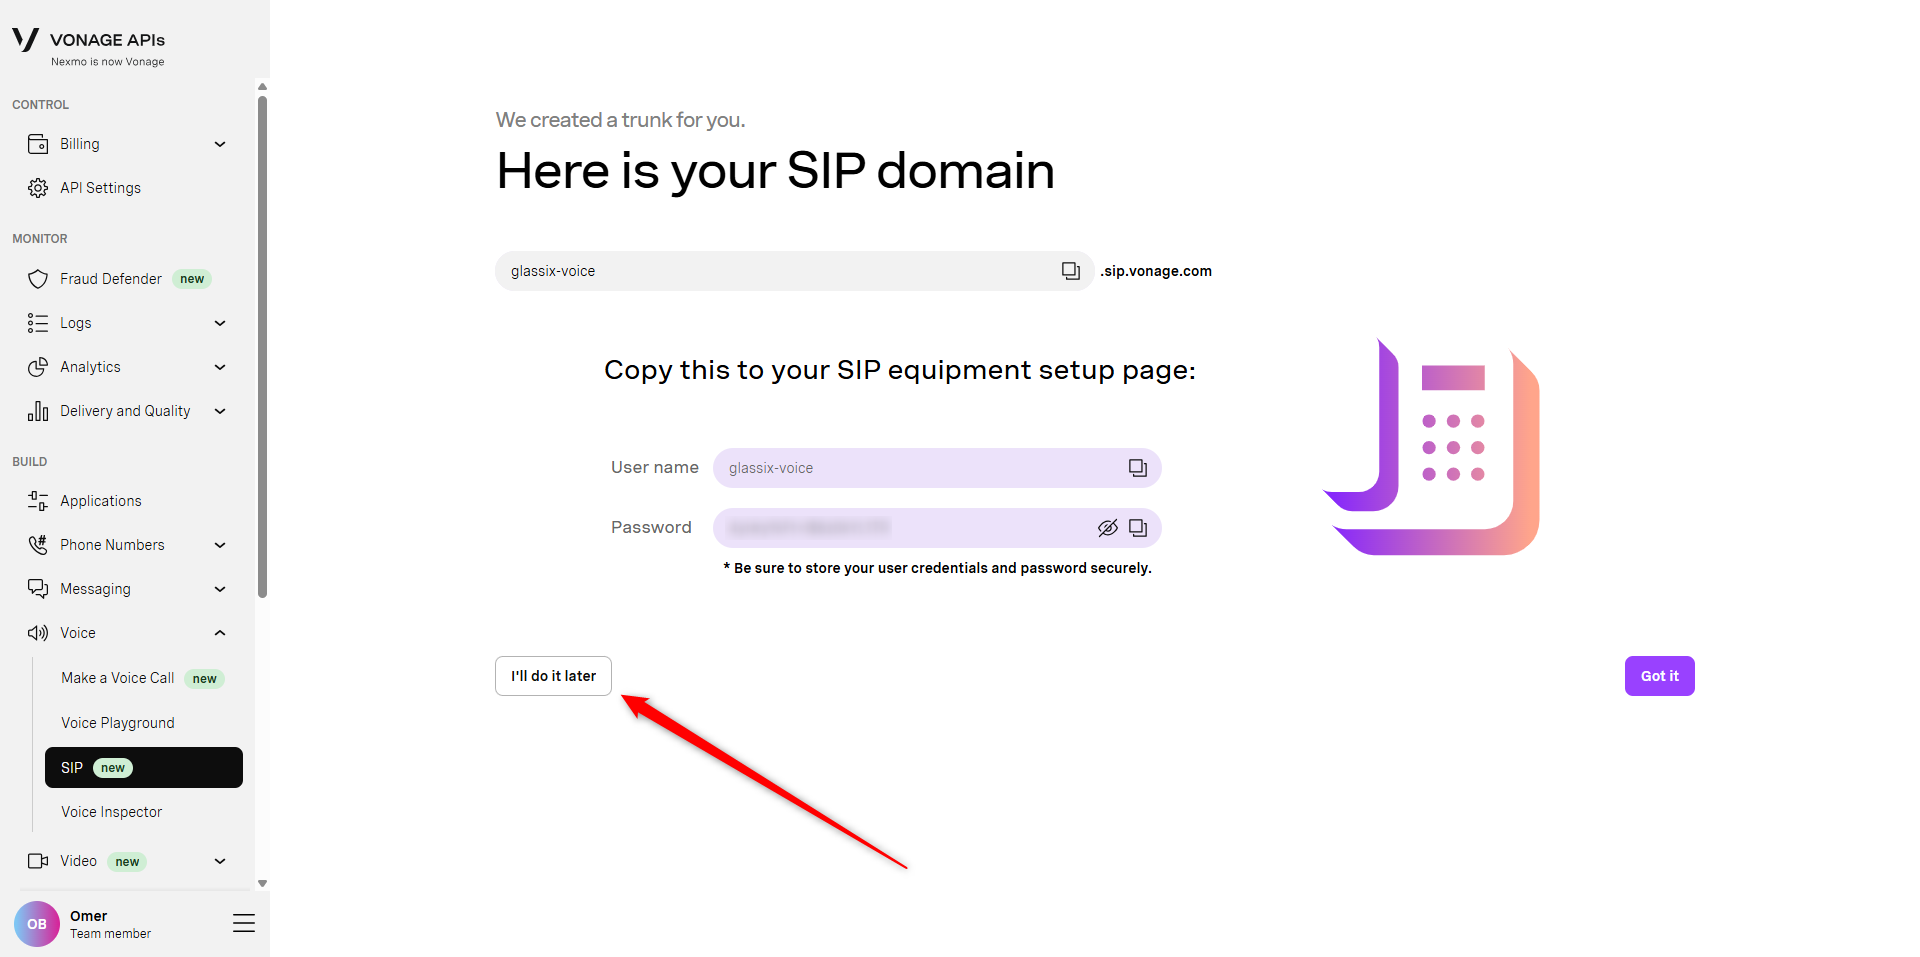
-
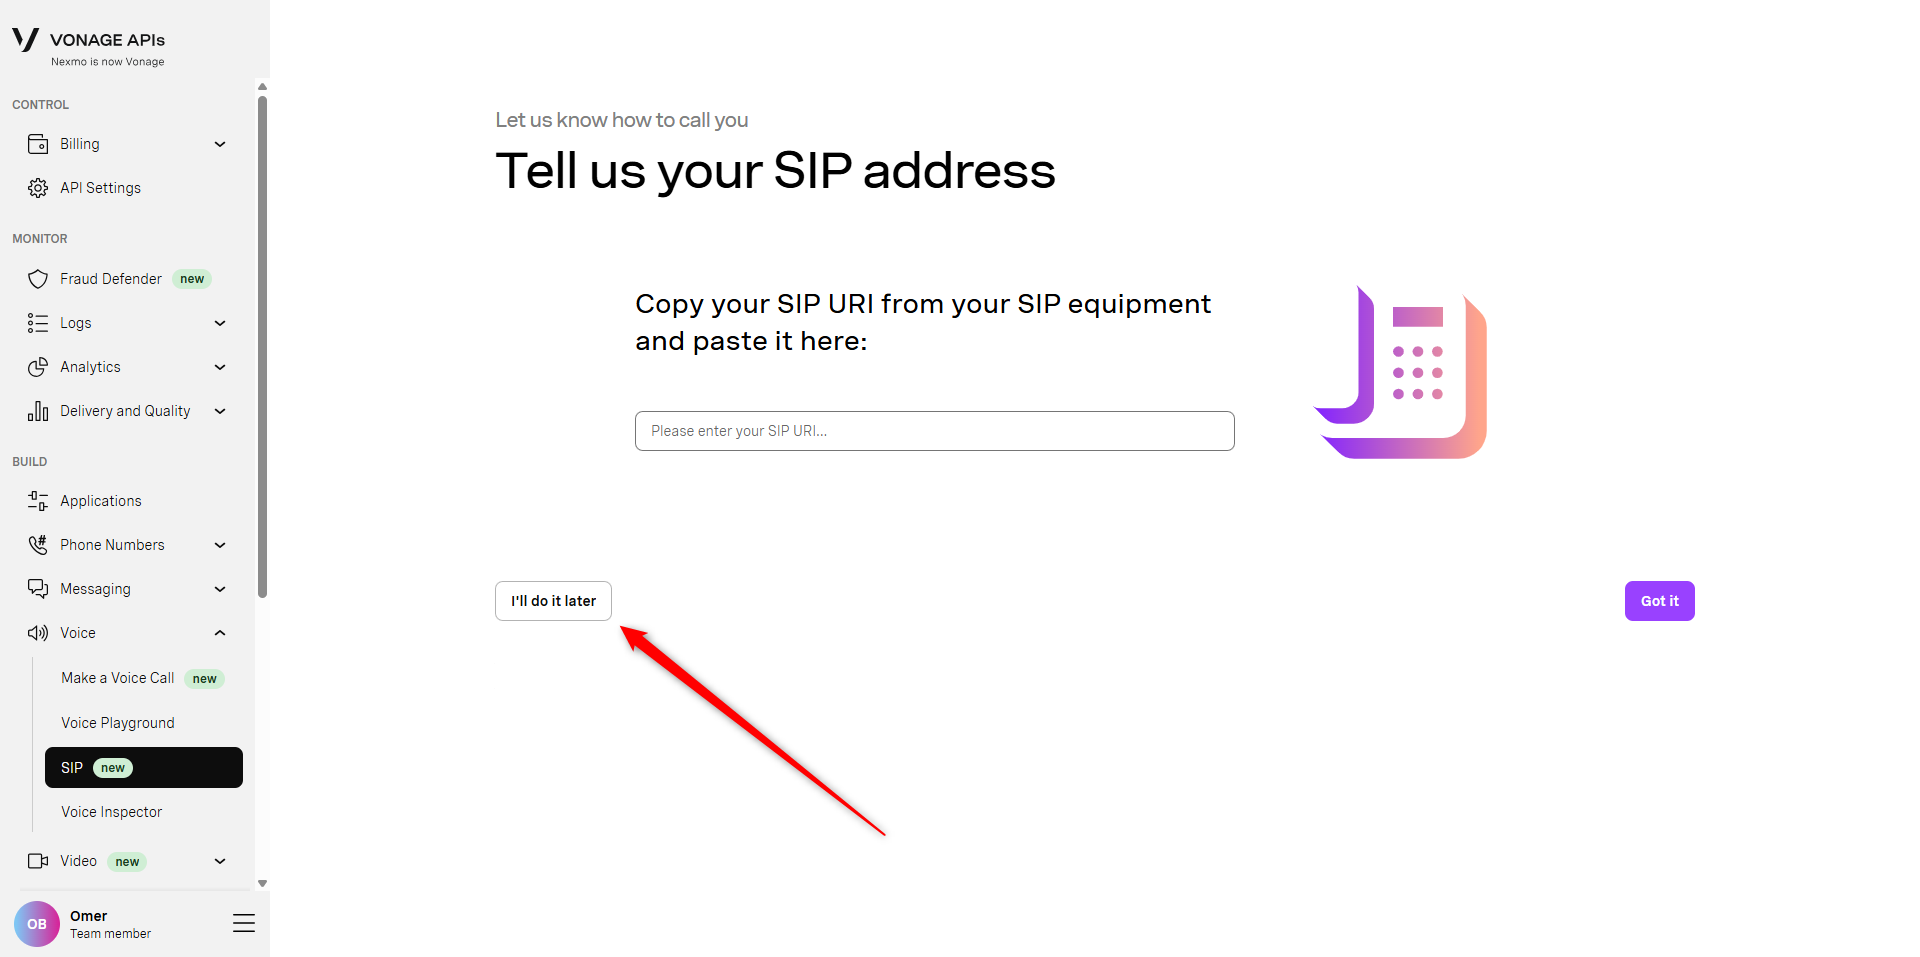
On the next page, again choose I'll do it later. We'll come back to fill in these values after creating SIP credentials in Glassix:
-
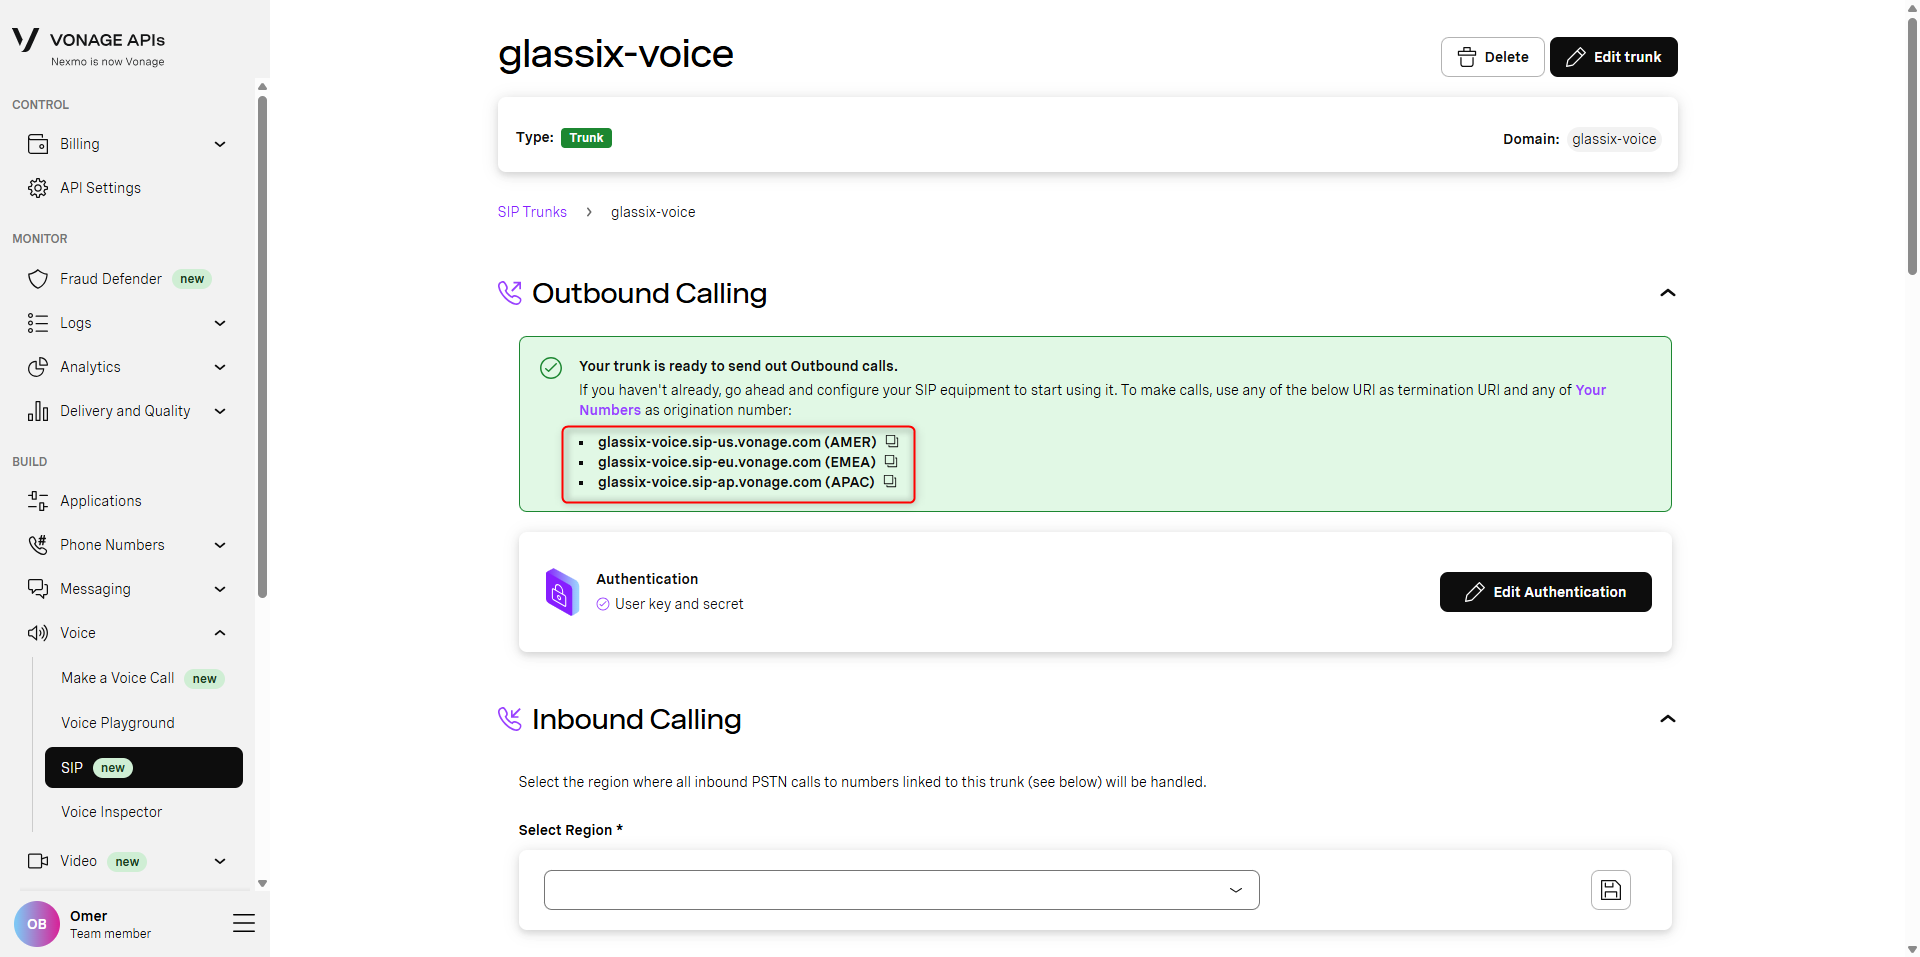
You should now see your new SIP trunk. In the green box, you'll see your termination URIs. Copy these and save them along with your domain, username and password which you saved earlier:
-
Continue with Step Two: Create SIP Credentials in Glassix
If You Already Have Other SIP Trunks in Vonage
-
In your Vonage Dashboard, navigate to Build → Voice → SIP:
-
Click the + Create New button:
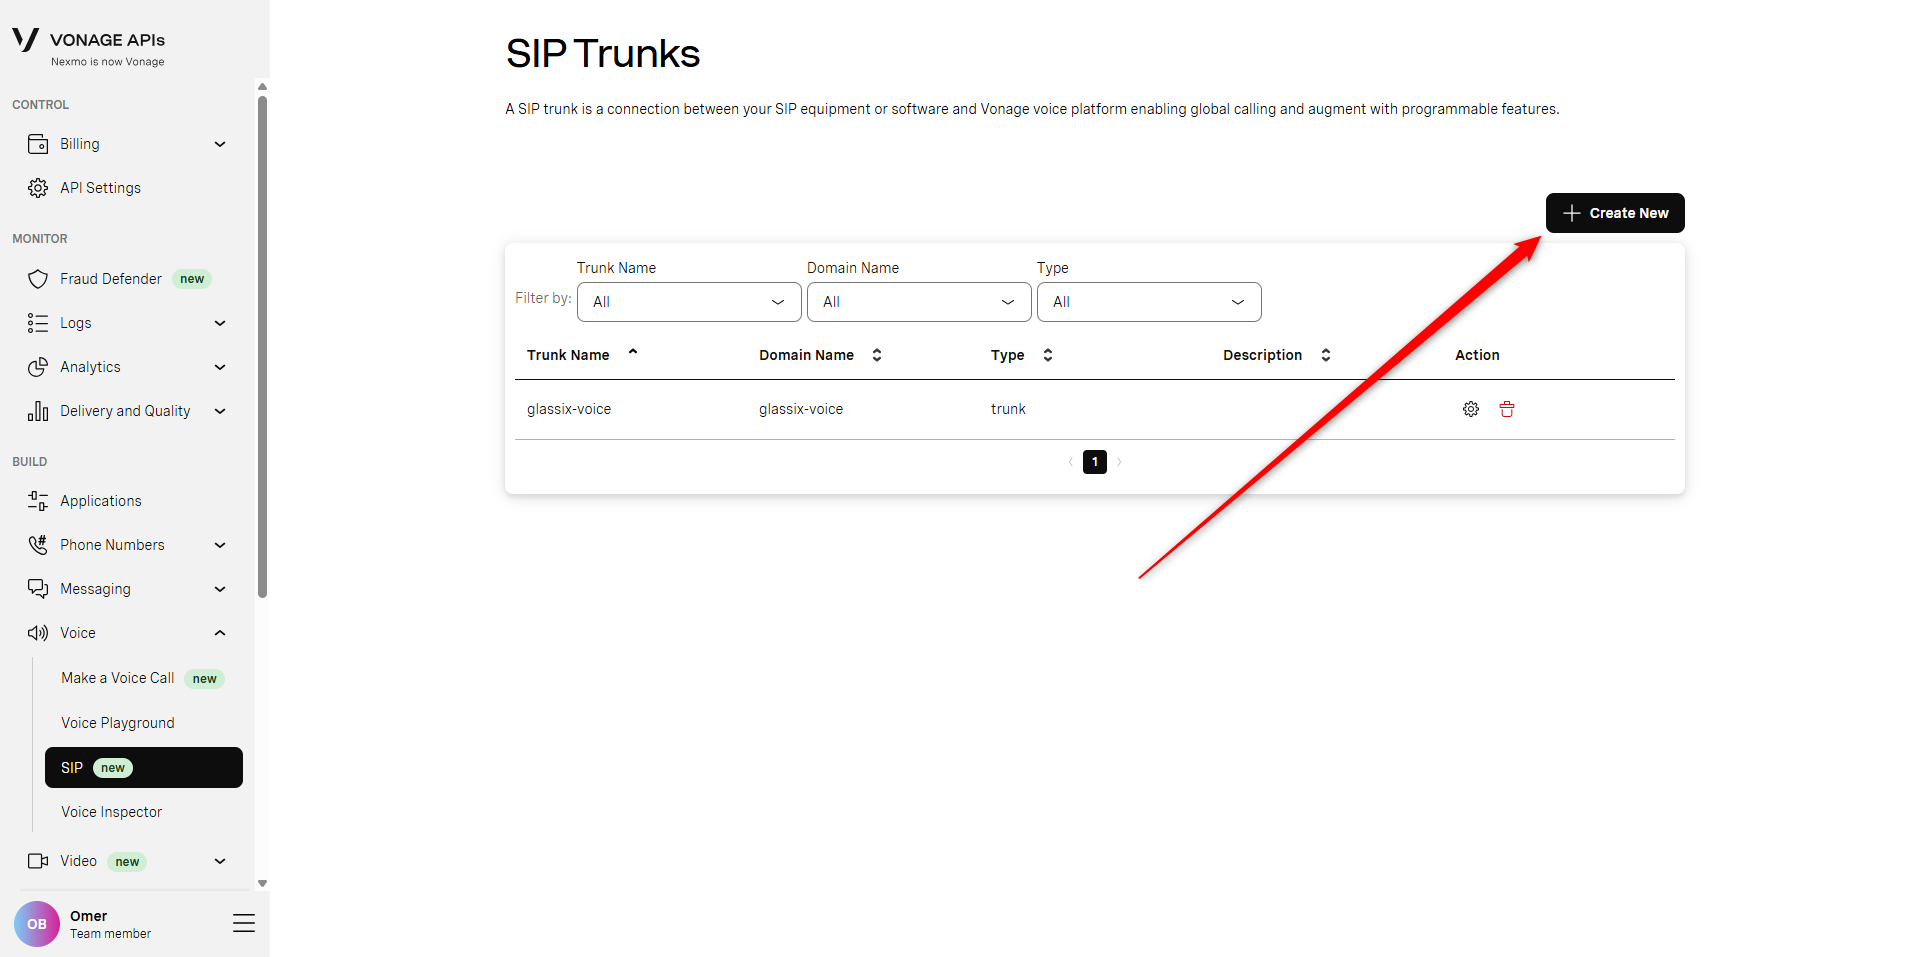
-
Choose a domain name for your SIP trunk, then click Create. Vonage will confirm for you whether the domain name is available. Save this domain name for later:
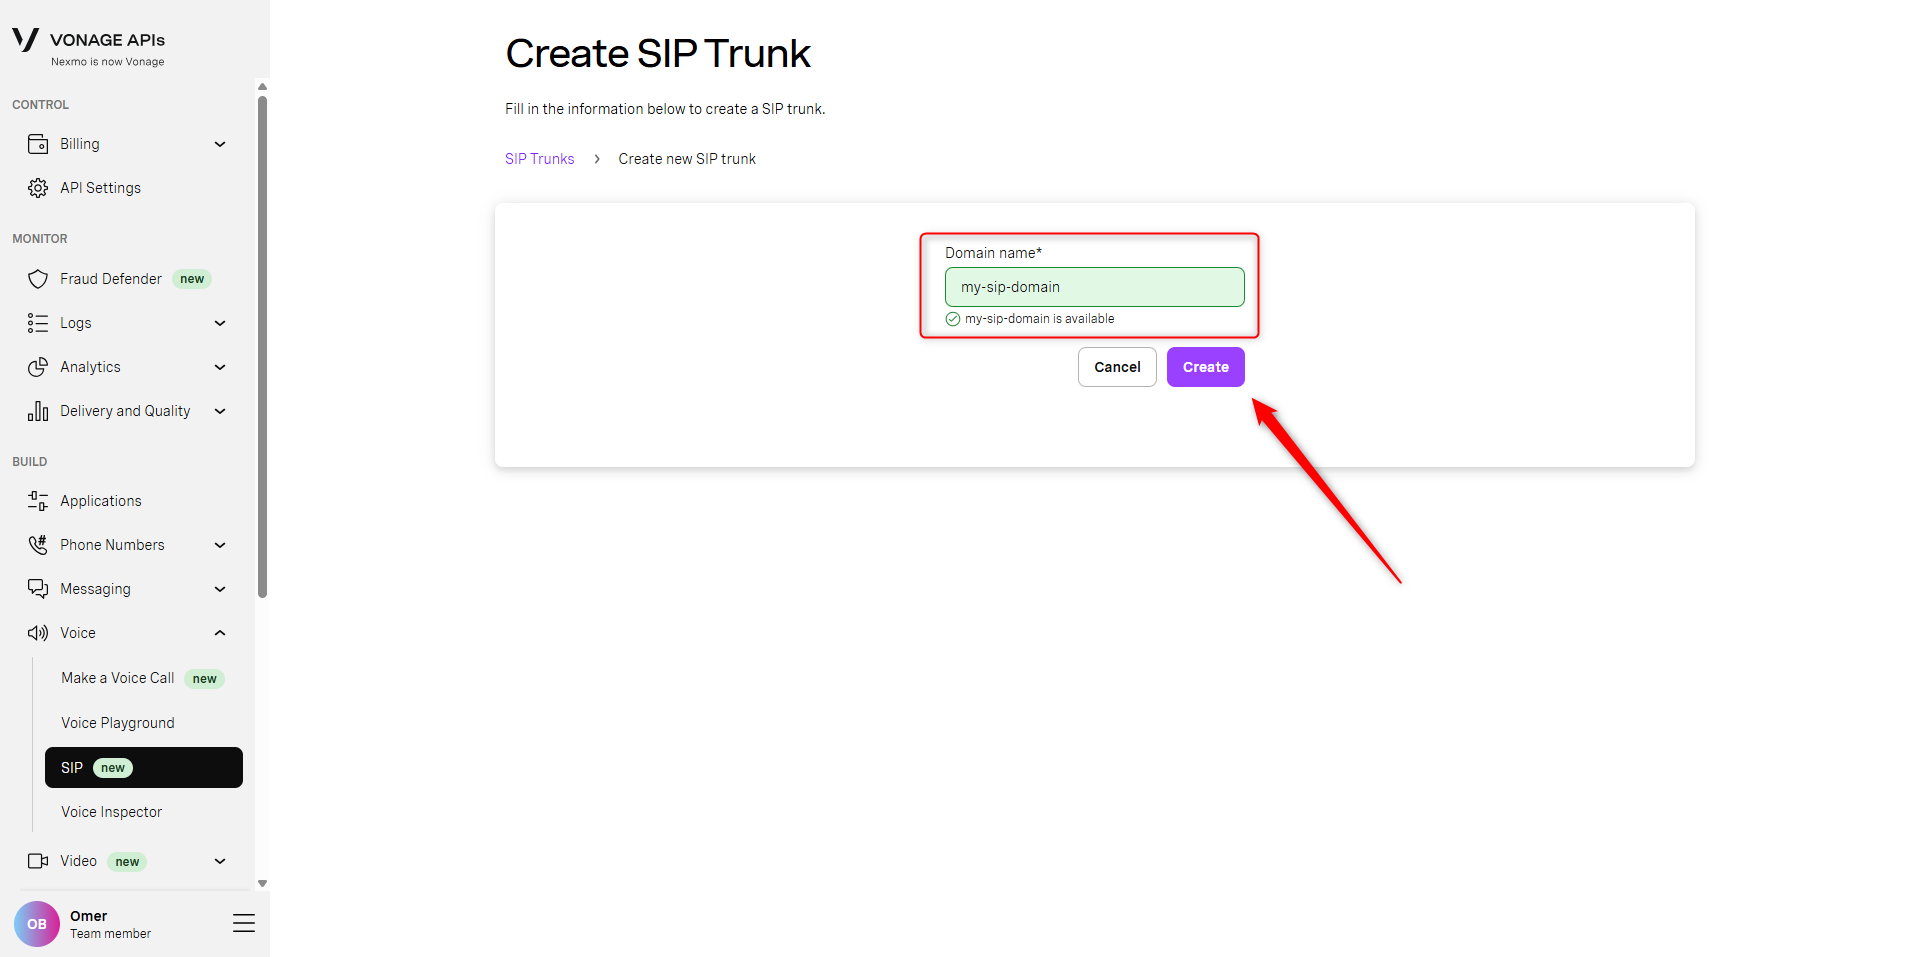
-
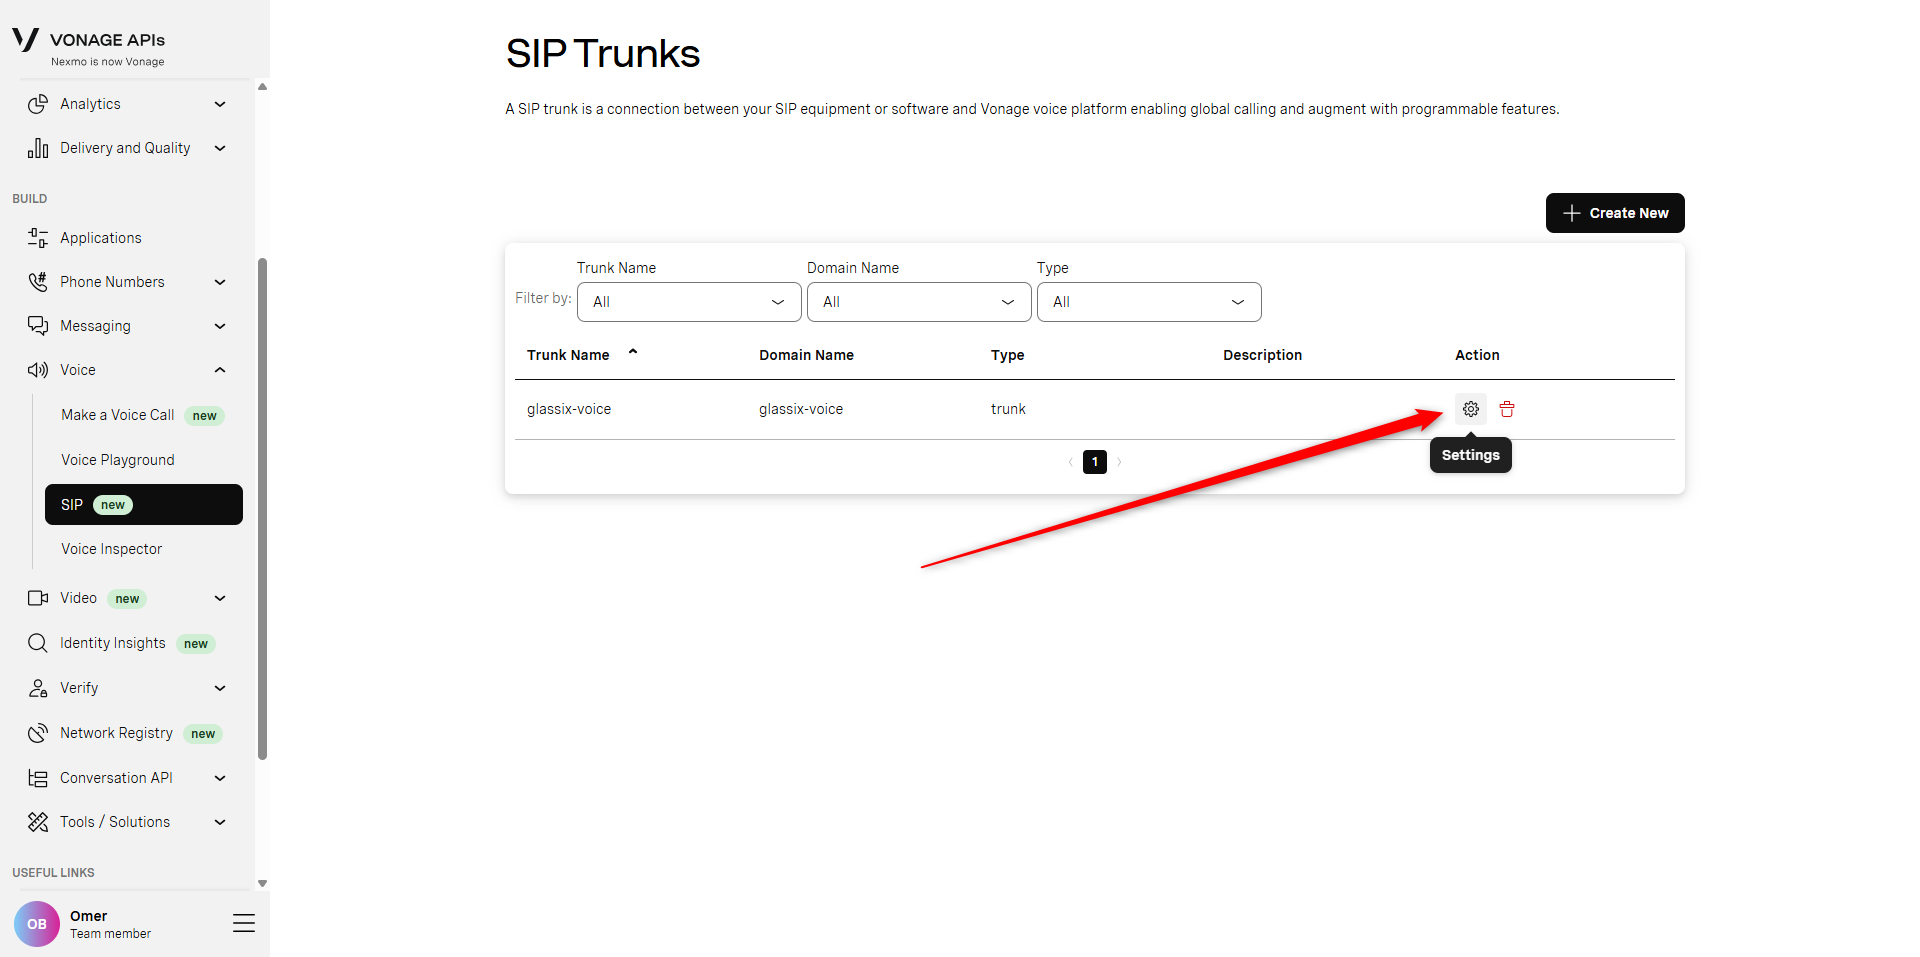
You should now see your new SIP trunk. Select Add Authentication:
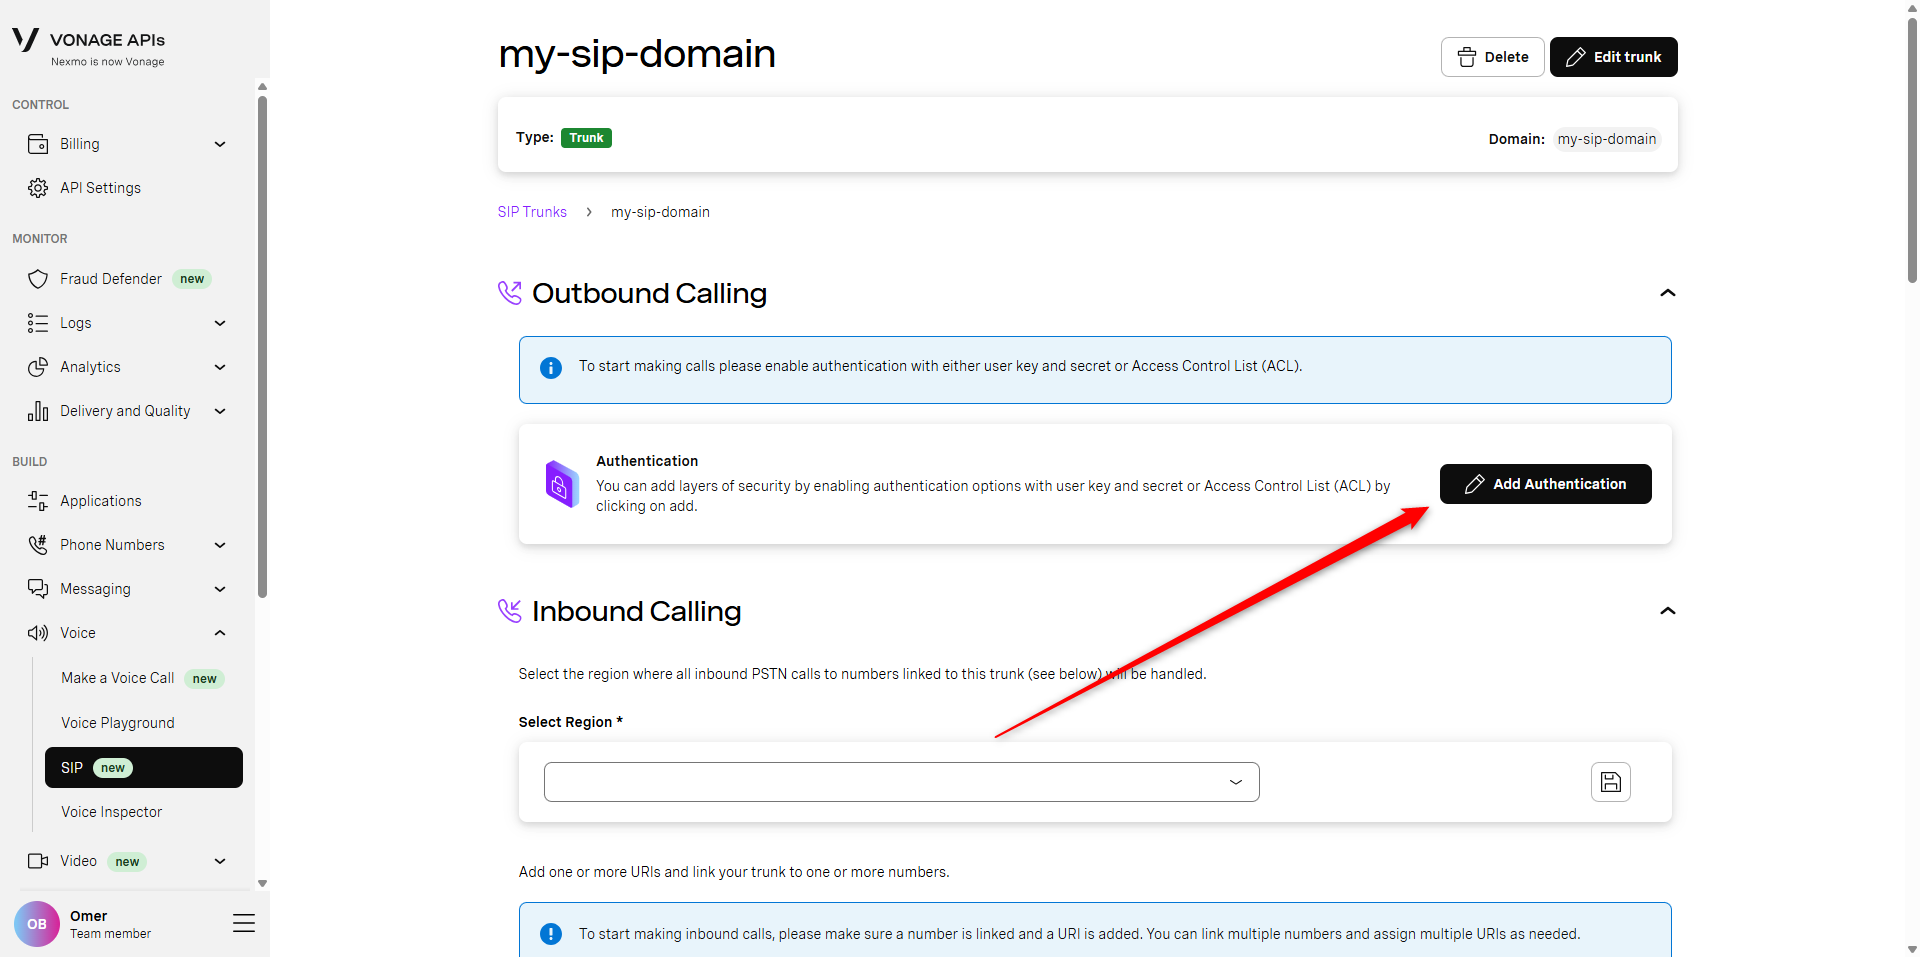
-
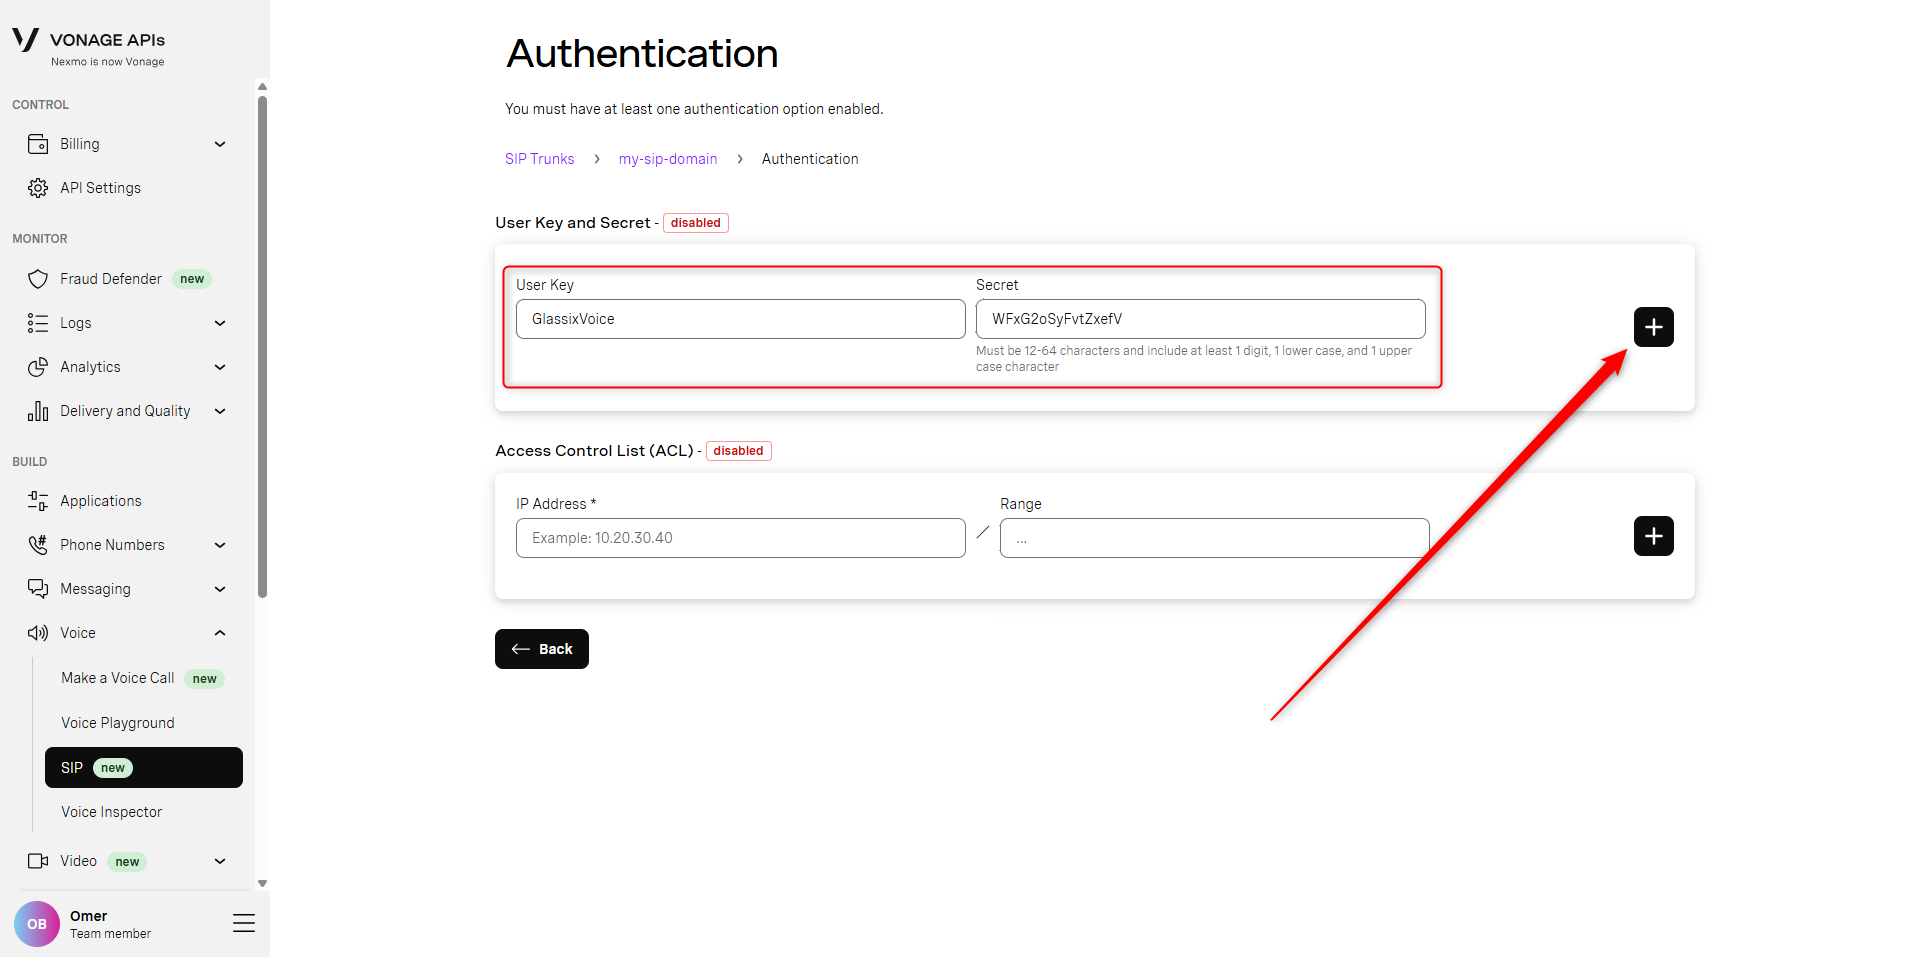
Under User Key and Secret, choose a username (User Key) and password (Secret), then click the [+] button. Save the values you choose here for later:
-
Click the ← Back button:
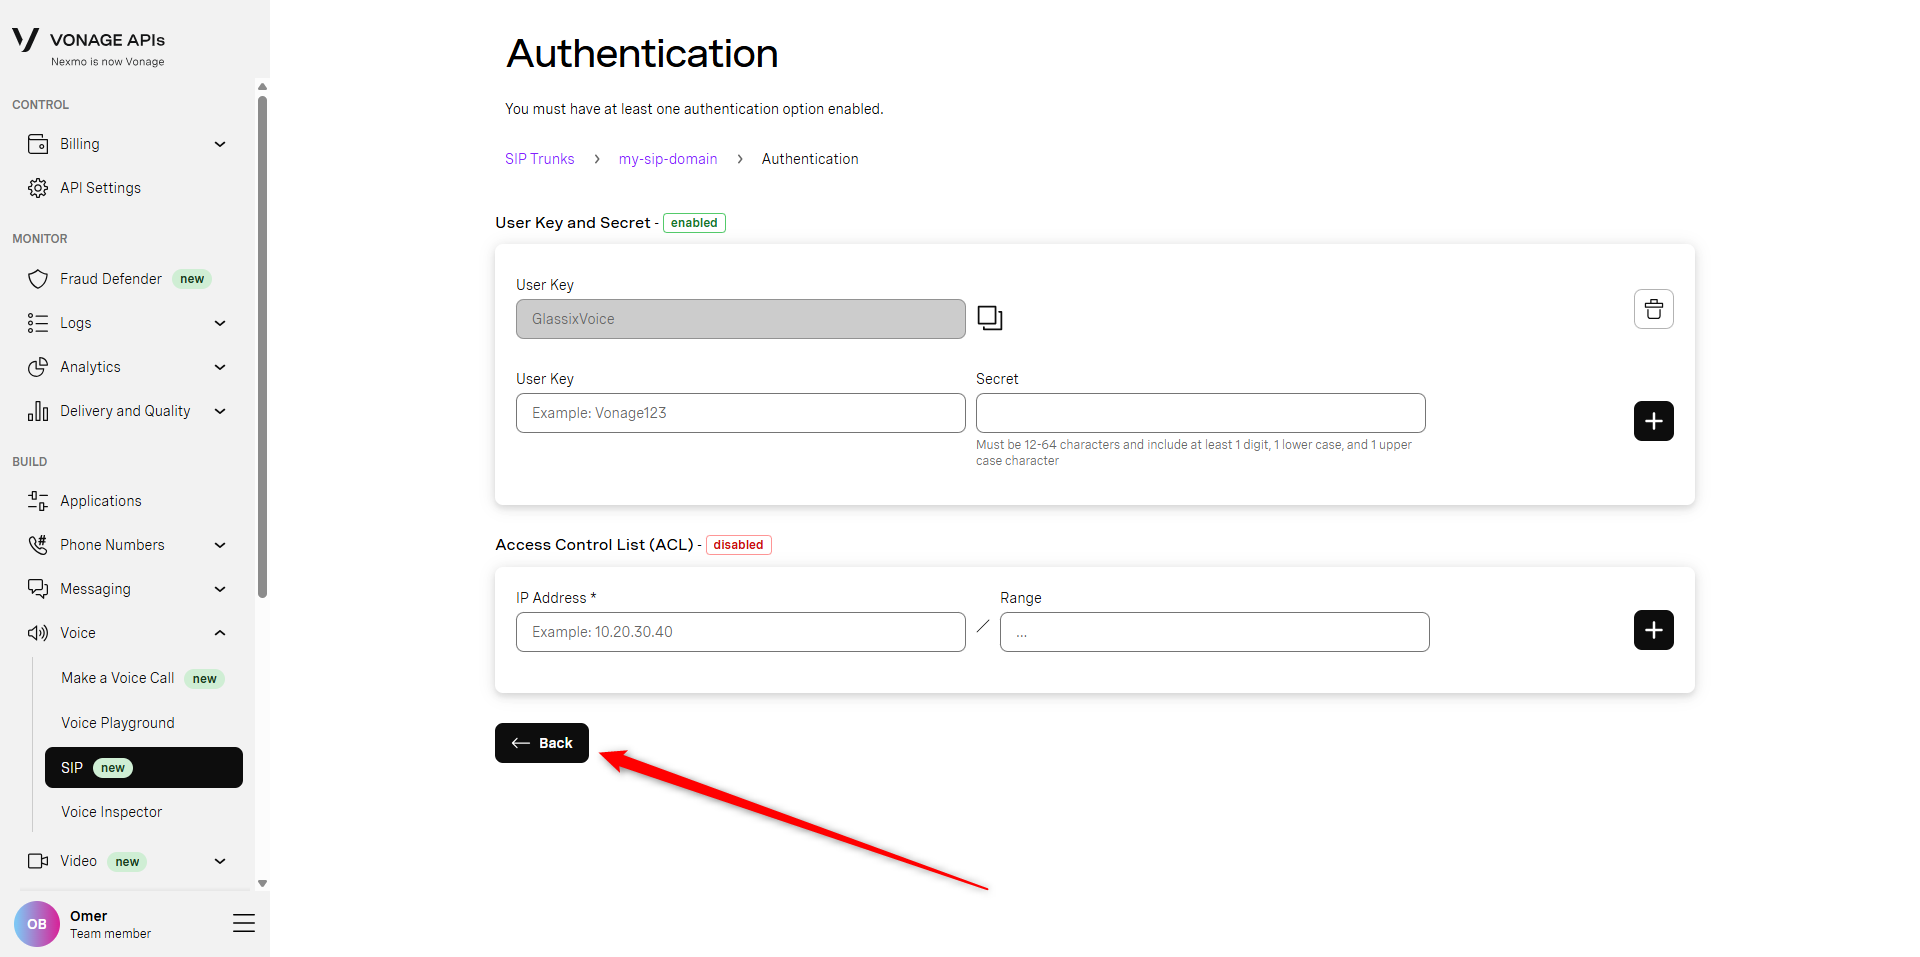
-
You should now see that your SIP trunk is ready to send outbound calls. In the green box, you'll see your termination URIs. Copy these and save them along with your domain, username and password which you saved earlier:
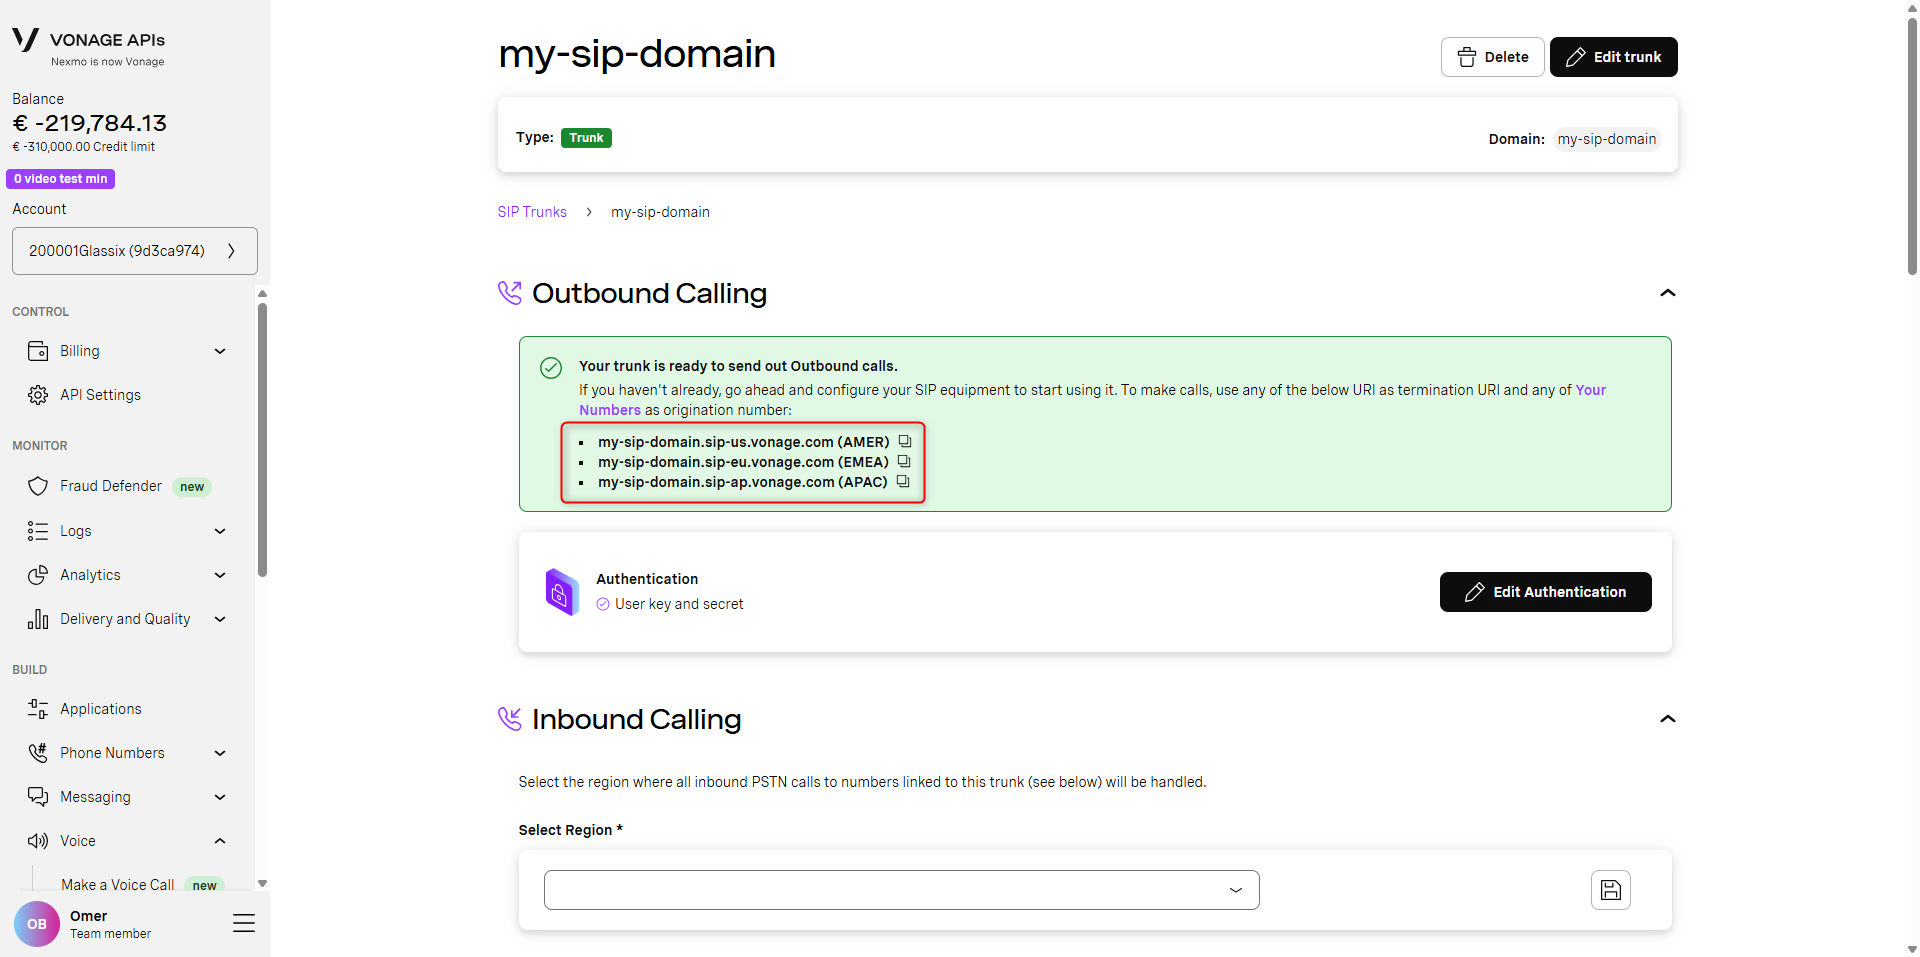
-
Continue with Step Two: Create SIP Credentials in Glassix
Twilio: Create a SIP Trunk
In this first step, we will need to create a SIP trunk in order to get a termination URI. This value is configured in Twilio after creating your trunk.
Because Twilio requires you to configure IP access controls in order to save your termination URI, we will also be setting up IP whitelisting for SIP transfers at this stage.
-
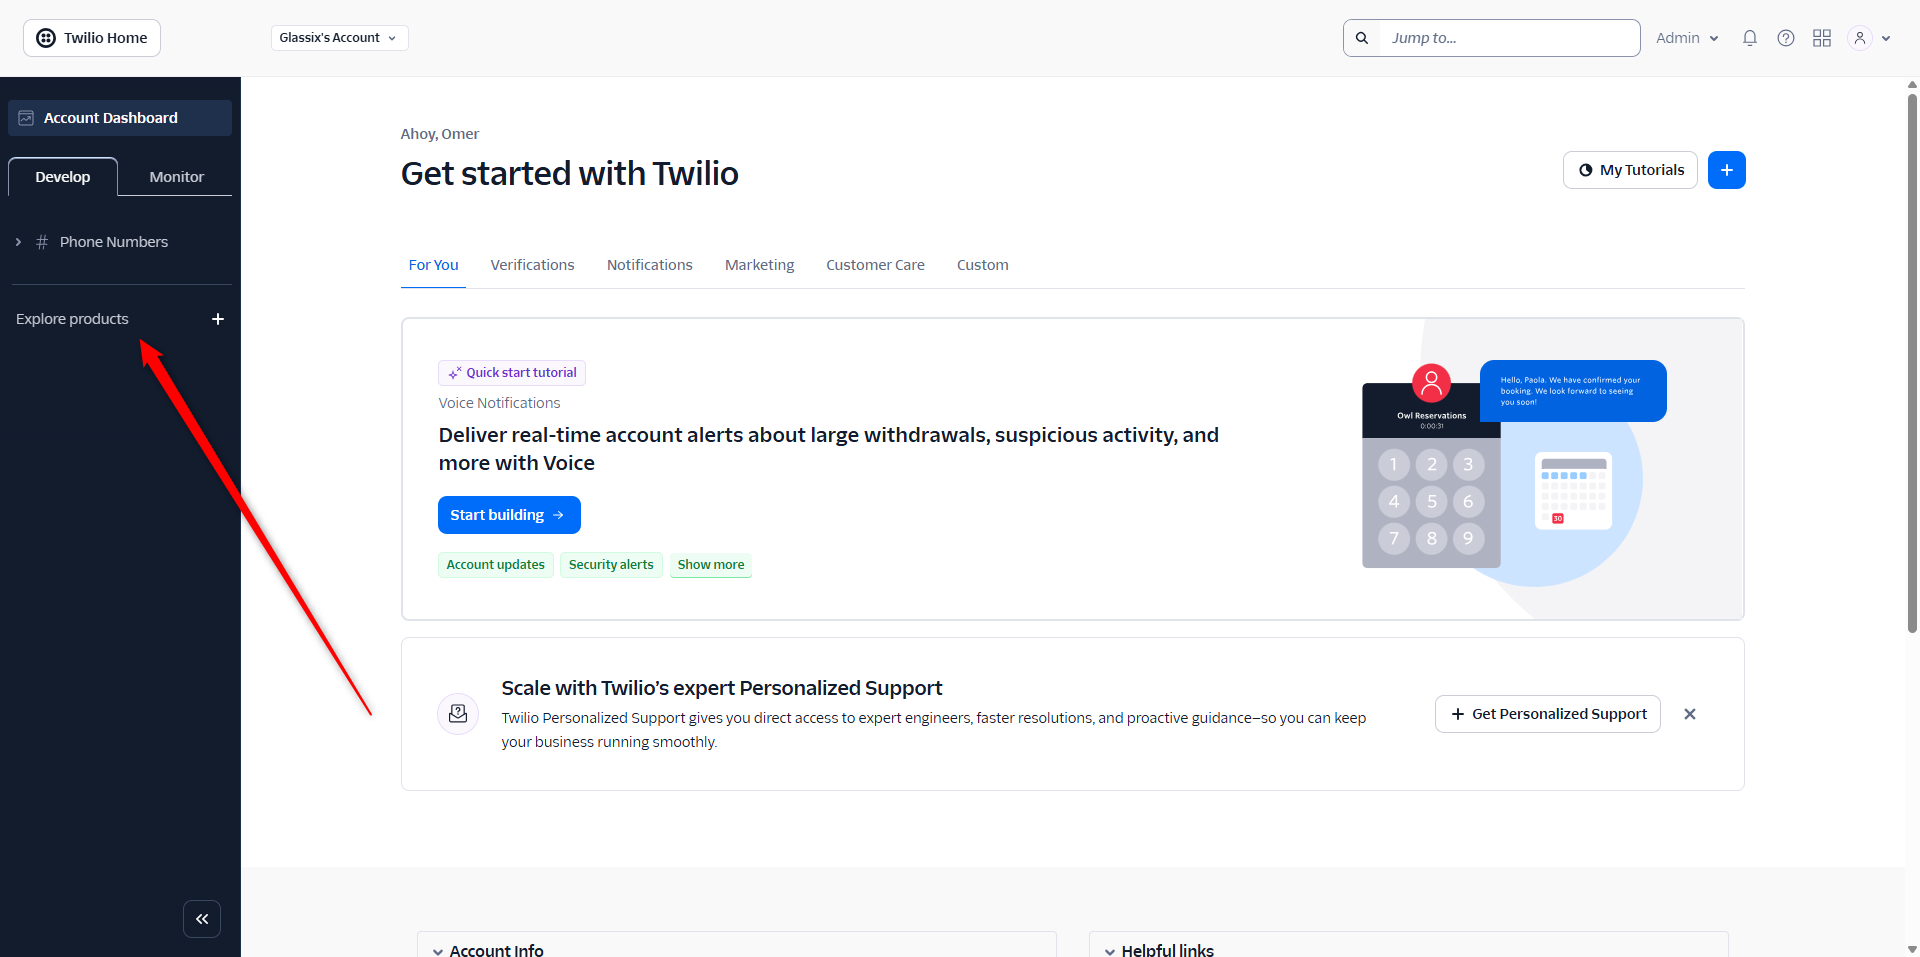
In your Twilio Console, select Explore Products +:
-
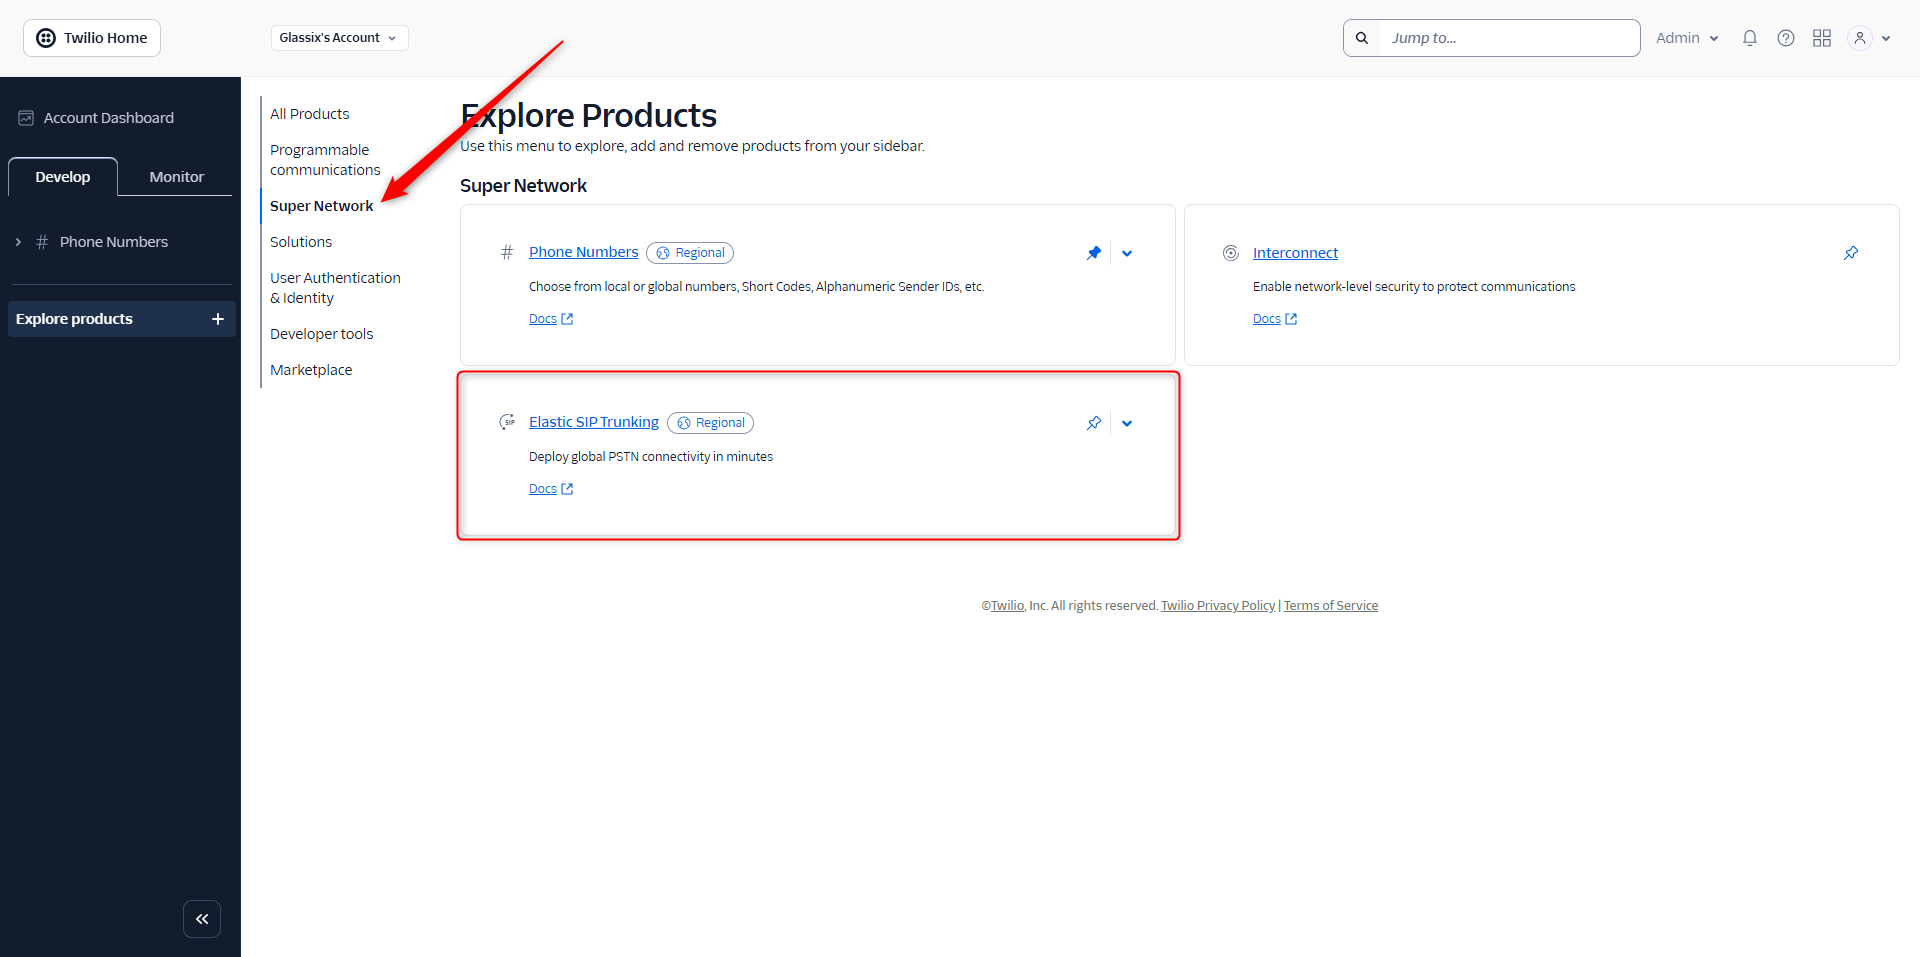
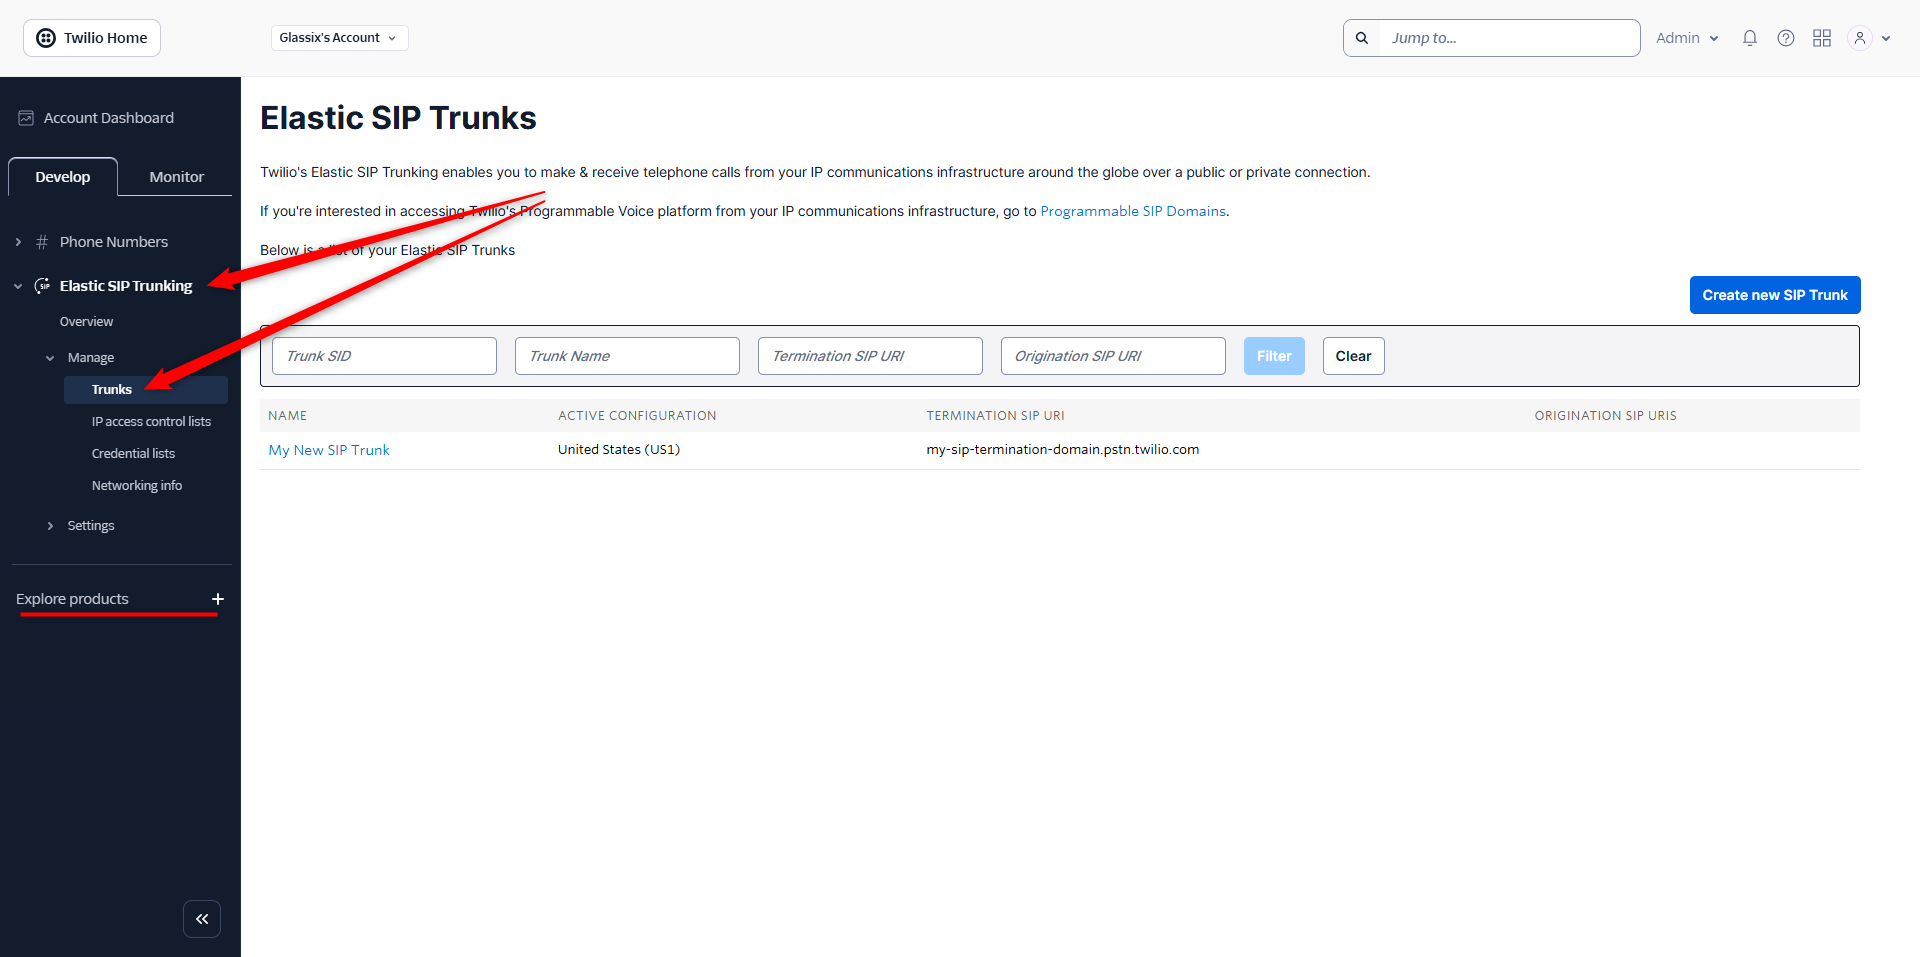
Select Super Network, then select Elastic SIP Trunking:
-
On your Elastic SIP Trunking Dashboard, under Trunks, click the (+) button to add a new trunk:
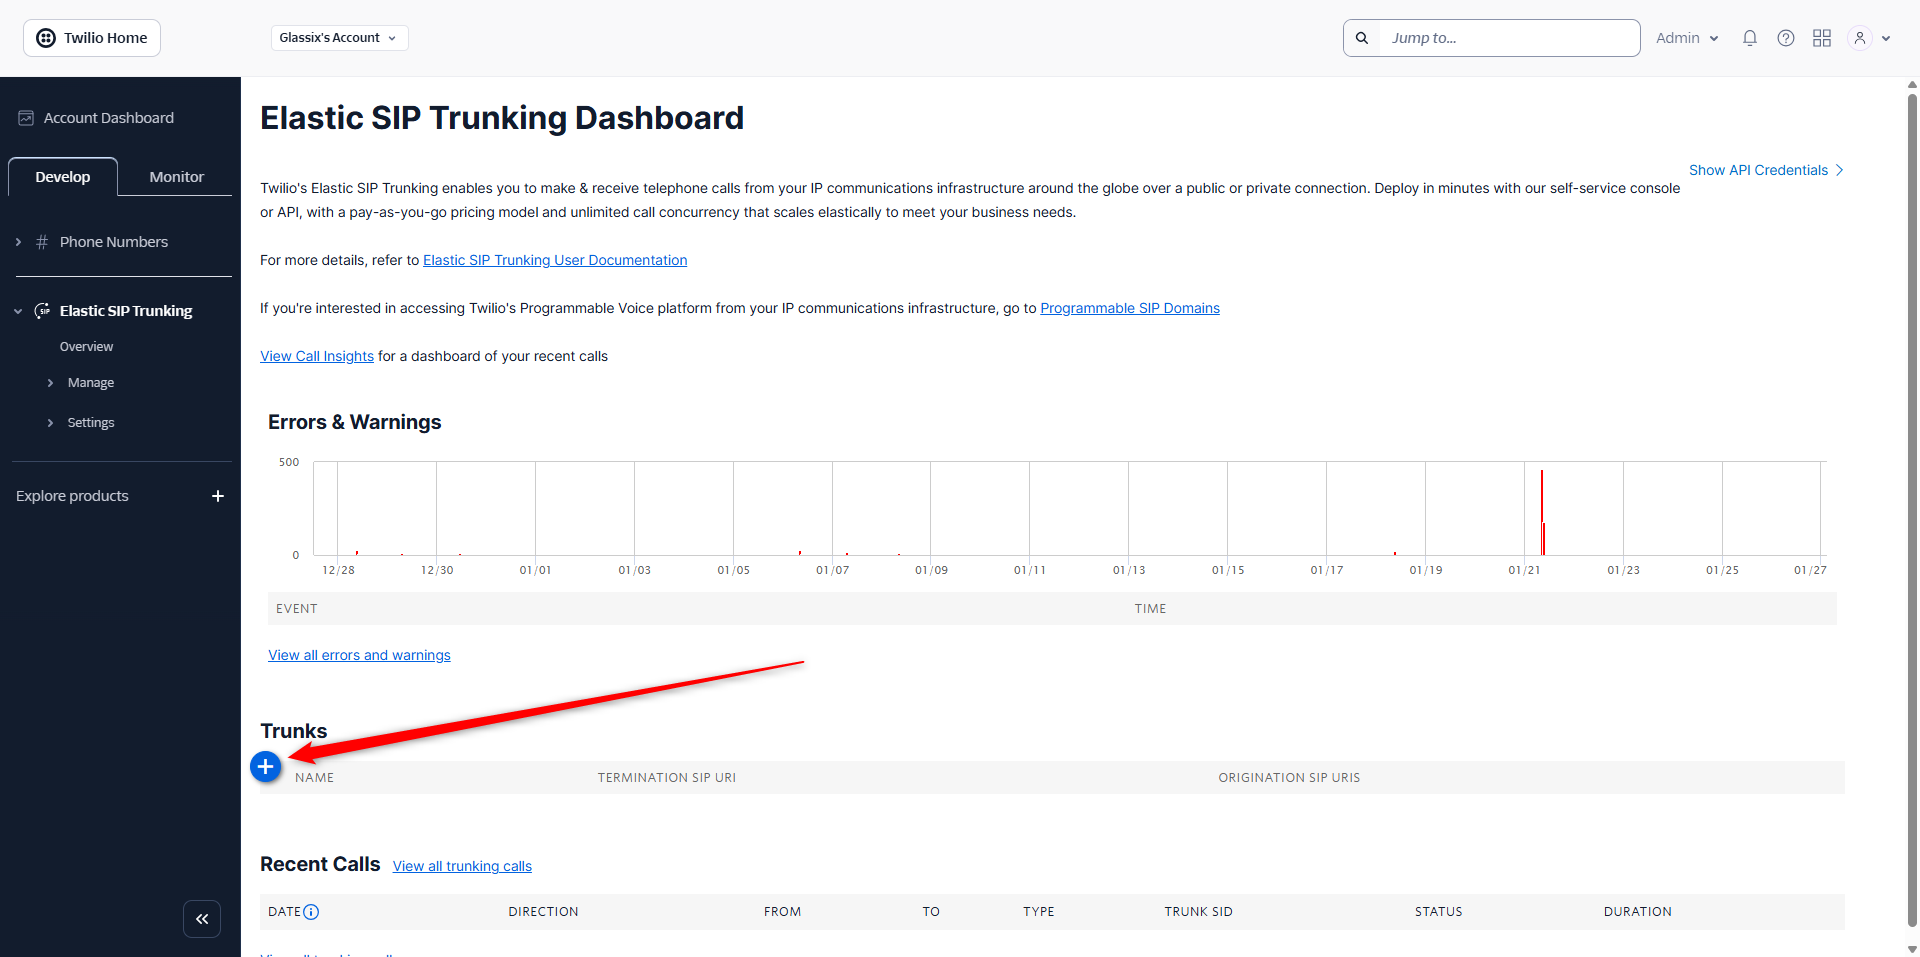
-
Add in a friendly name for your new SIP trunk, then click Create:
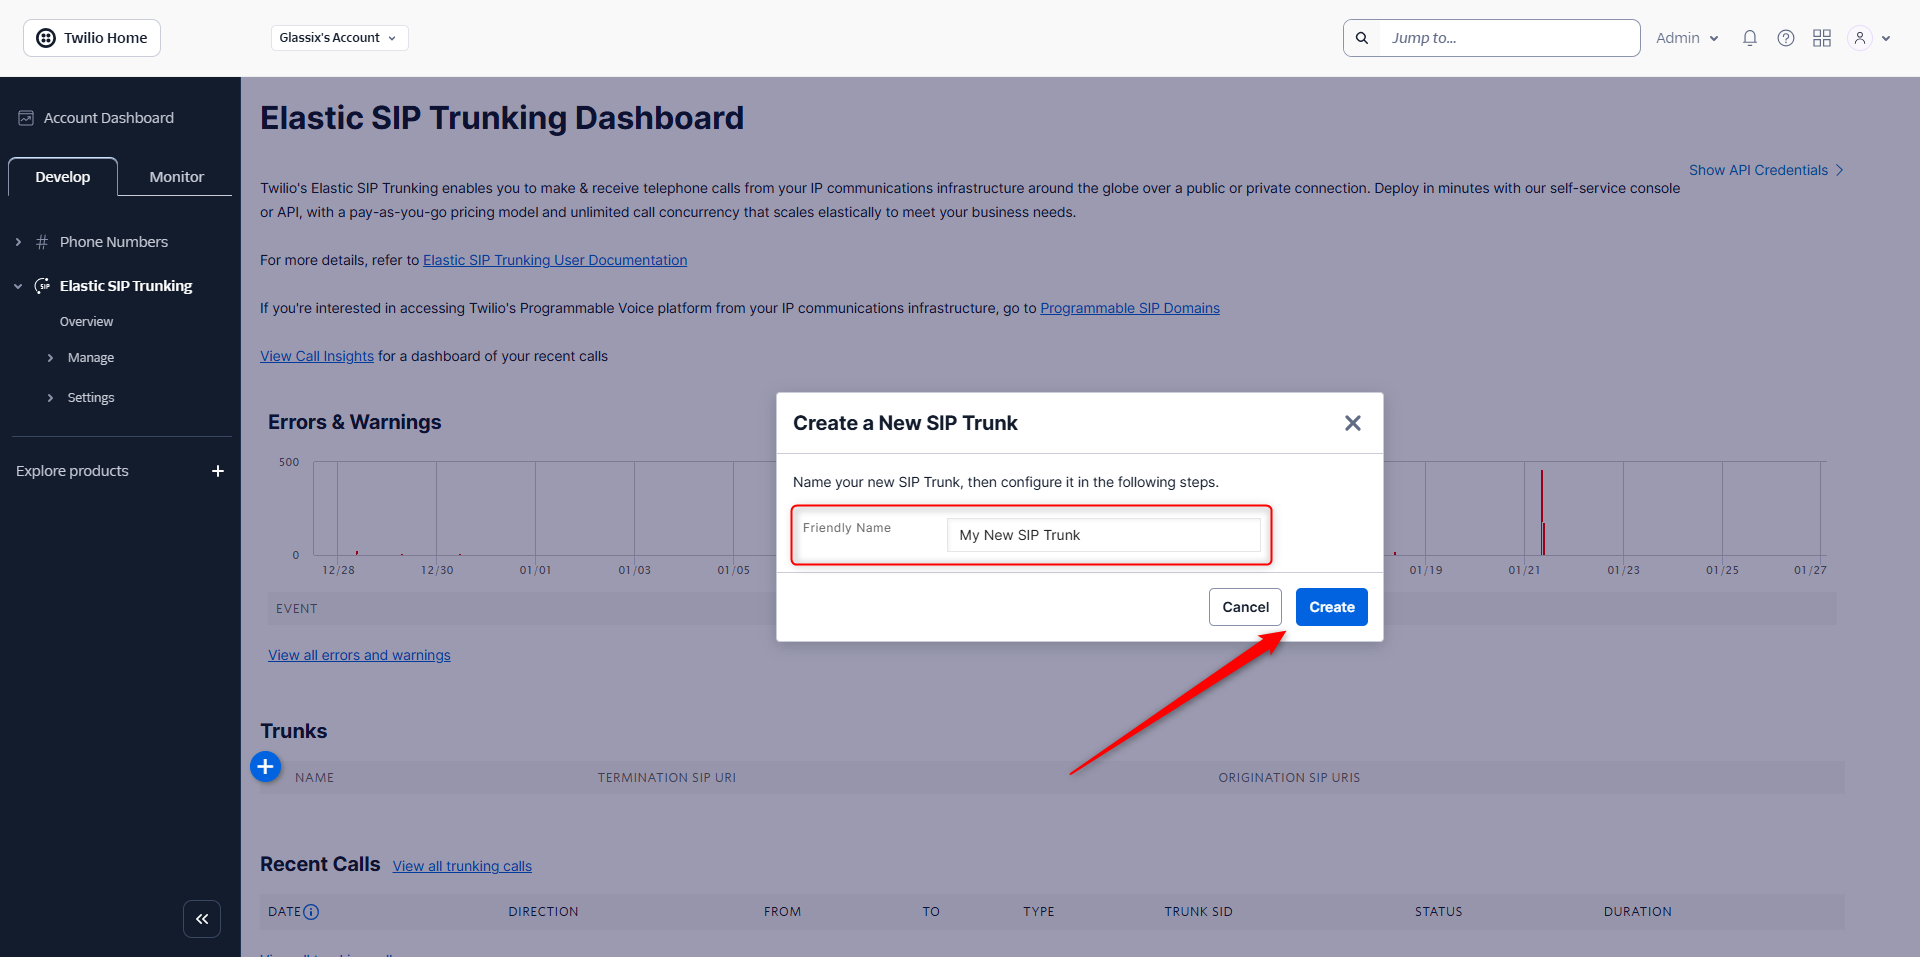
-
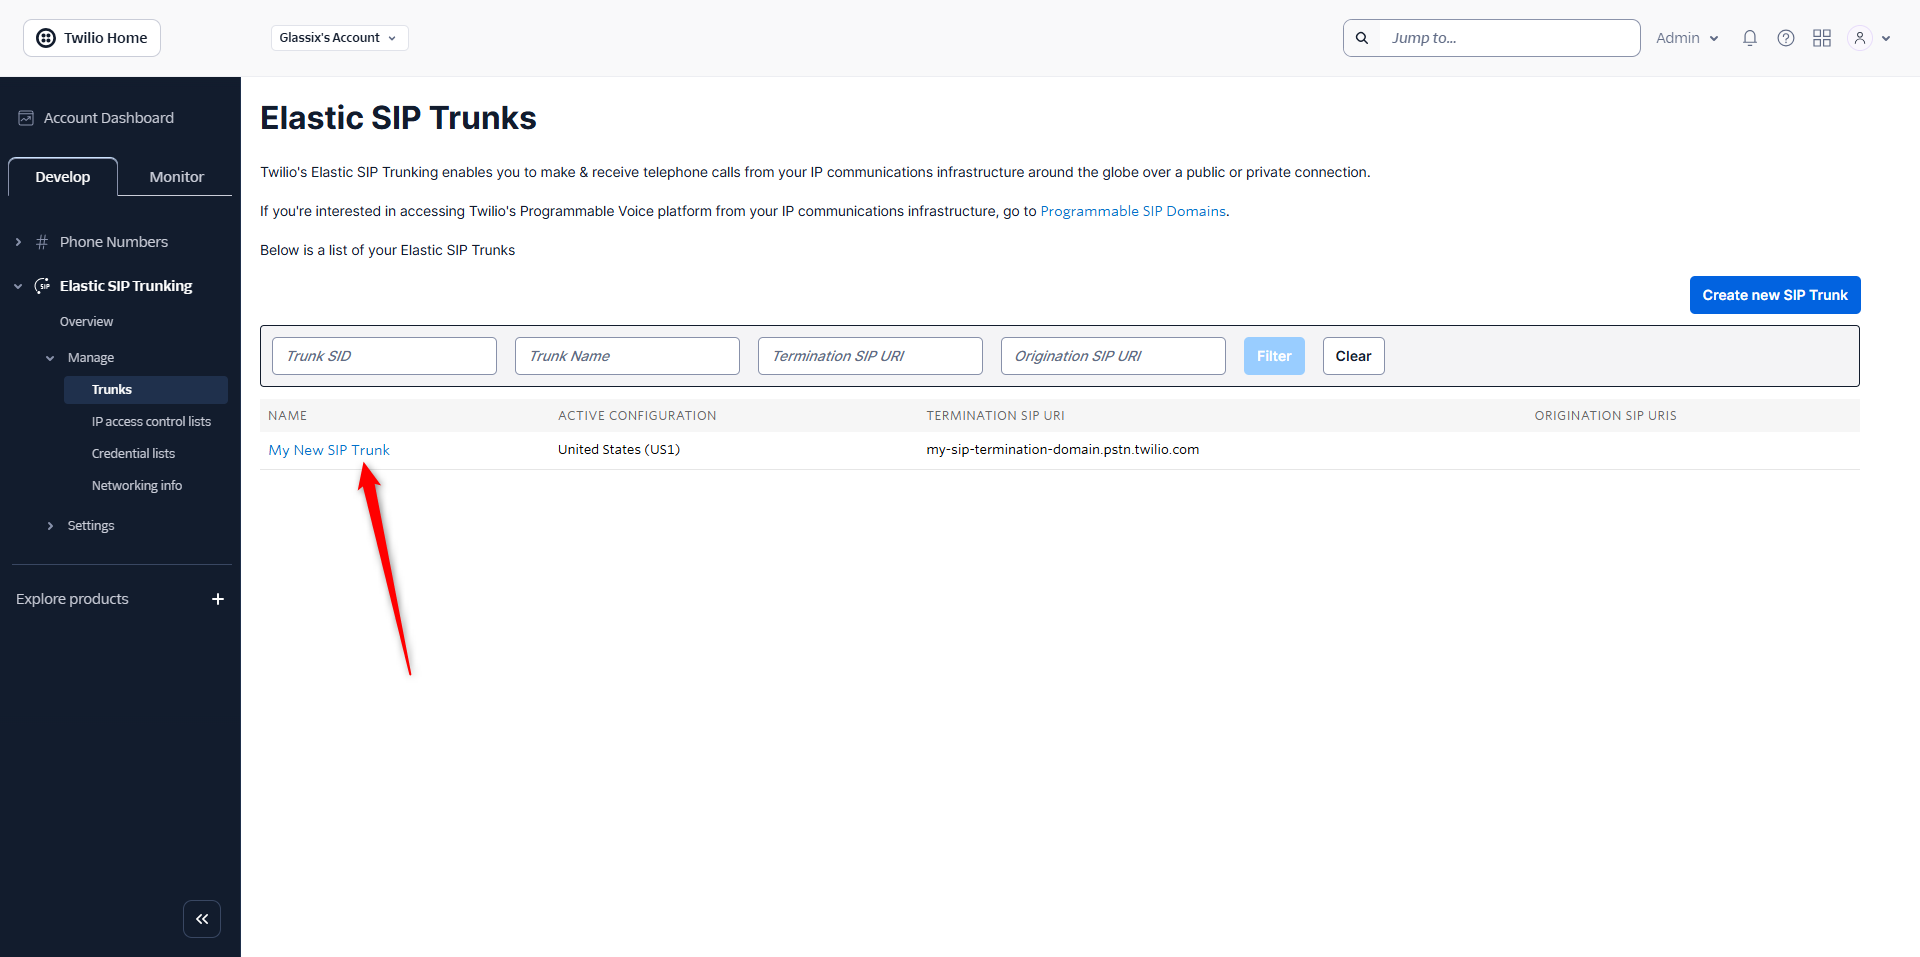
You should now see your new SIP trunk. In the left-hand menu, select Termination:
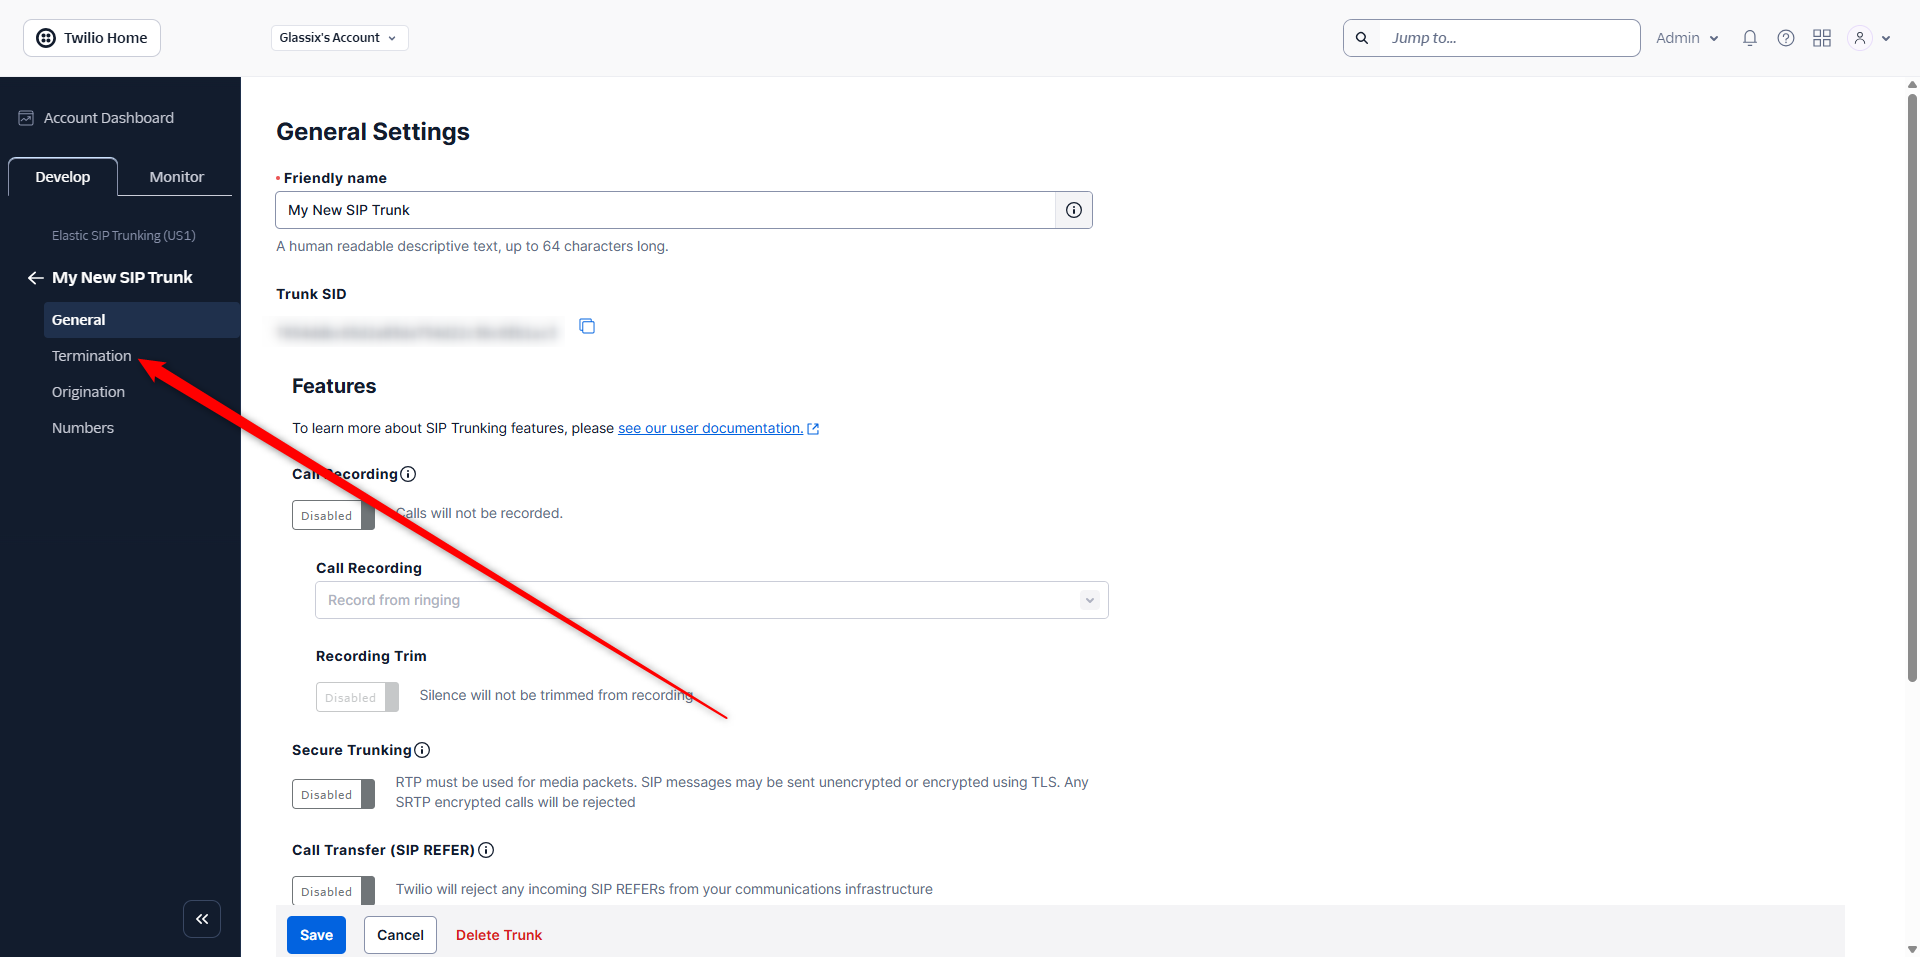
-
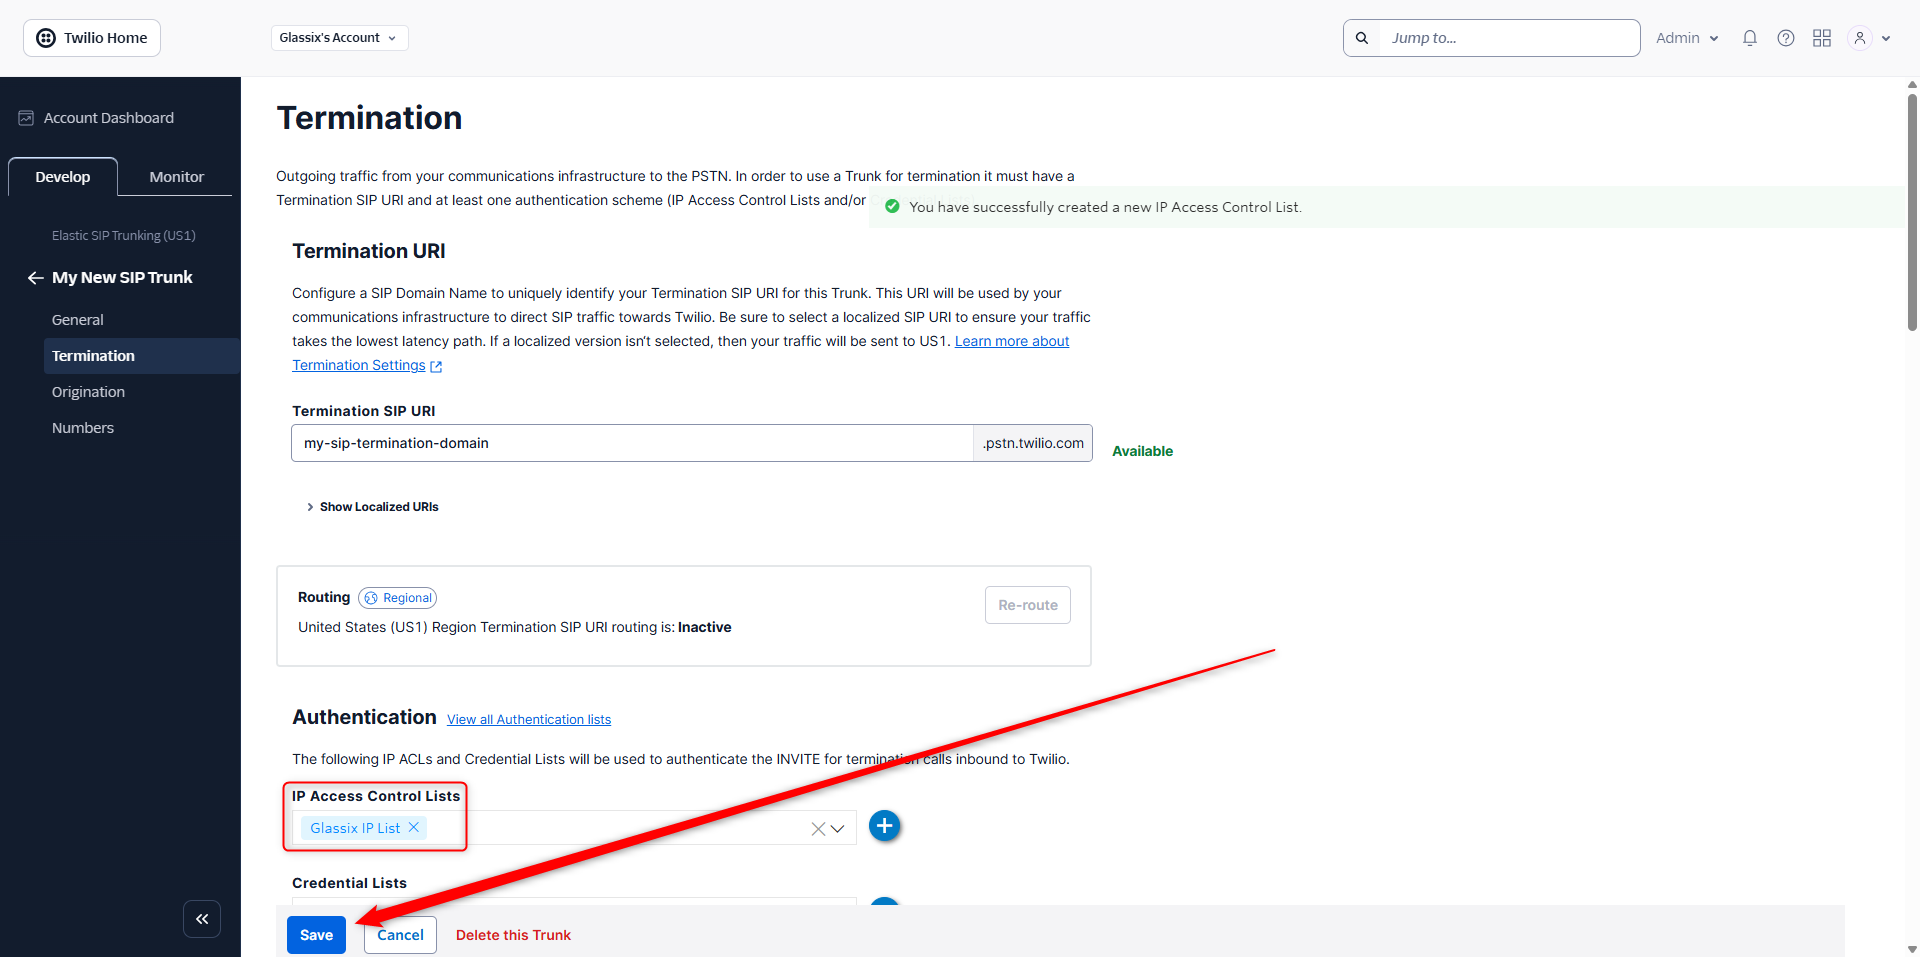
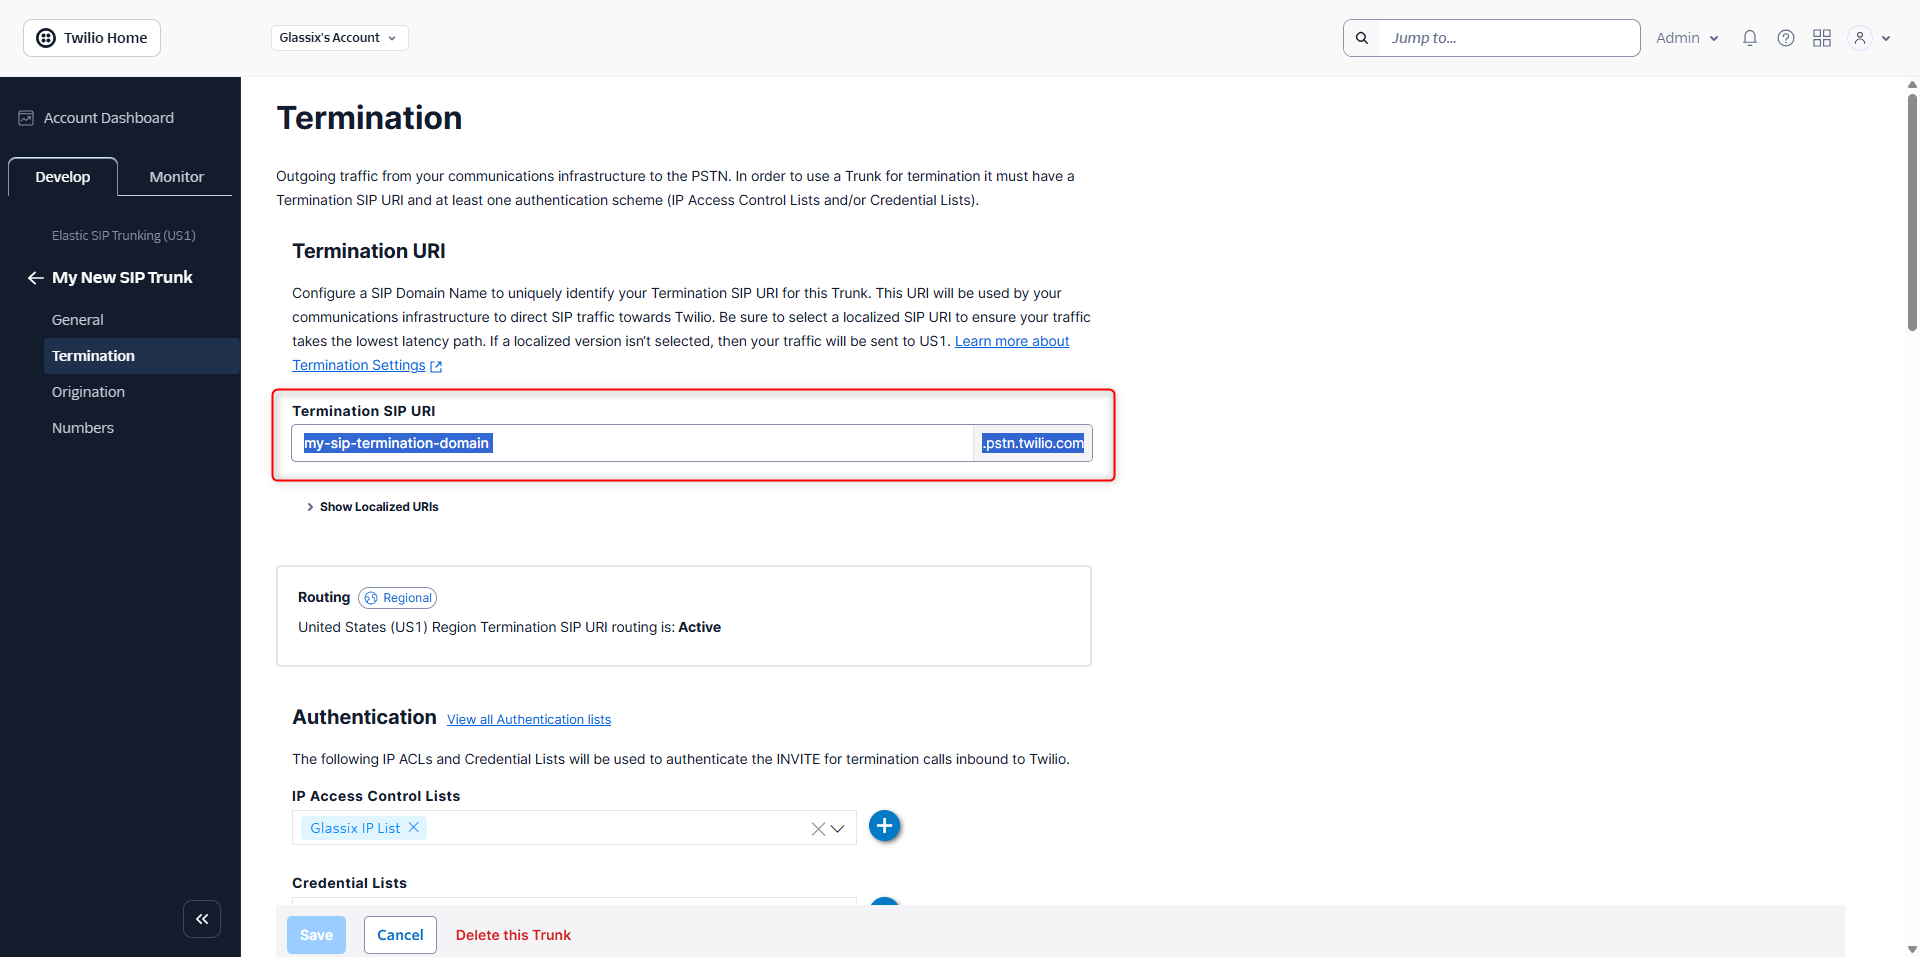
Under Termination URI, choose a domain name and enter it in Termination SIP URI. You may choose any domain name, Twilio will confirm for you whether the domain name is available:
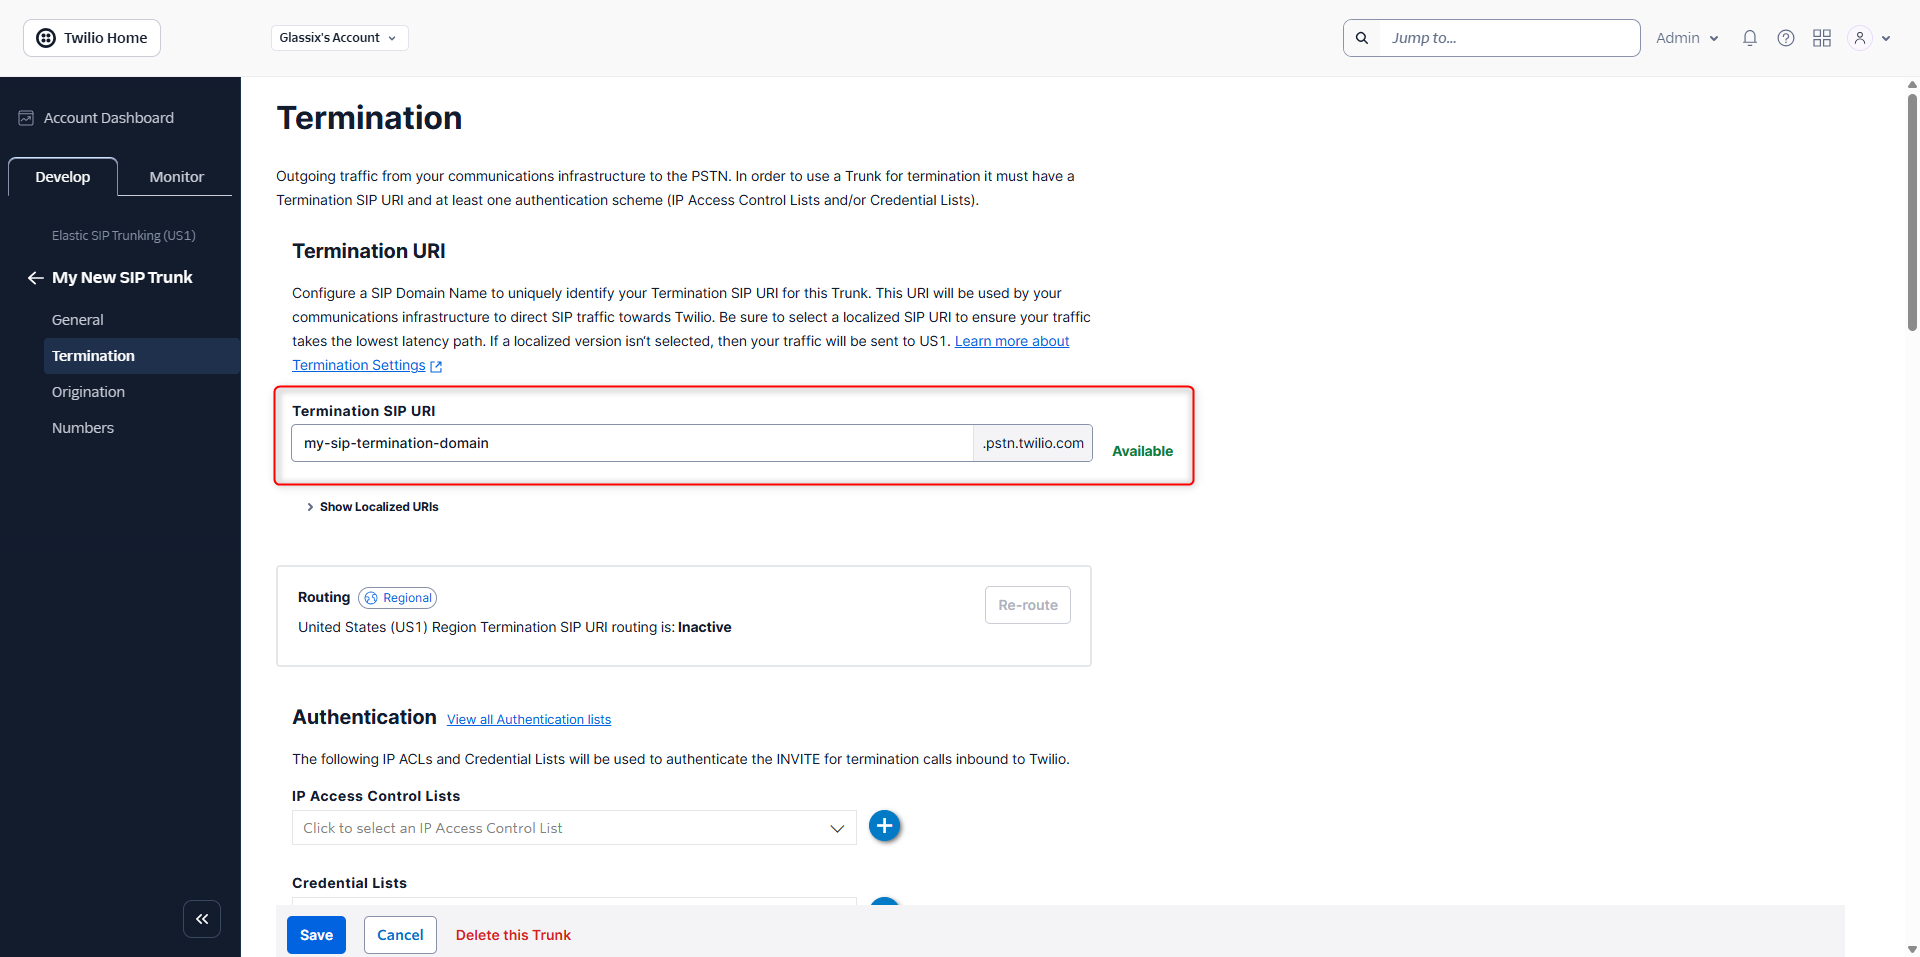
-
Under IP Access Control Lists, click the (+) button to add a new access control list:
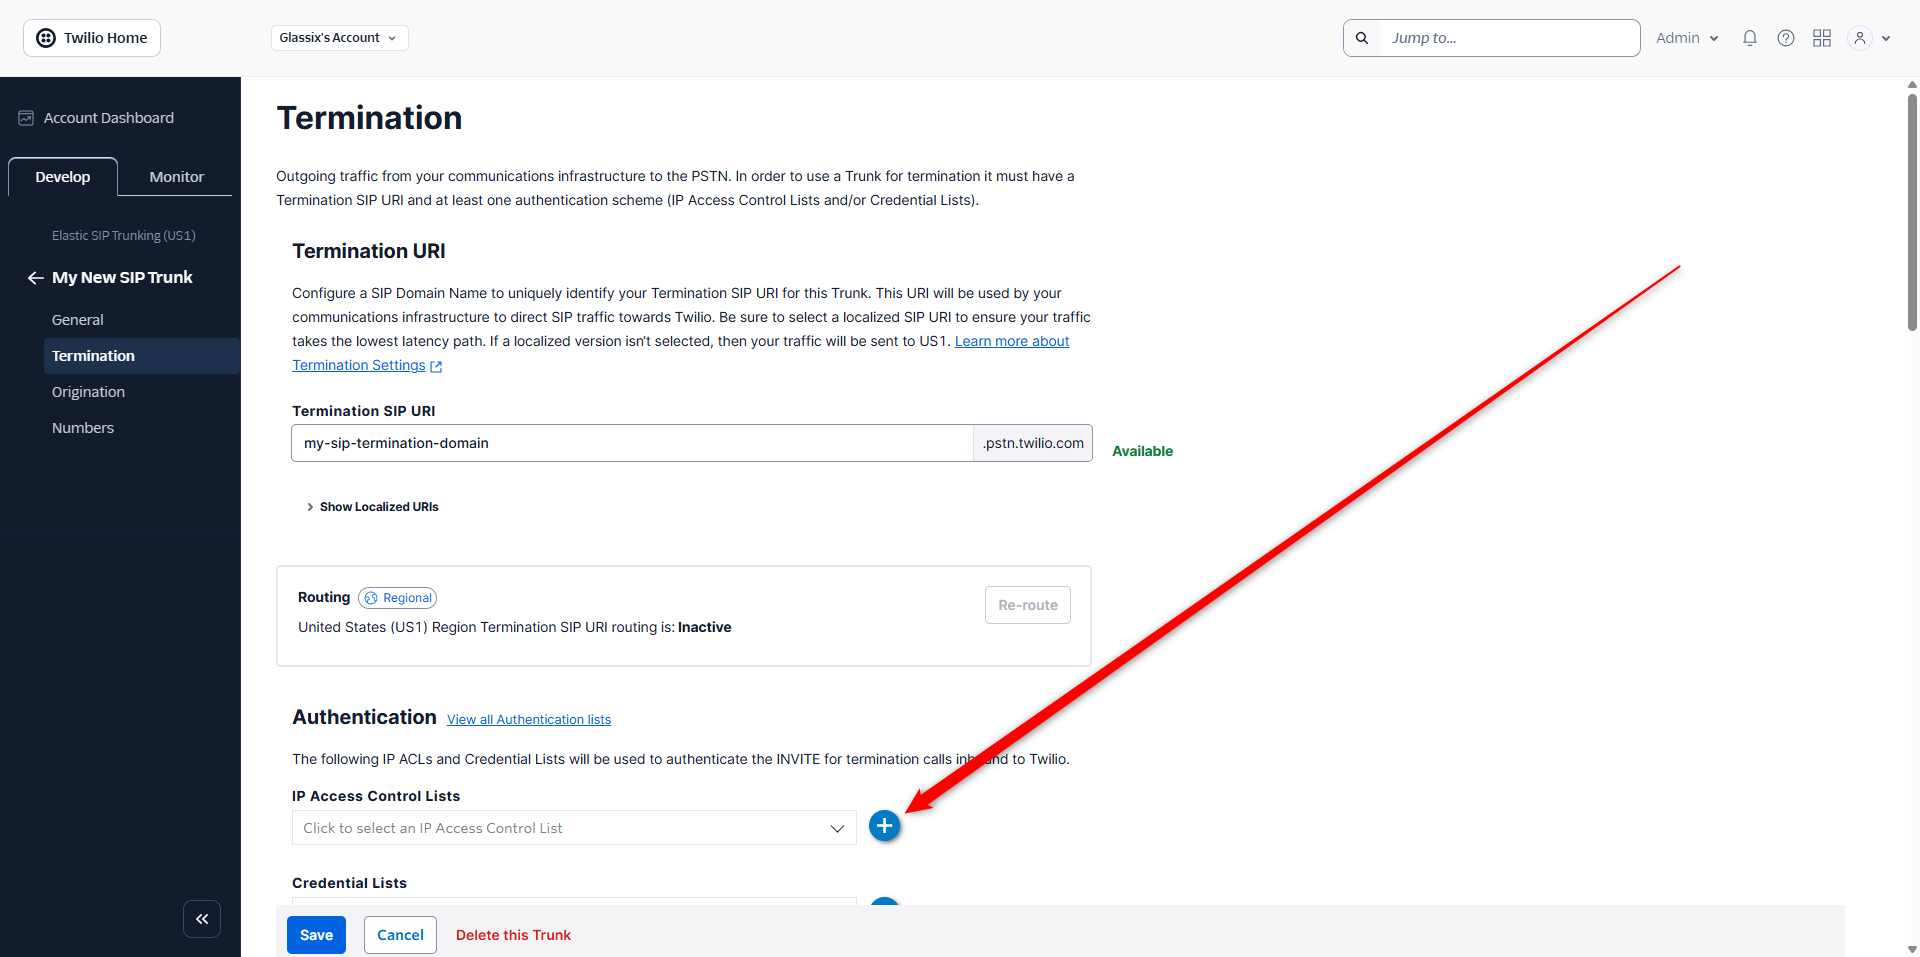
-
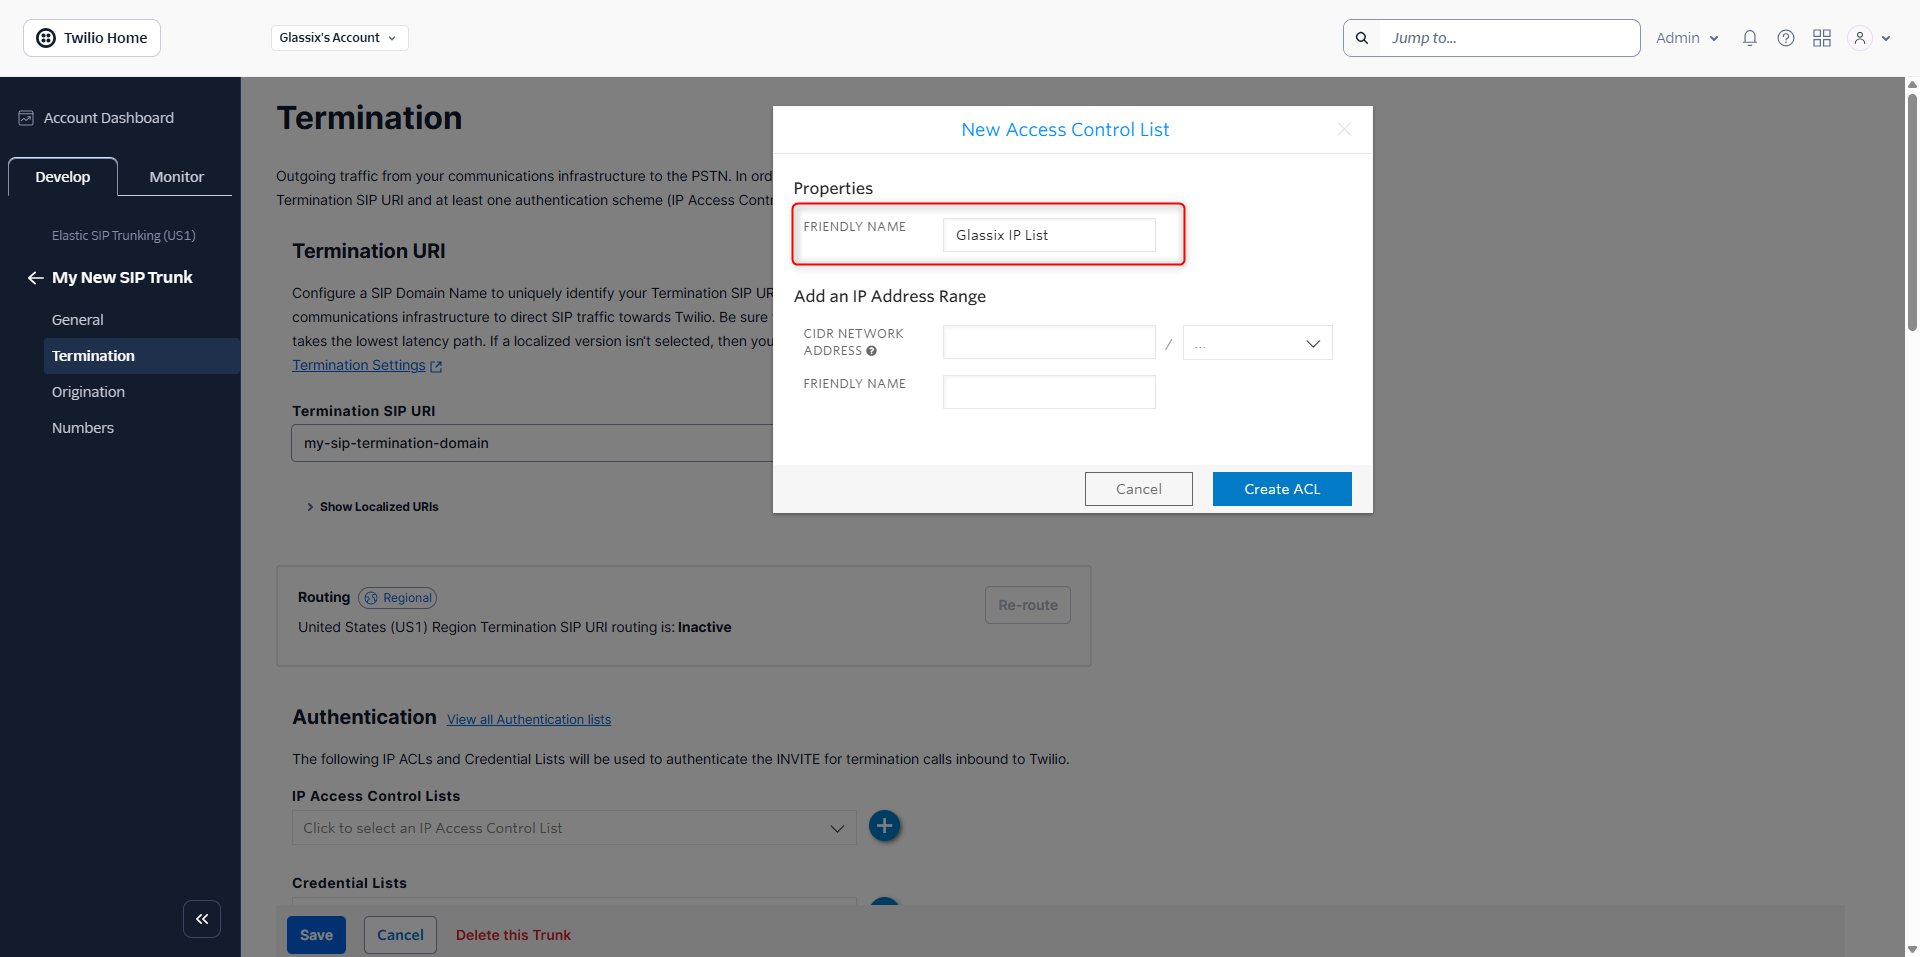
Give your new access control list a relevant name. You'll use this list again whenever you want to connect another trunk to Glassix, so we recommend naming it appropriately such that you'll be able to easily identify this list in the future:
-
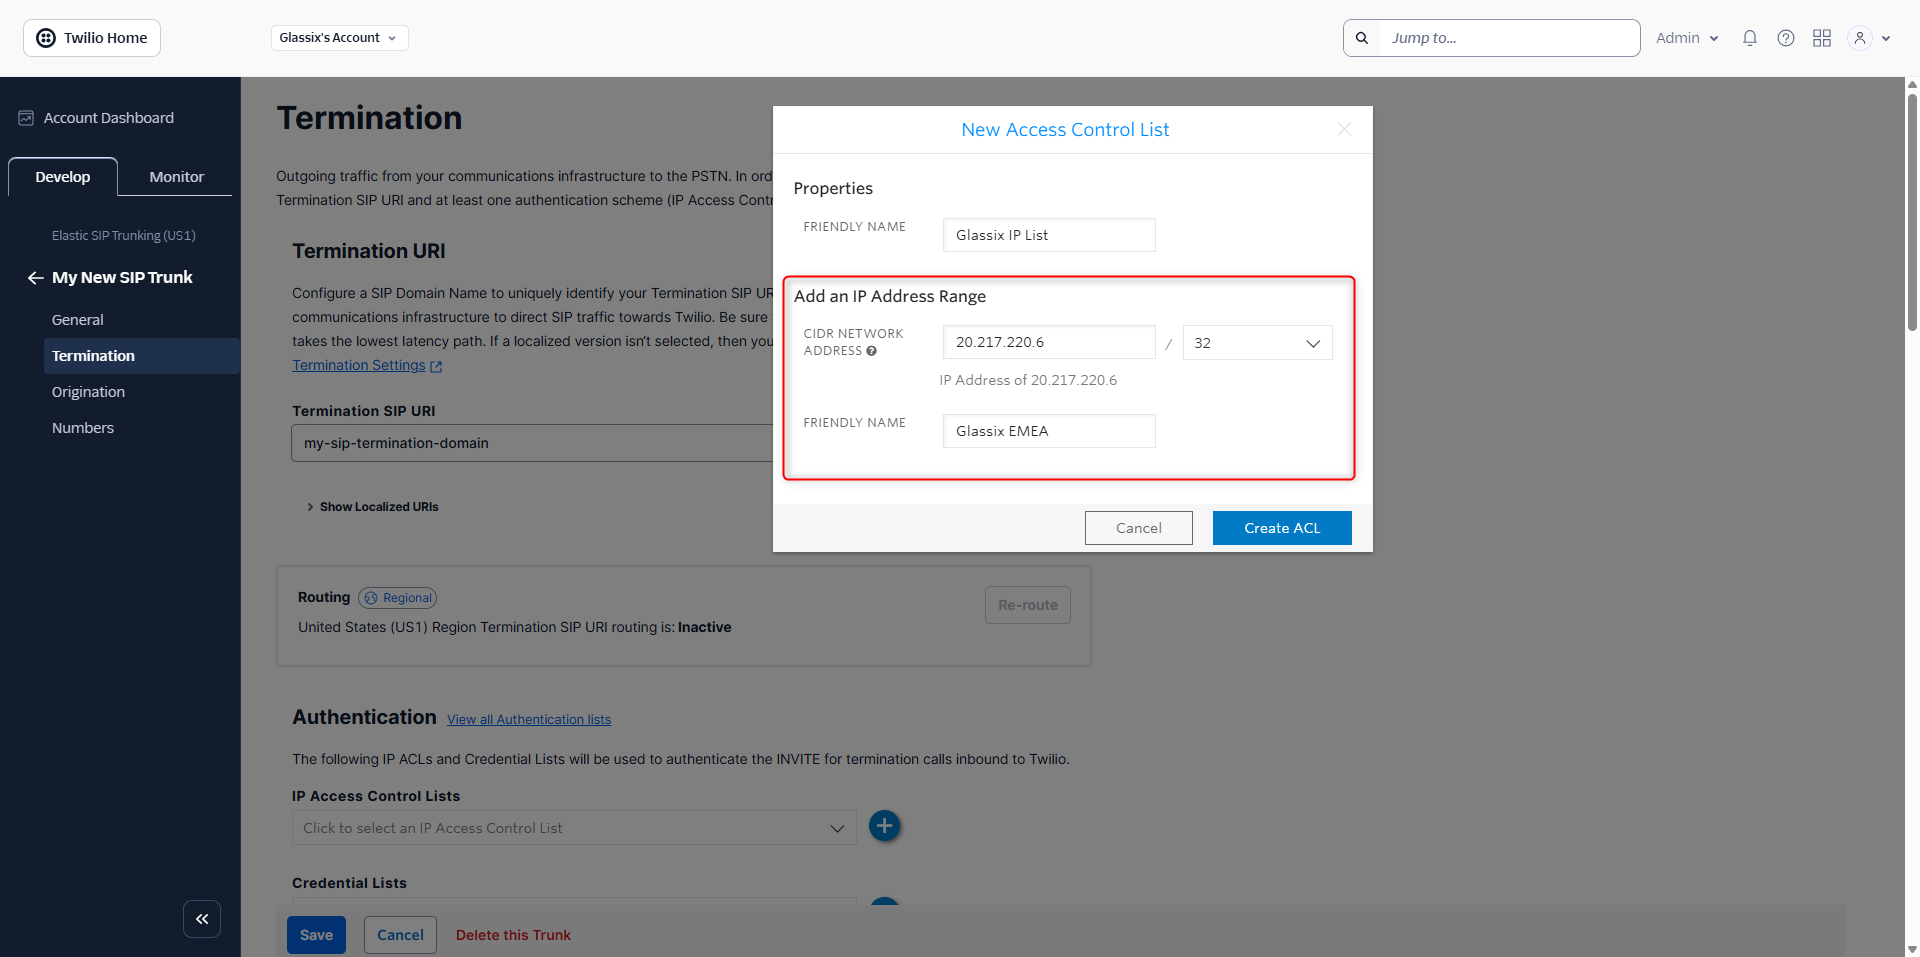
There is currently only one IP address to whitelist for Glassix, but there may be more in the future as we open up new regions. For now, add the following IP address: 20.217.220.6/32
We recommend naming this IP address Glassix EMEA (the region for this IP address):
-
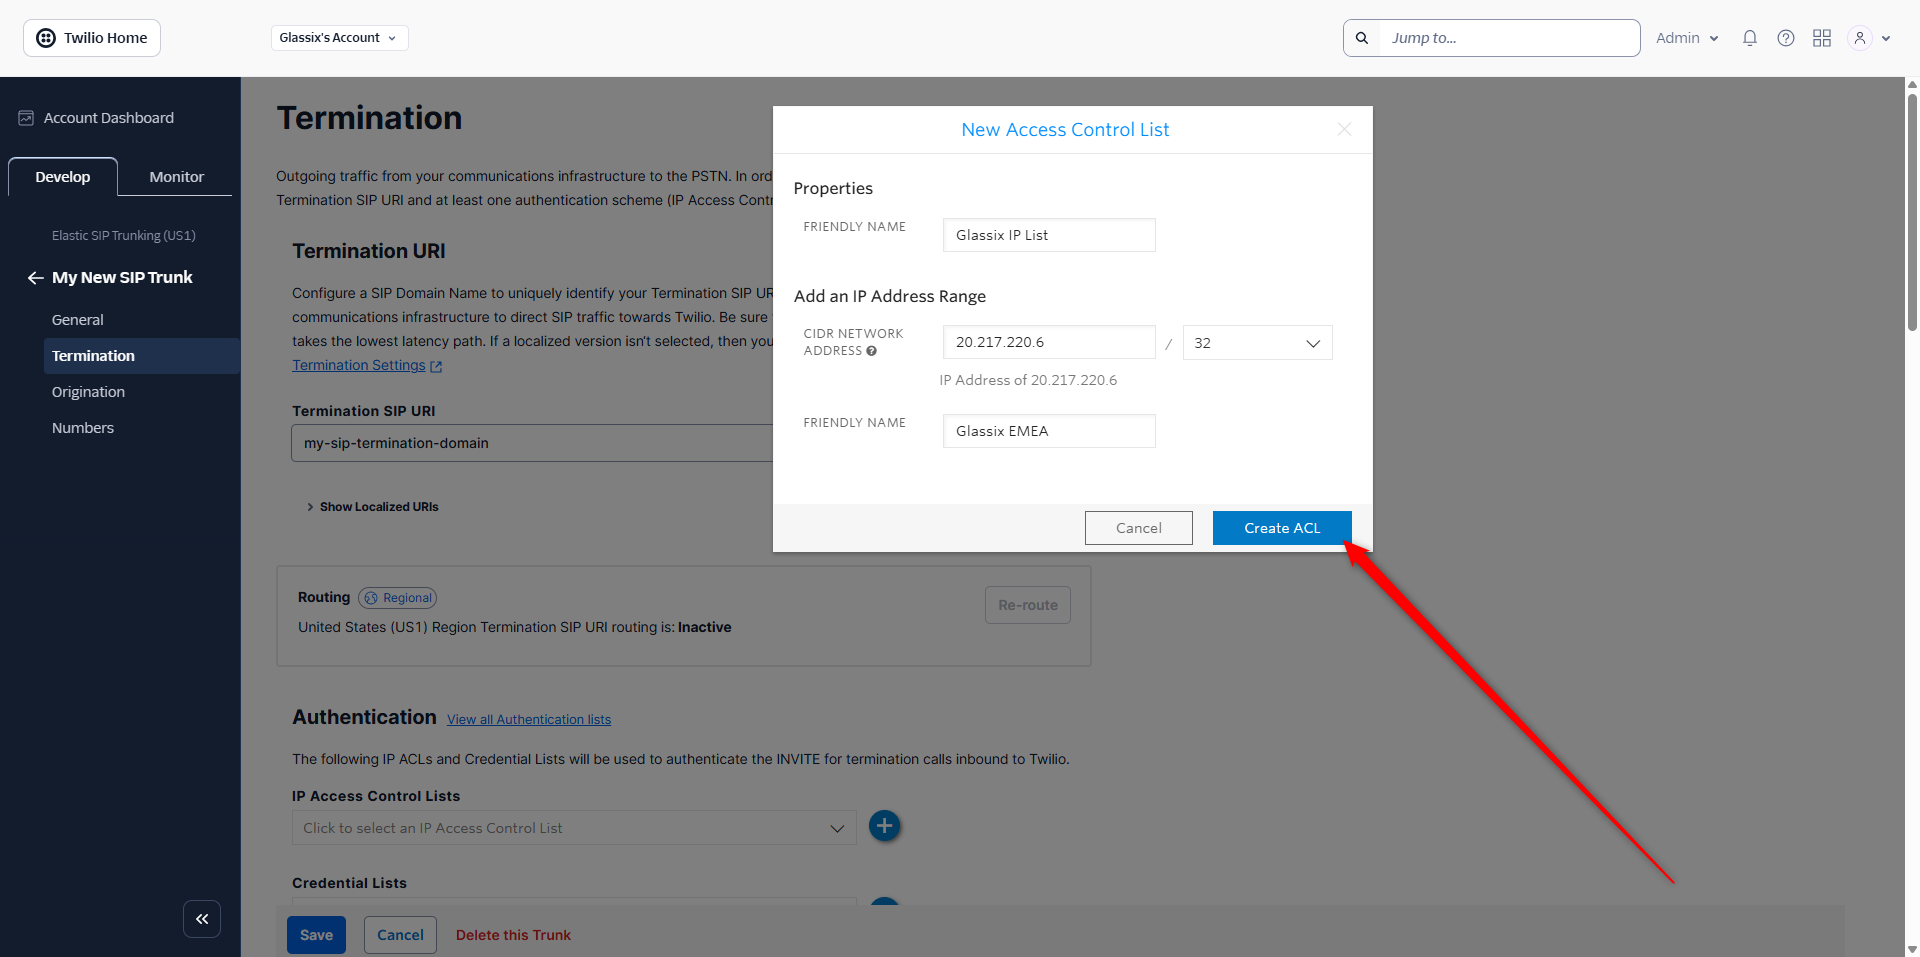
Once you have confirmed the IP address is correct, click Create ACL:
-
Make sure you see your new IP list under IP Access Control Lists, then click Save:
-
Copy your Termination SIP URI and save it somewhere, then continue with Step Two: Create SIP Credentials in Glassix:
Step Two: Create SIP Credentials in Glassix
Note:This step requires an existing SIP trunk. If you haven't set one up already, click here.
The second step in connecting a number, regardless of your SIP trunking provider, will be to create your SIP credentials in your department in Glassix.
Regardless of your provider, you will need your termination URI in order to proceed with this step. If you set up your SIP trunk with Vonage, you will also need your SIP username and password which you created earlier.
Please make sure you have these available before continuing.
To create your SIP credentials in Glassix:
-
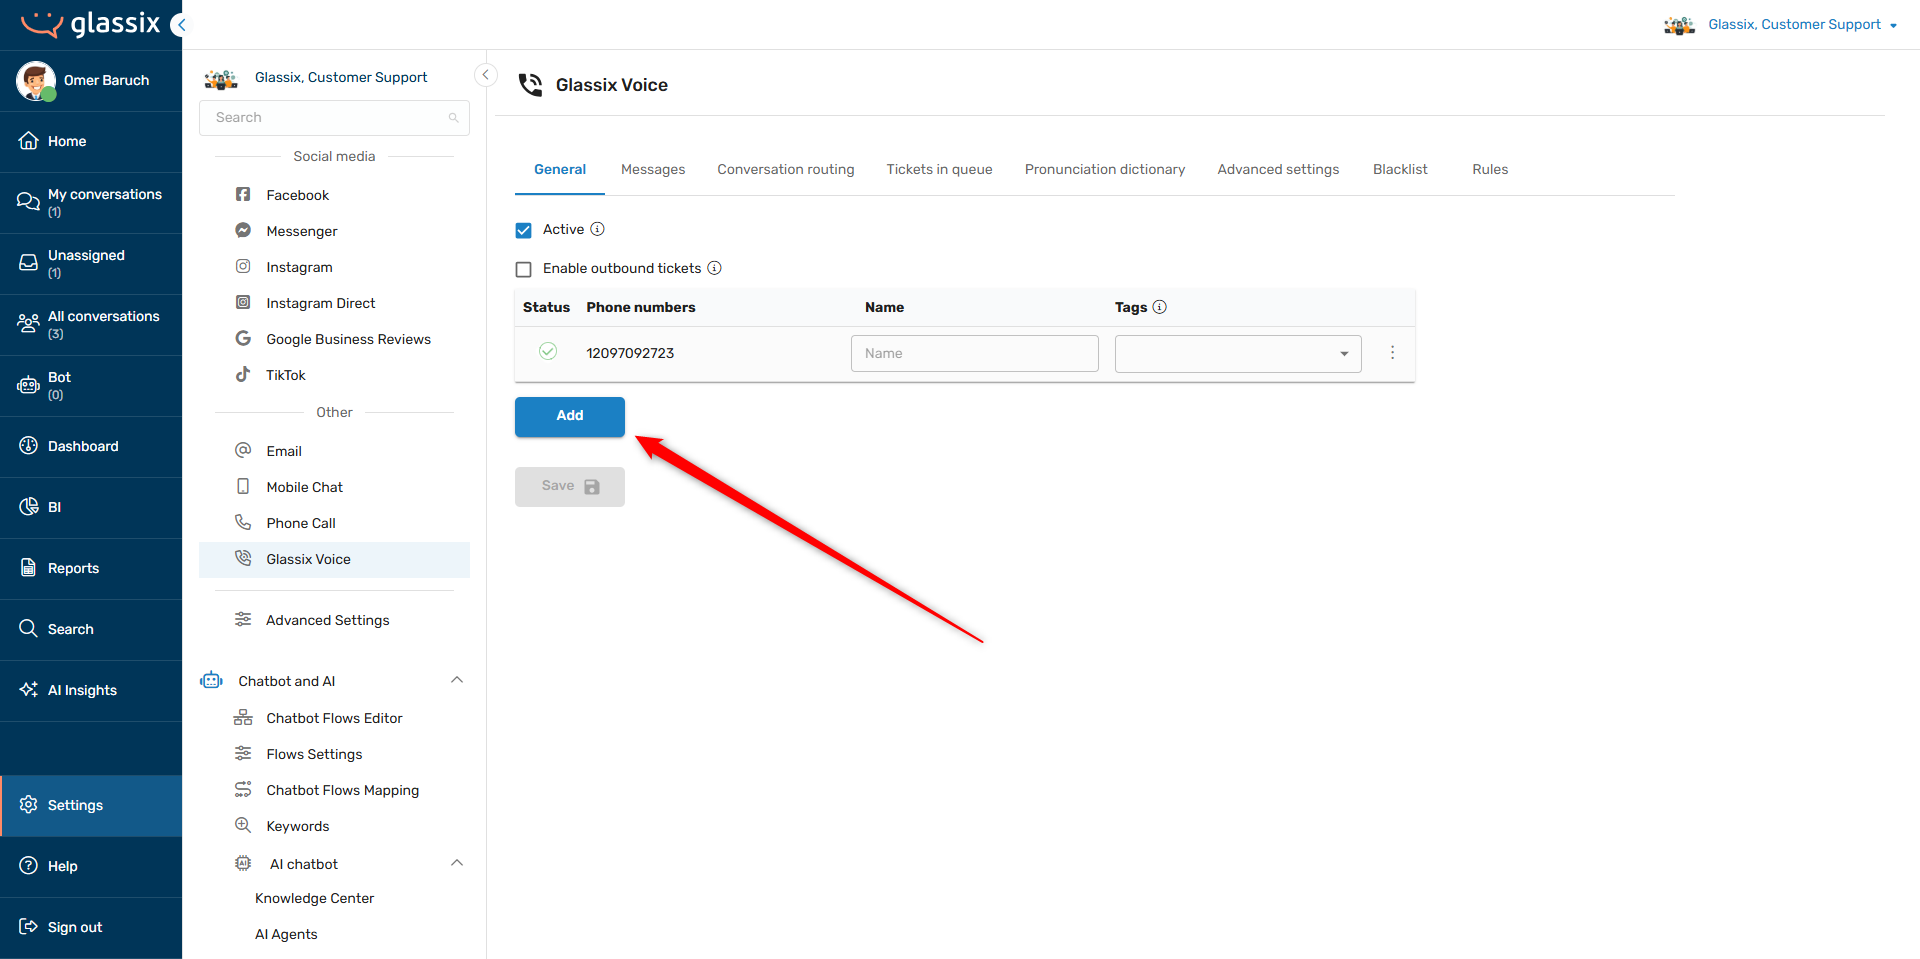
Click here or navigate to Settings → Channels → Glassix Voice
-
Click Add:
-
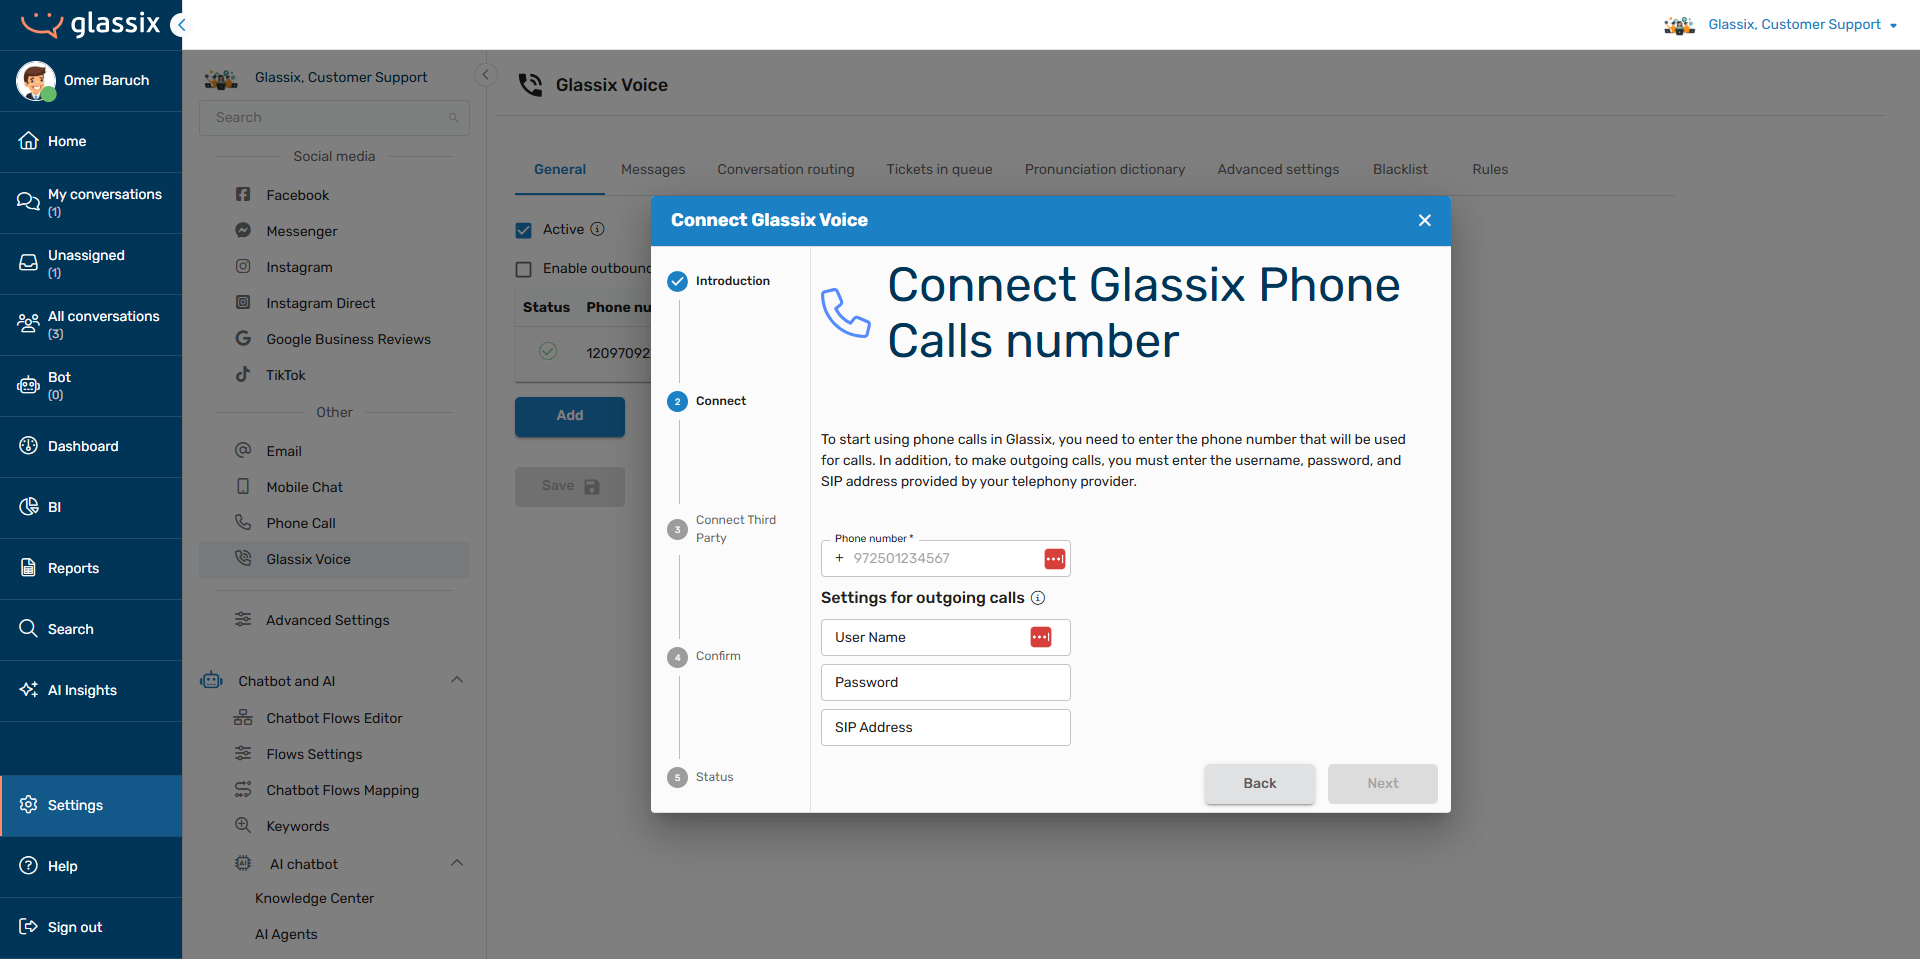
Proceed to the Connect screen in the popup modal:
-
Under Phone number, fill in the phone number you'll be connecting to your department:
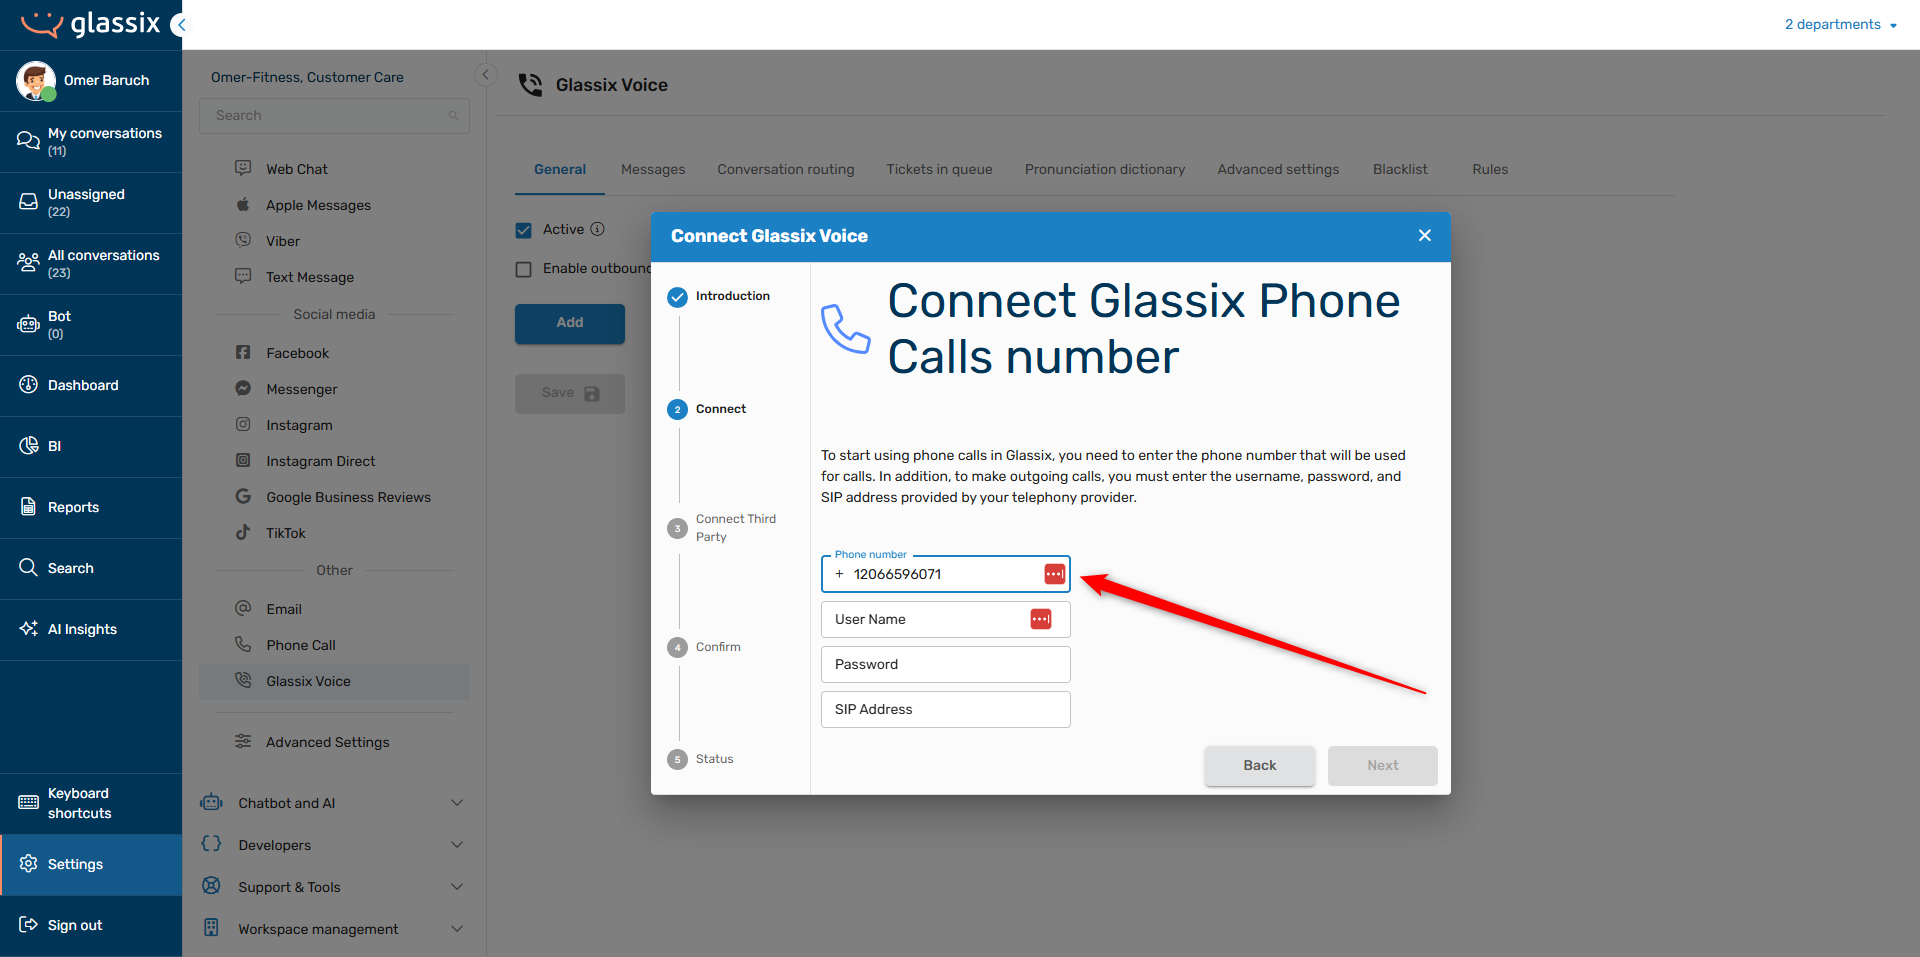
-
The values you enter under User Name and Password will differ based on your SIP trunking provider:
-
If you set up your SIP trunk with Vonage, enter the username and password you created or were provided in Vonage earlier:
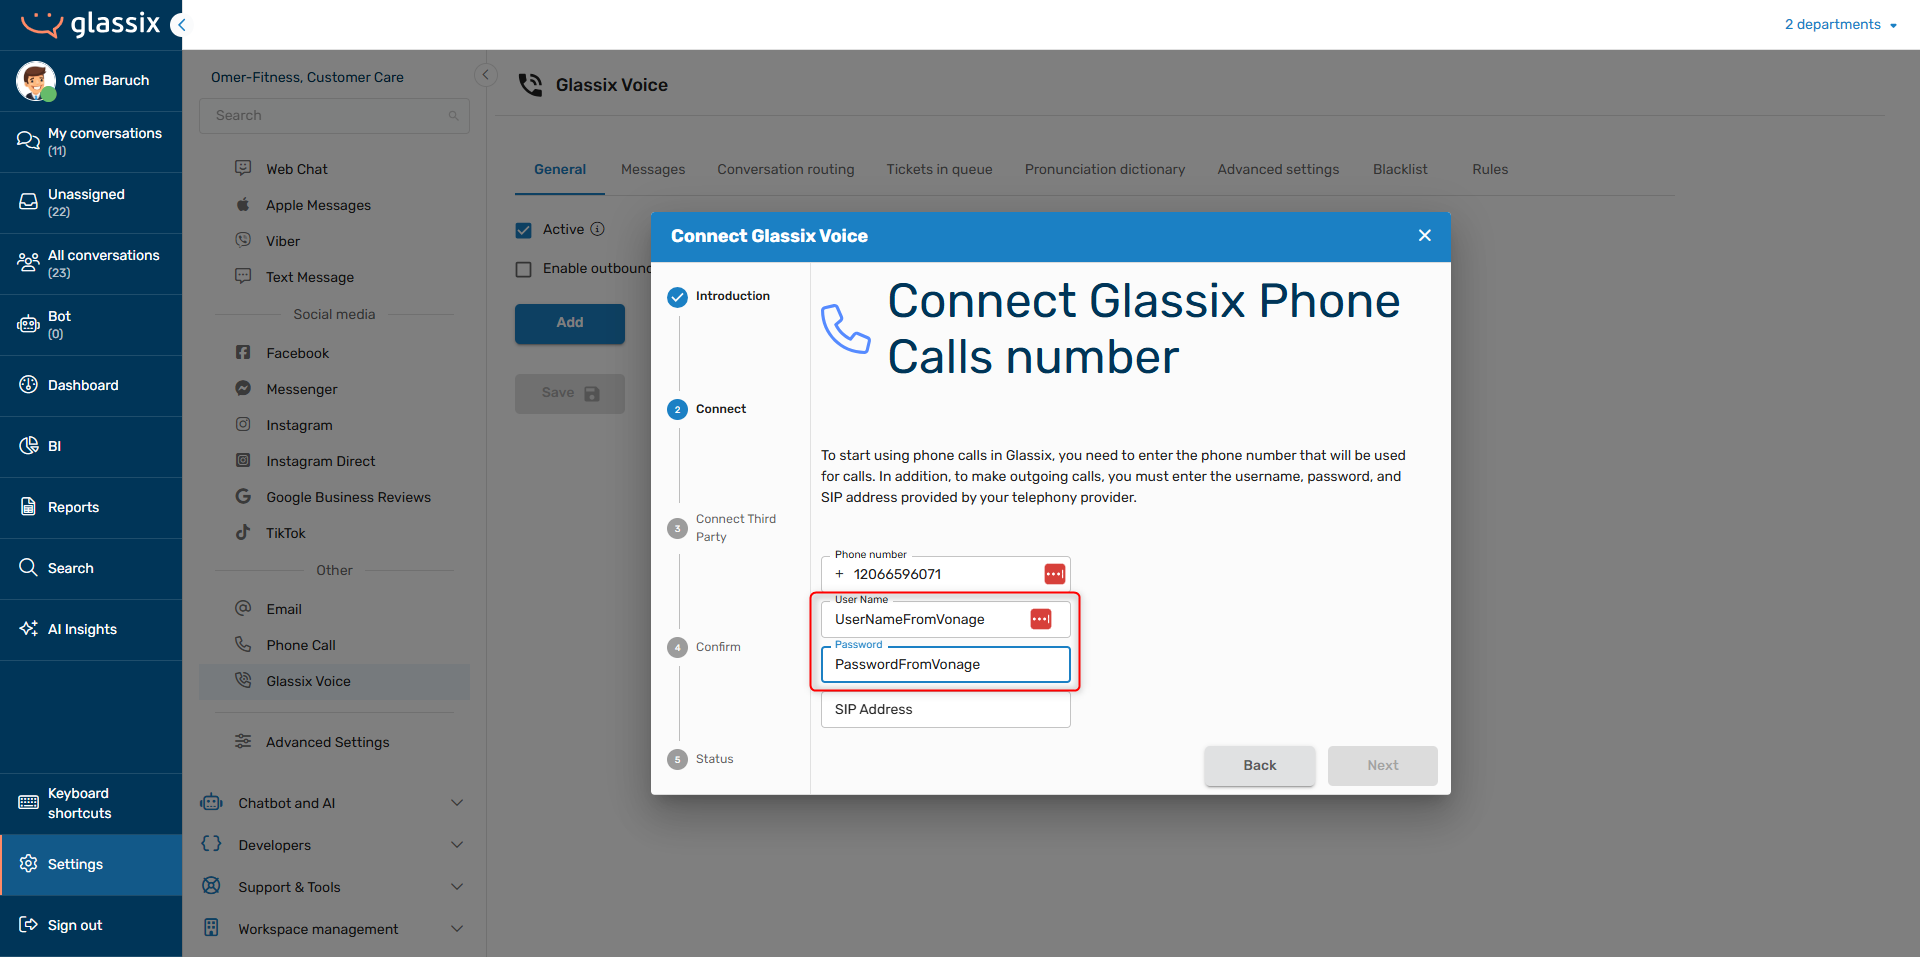
-
If you set up your SIP trunk with Twilio, choose a new username and password.
Make sure the password you choose has a minimum length of 12 characters, and at least one number, uppercase character and lowercase character. Twilio will not let you use any passwords which do not meet these minimum requirements.
Enter the username and password you've chosen and save these values for later:

-
If you set up your SIP trunk with a different provider, please make sure that the username and password you enter here match the username and password you entered/will enter in your SIP trunk.
-
-
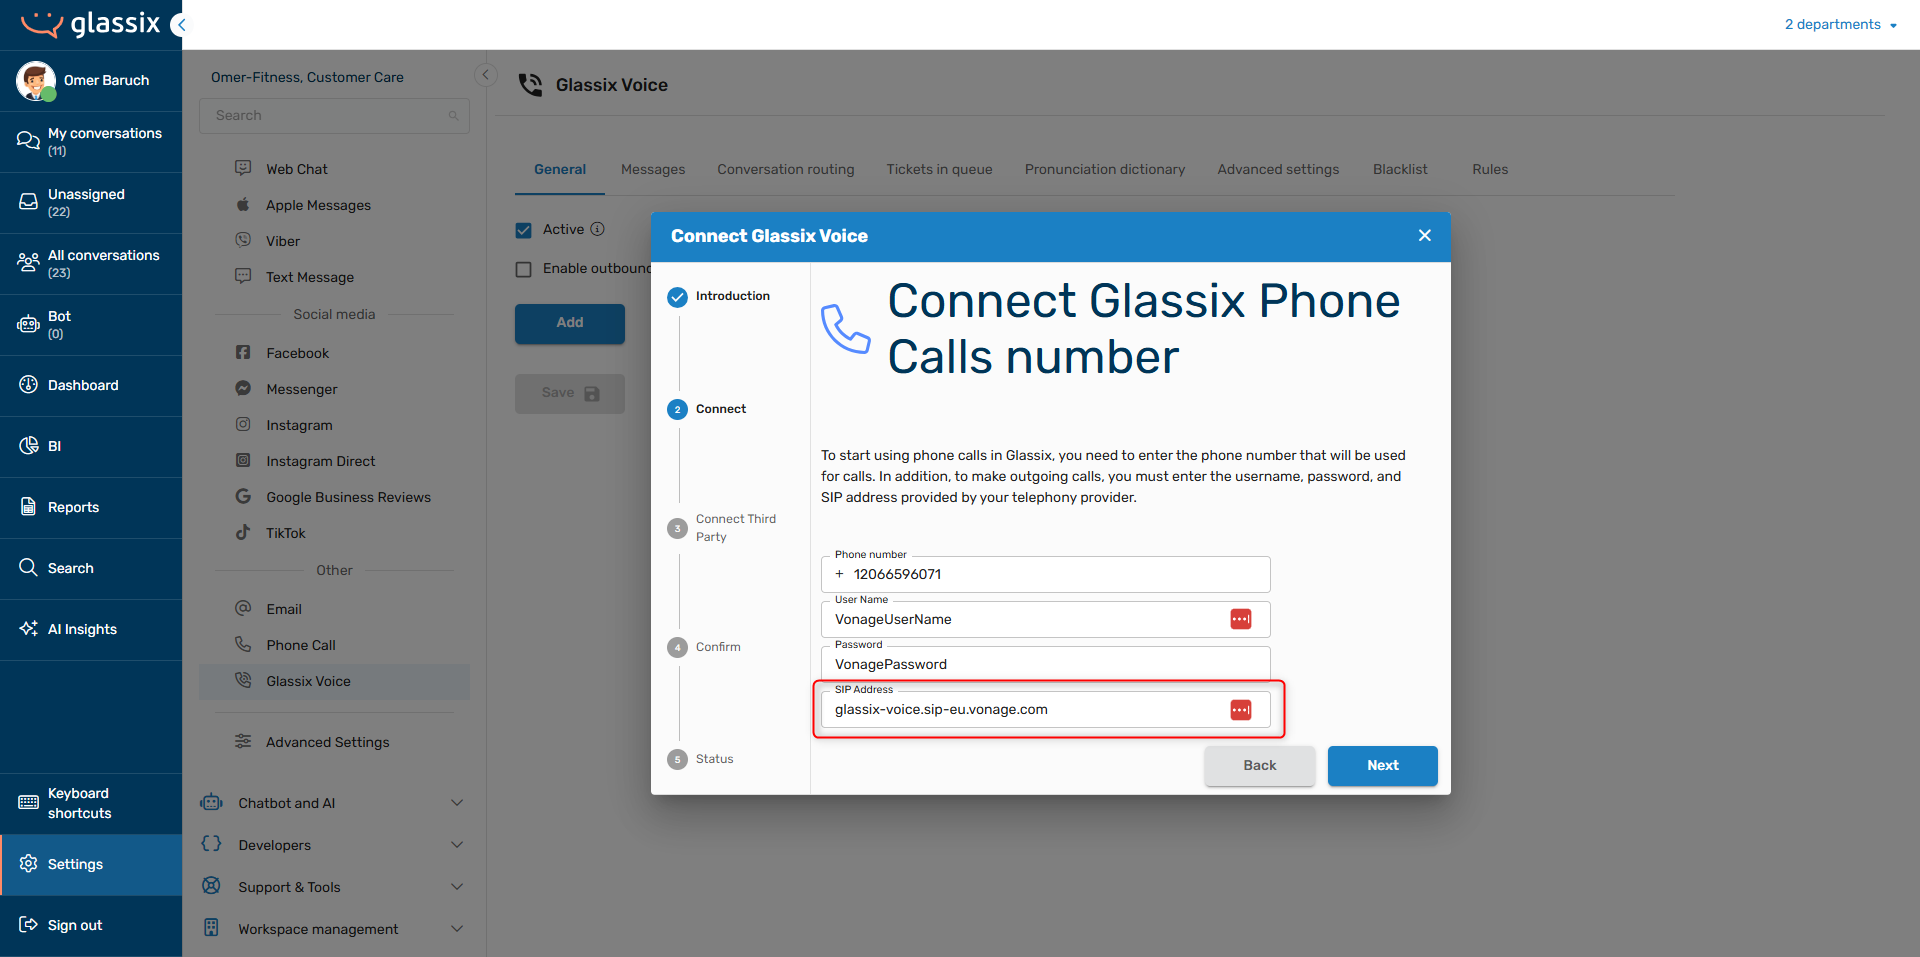
Under SIP Address, enter your termination URI which you saved earlier. If you set up your SIP trunk with Vonage, enter the termination URI for your region (or the closest region to you):

-
Click Next, then copy the regional server address which was generated for you. Save this value for later:

-
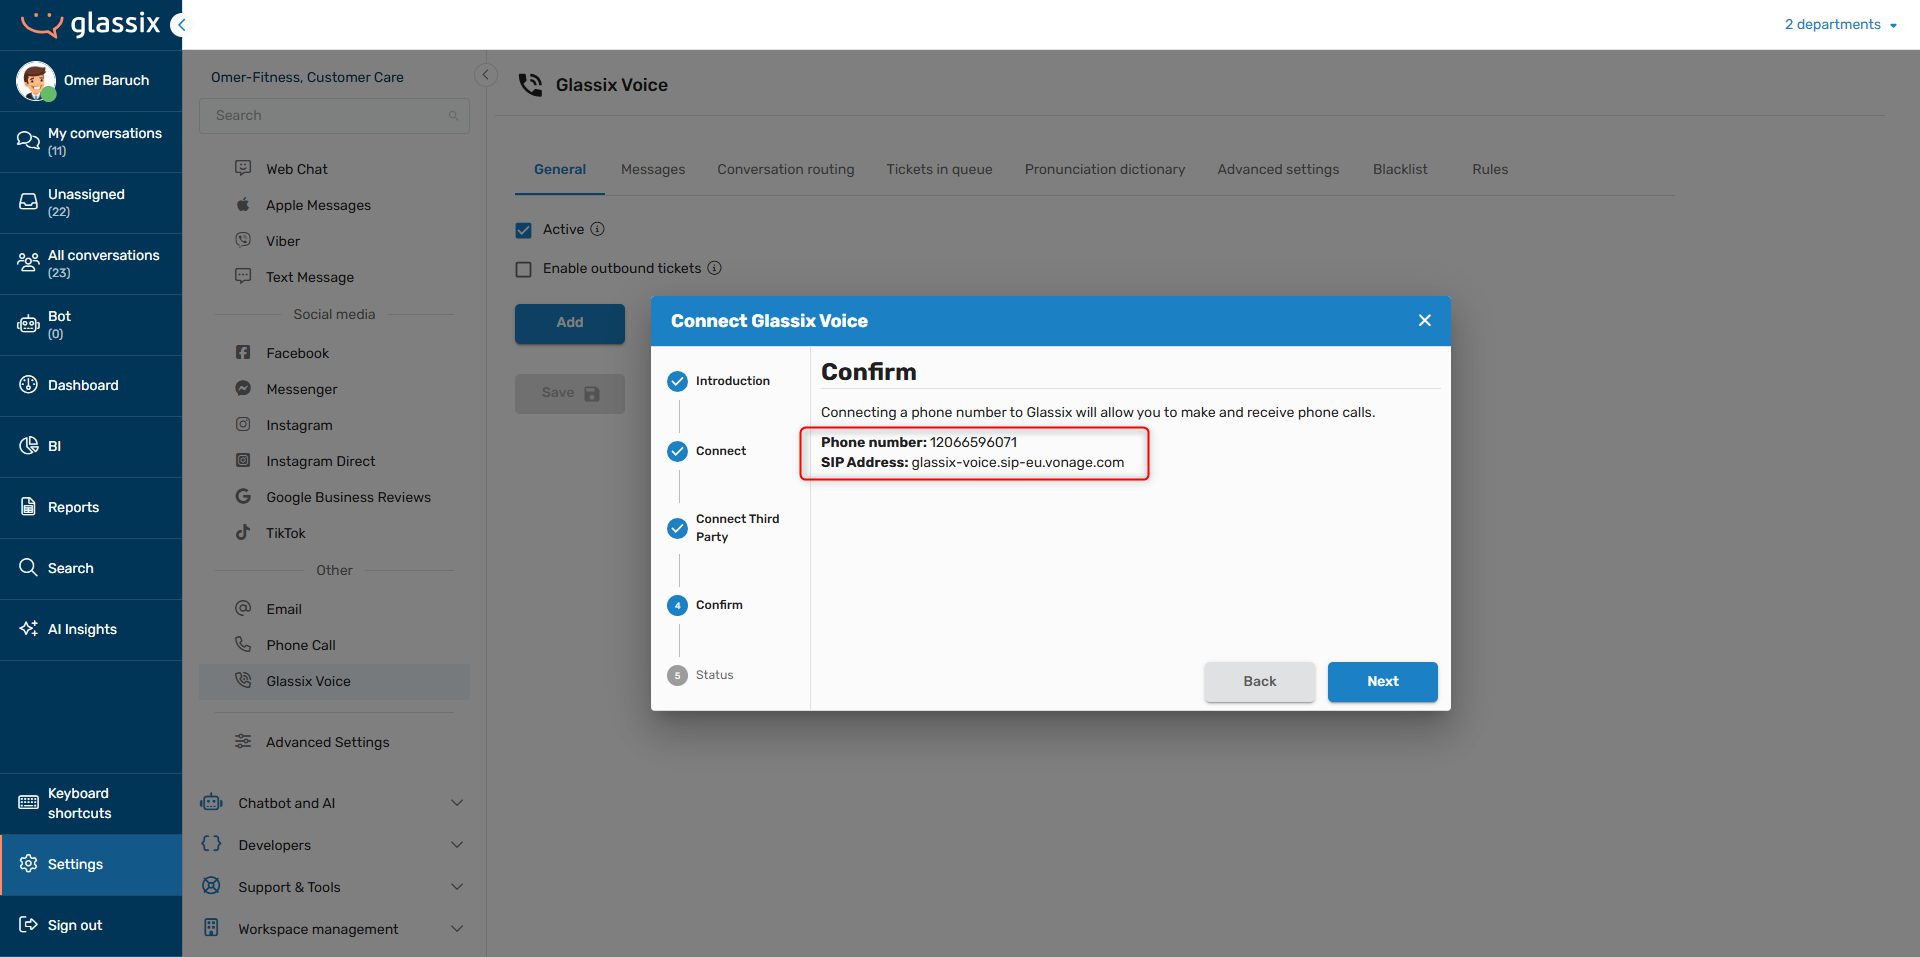
Click Next and confirm the details you entered are correct. Any mistake in this information will prevent calls from connecting to your department:
-
Click Next and then Close
Depending on your SIP trunking provider, continue with the relevant next step below:
- General SIP Trunk Connection Information
- Vonage: Connect Your SIP Trunk
- Twilio: Connect Your SIP Trunk
Step Three: Connect Your SIP Trunk to Glassix
Now that we have created both a SIP trunk and Glassix SIP credentials, we can proceed with connecting the SIP trunk you created earlier to Glassix.
General SIP Trunk Connection Information
Tip:This section is only relevant for providers other than Vonage and Twilio. For Vonage click here and for Twilio click here.
In the SIP trunk you created earlier, you will need to
- Set up the inbound configuration
- Assign the phone number you connected to Glassix to route through this trunk
- (If you did not do this in step one) Set up the outbound configuration
Inbound Configuration
Set the destination:
- SIP URI/Hostname: the regional server address you were provided in the previous step
- Port: 5060 (UDP/TCP) or 5061 (TLS)
- Protocol: UDP, TCP, or TLS (TLS recommended)
Outbound Configuration
In your provider's portal, add Glassix as an allowed termination destination.
- Peer/Trunk Name: "Glassix Voice"
- Auth Type: Digest/Credential Authentication
- Username: The username you entered in the previous step
- Password: The password you entered in the previous step
- Realm: the regional server address you were provided in the previous step
- Allowed Prefixes: Configure as needed for your dial plan
Once you have finished both inbound and outbound configuration, proceed with Step Four: IP Whitelisting for SIP Transfers.
Vonage: Connect Your SIP Trunk
To connect your new SIP trunk to Glassix:
-
In your Vonage Dashboard, navigate back to Build → Voice → SIP:

-
On the SIP trunk you created earlier, select the settings cogwheel:
-
Under Outbound Calling, select Edit Authentication:
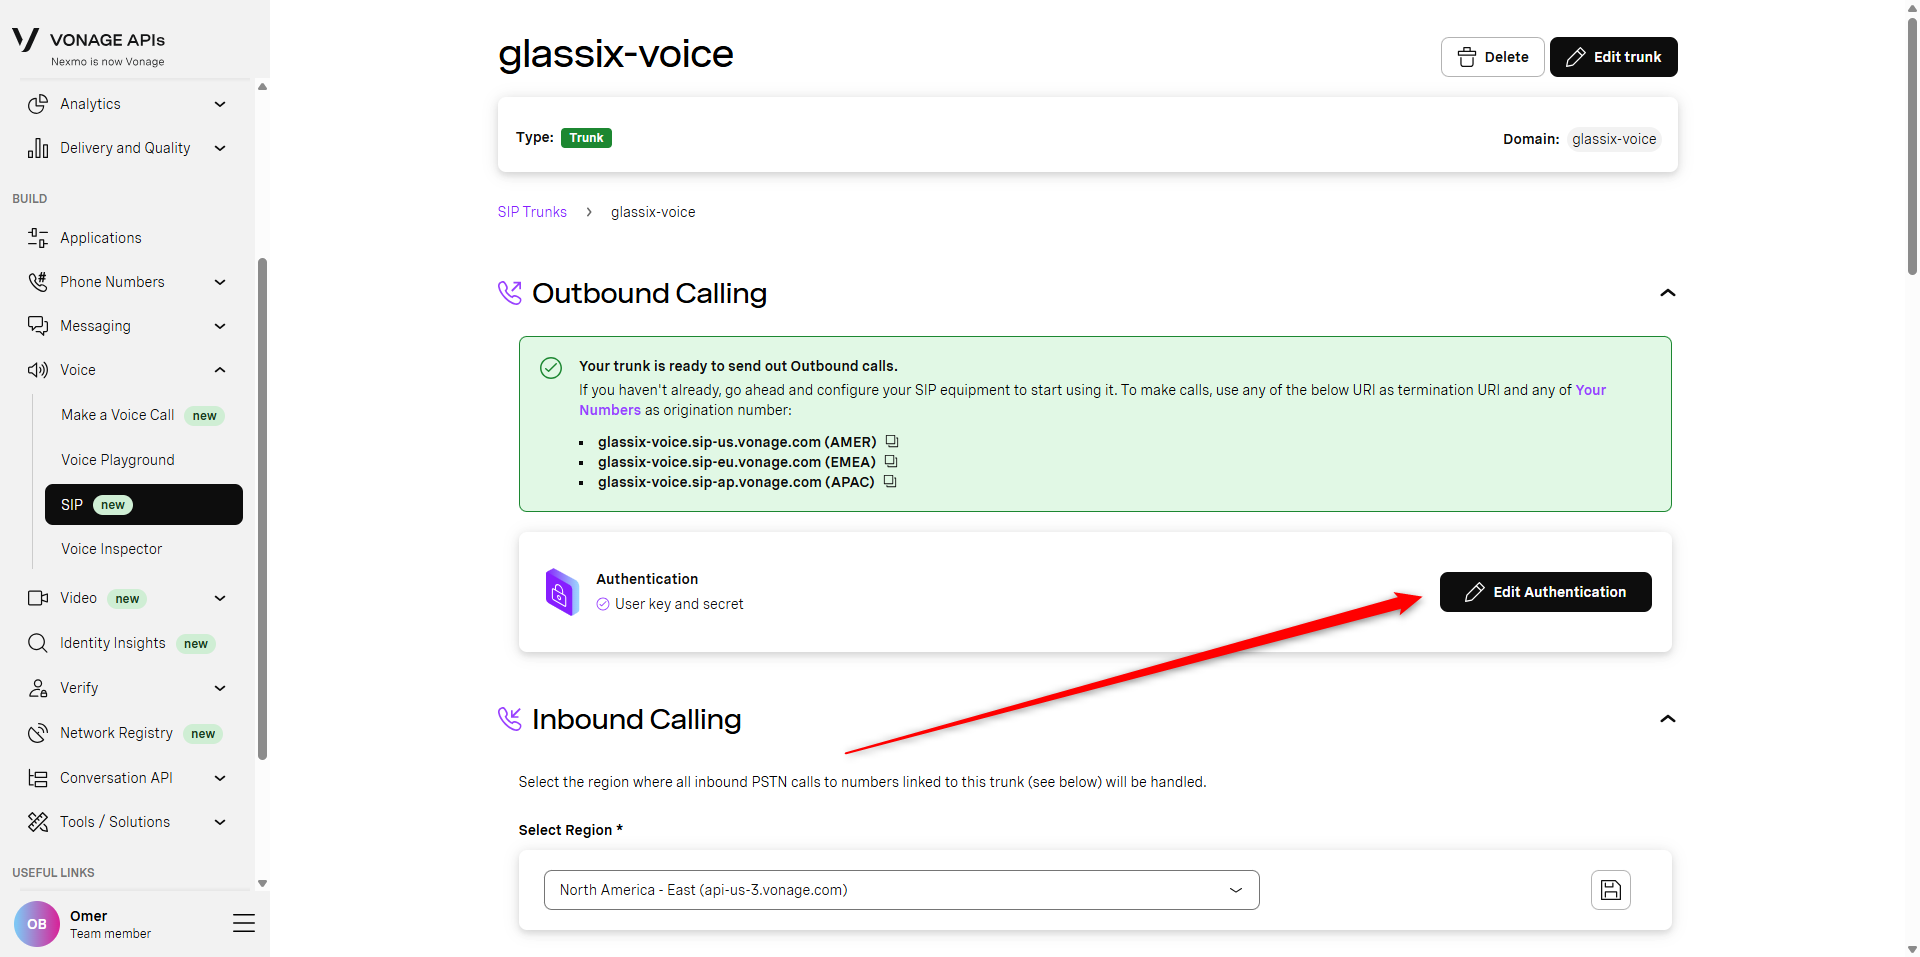
-
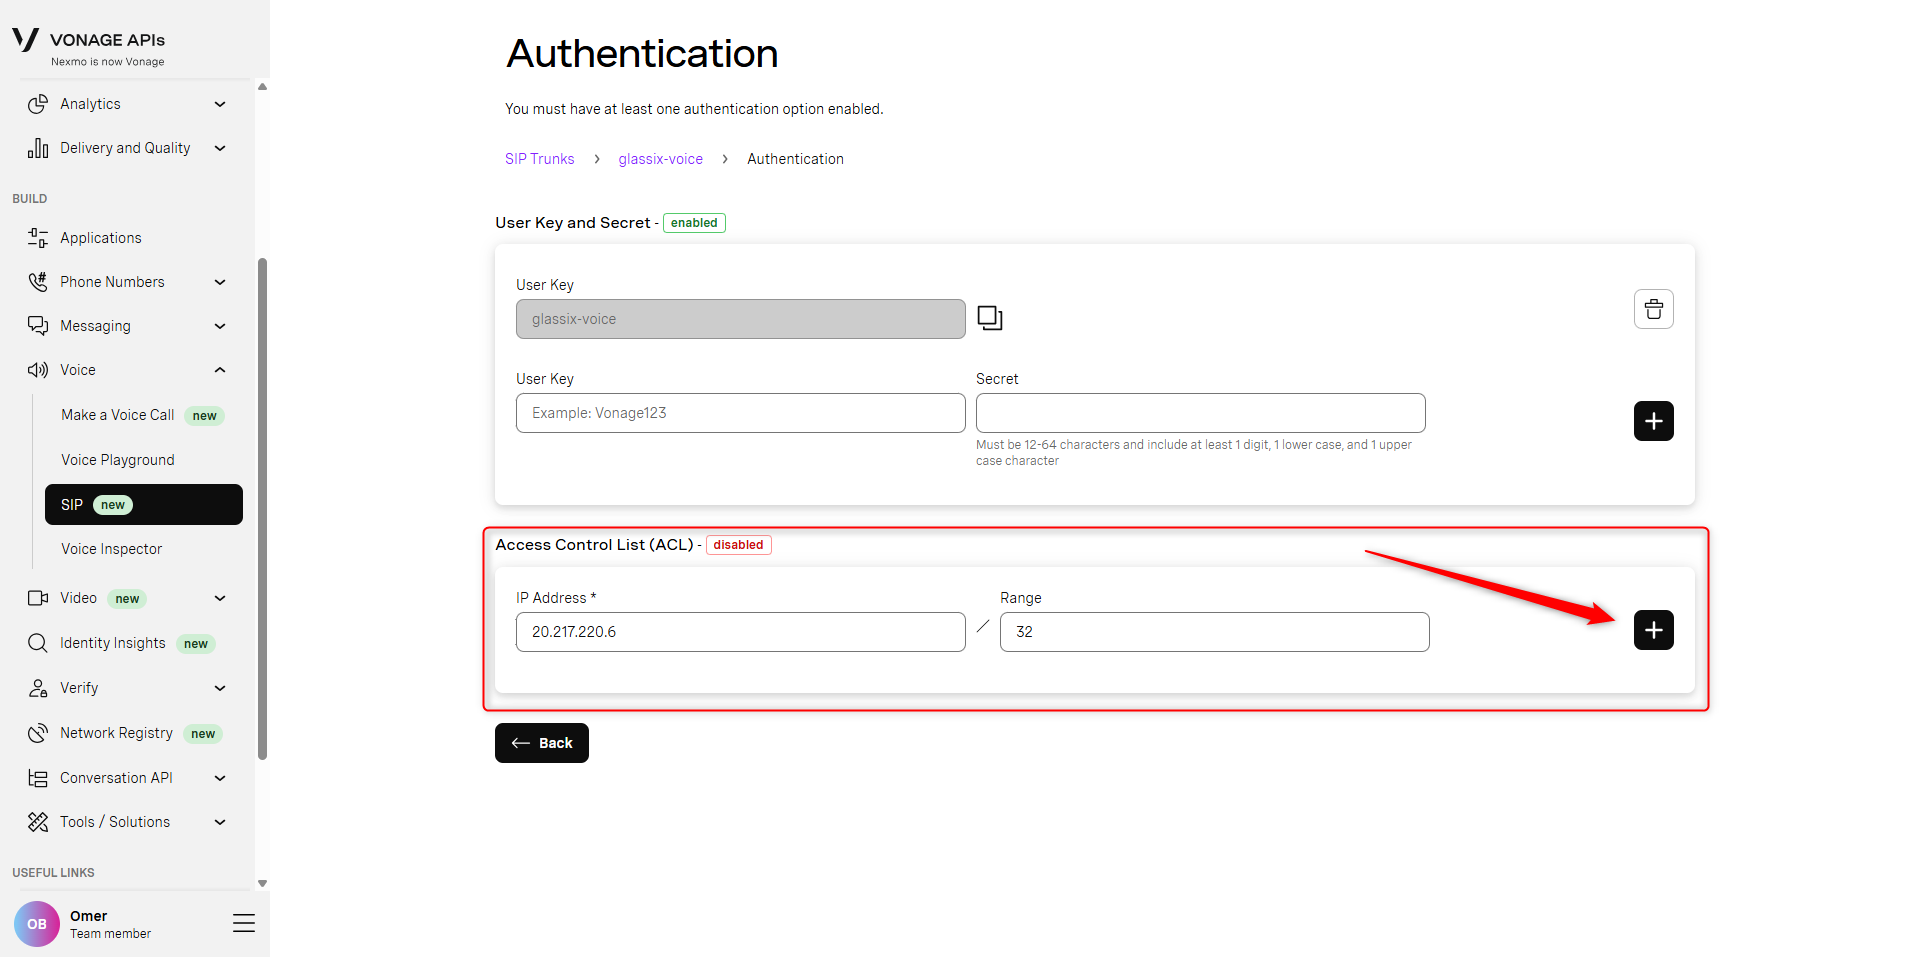
Under Access Control List (ACL), add the following IP address: 20.217.220.6/32 and click the [+] button to save:
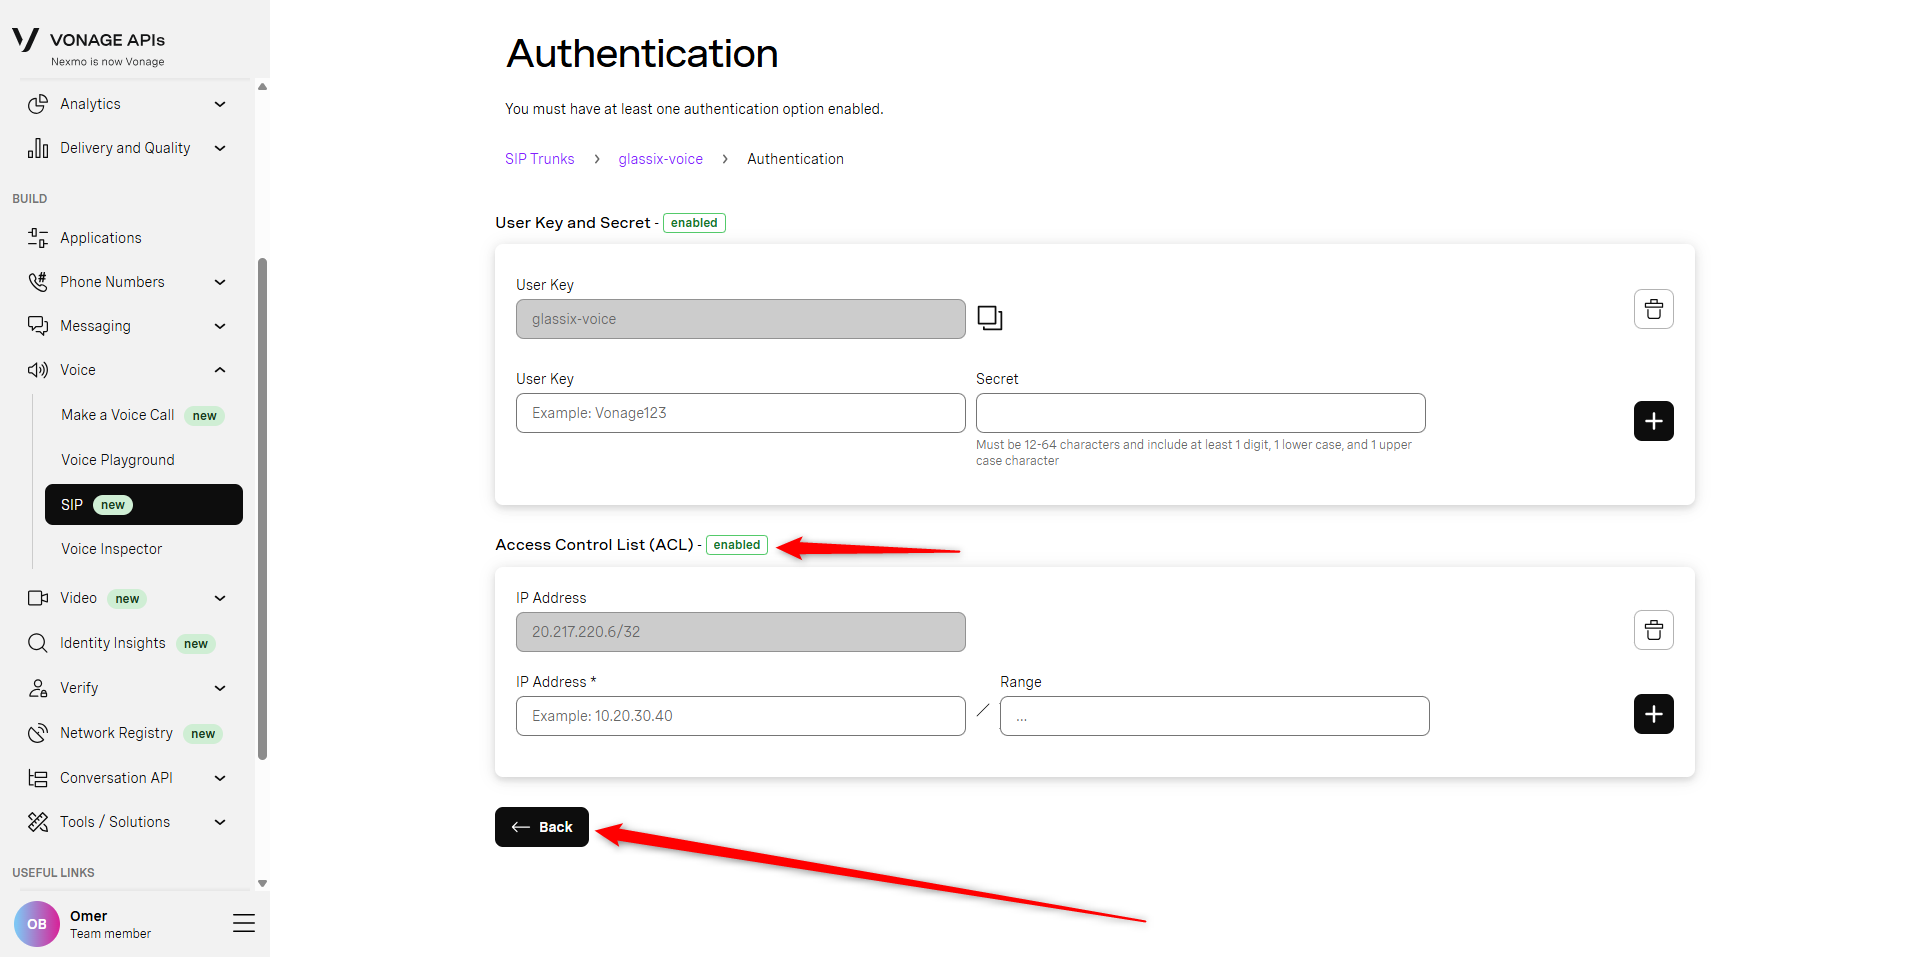
-
Confirm the ACL has switched to enabled status automatically, then click the ← Back button:
-
You should now be back on the main screen for your SIP trunk. Under Inbound Calling, in the Select Region dropdown, choose the region closest to you and click the save button:
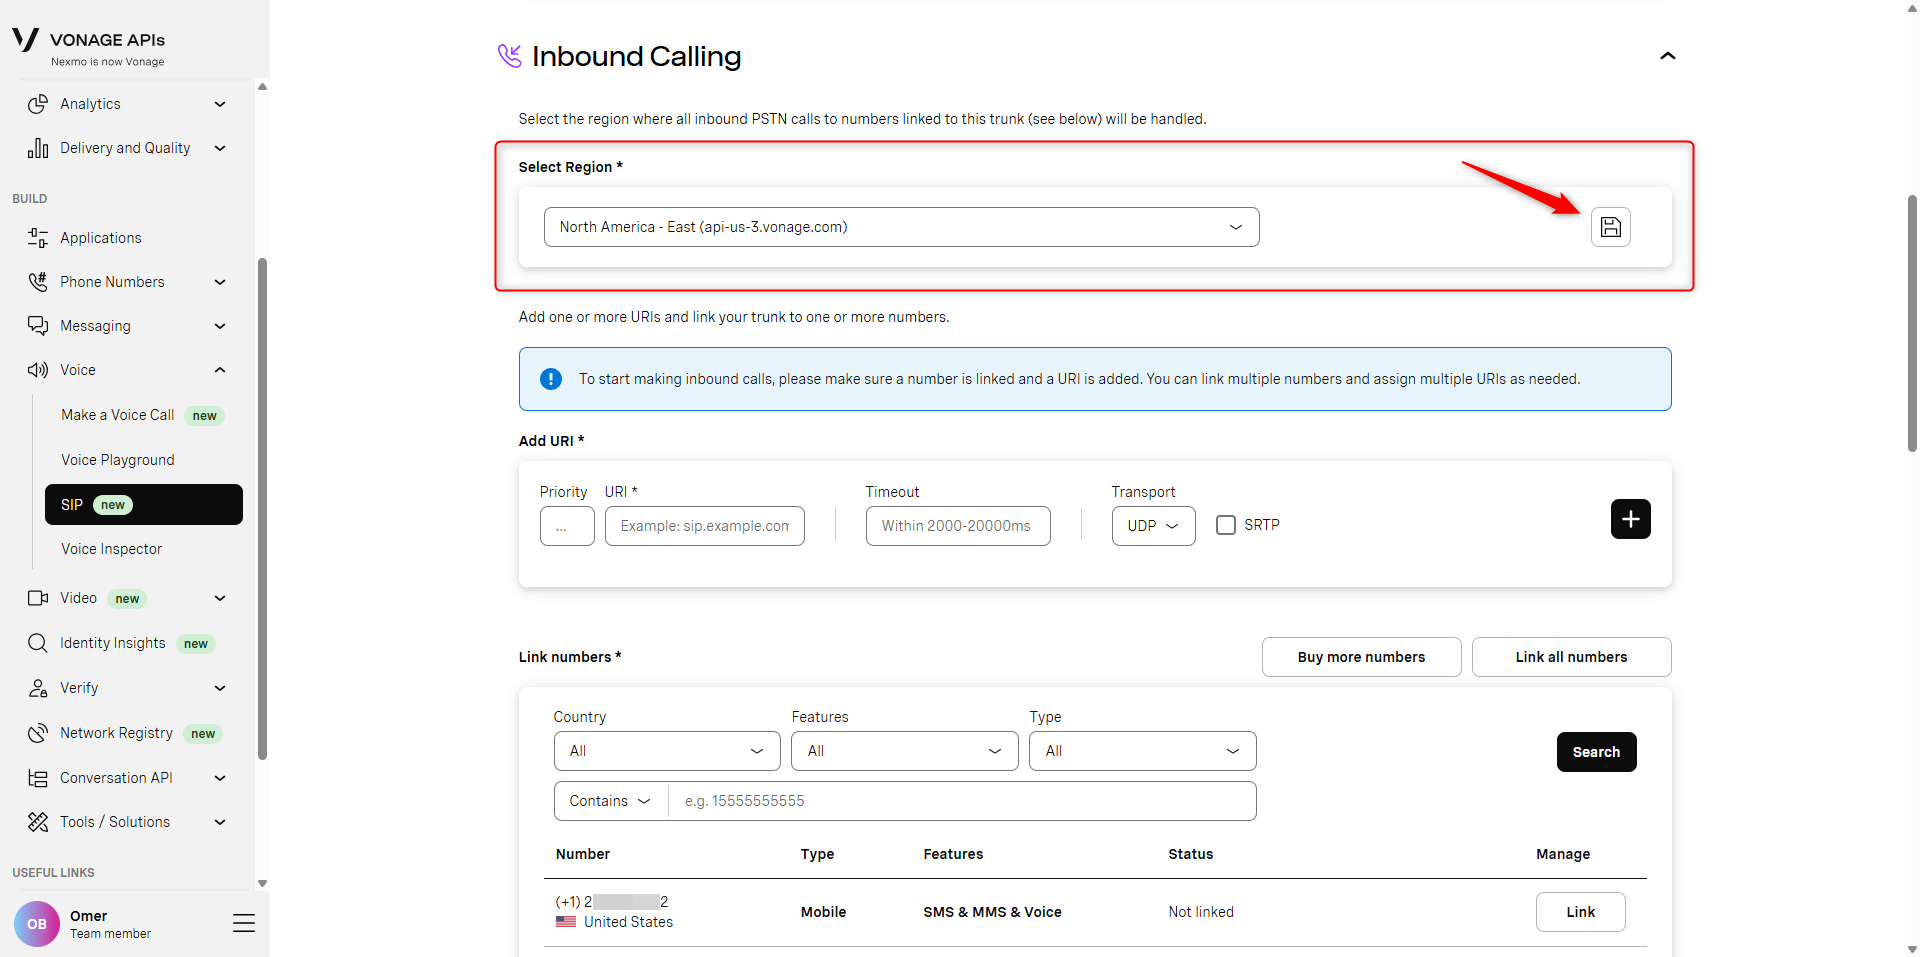
-
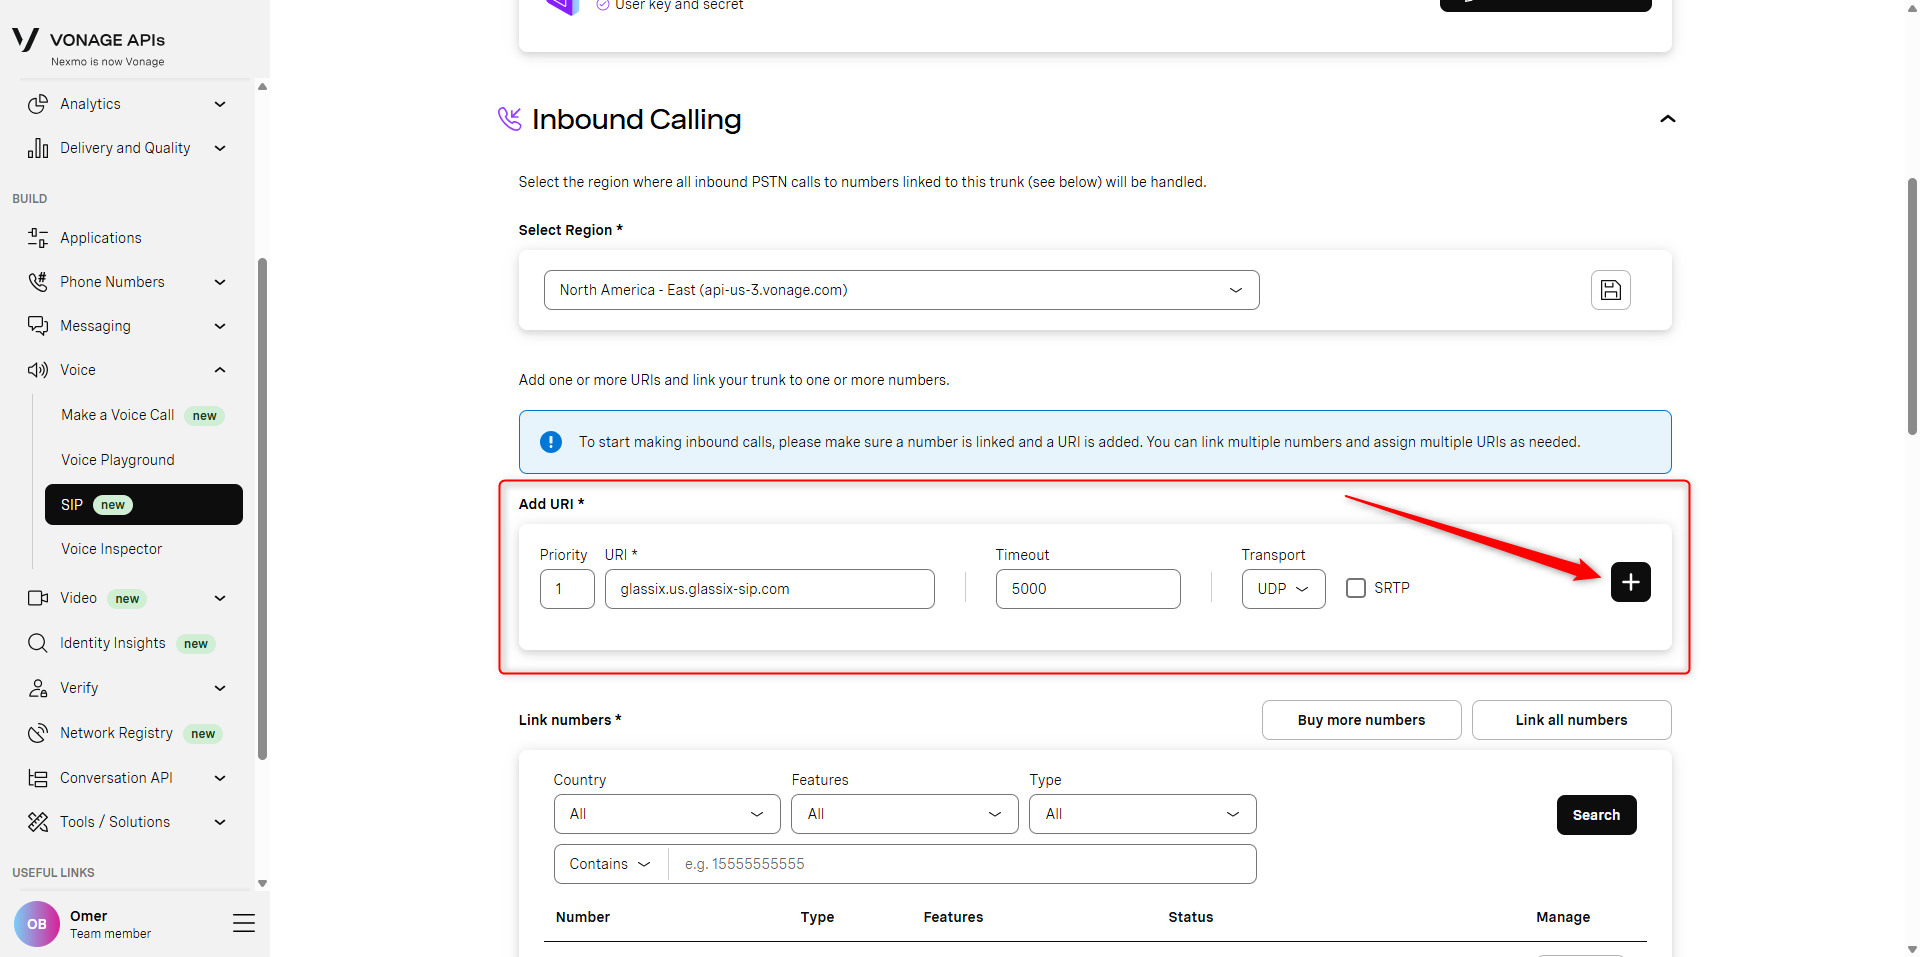
Still under Inbound Calling, in the Add URI section, fill in the following values. When you're done, click the [+] button to save your changes:
- Priority: 1
- URI: The regional server address you were provided previously (e.g. glassix.us.glassix-sip.com)
- Timeout: 5000
- Transport: UDP
- SRTP: Unchecked
See below:
-
At the bottom of the screen, under Link numbers, find the number you connected to Glassix earlier and select Link:
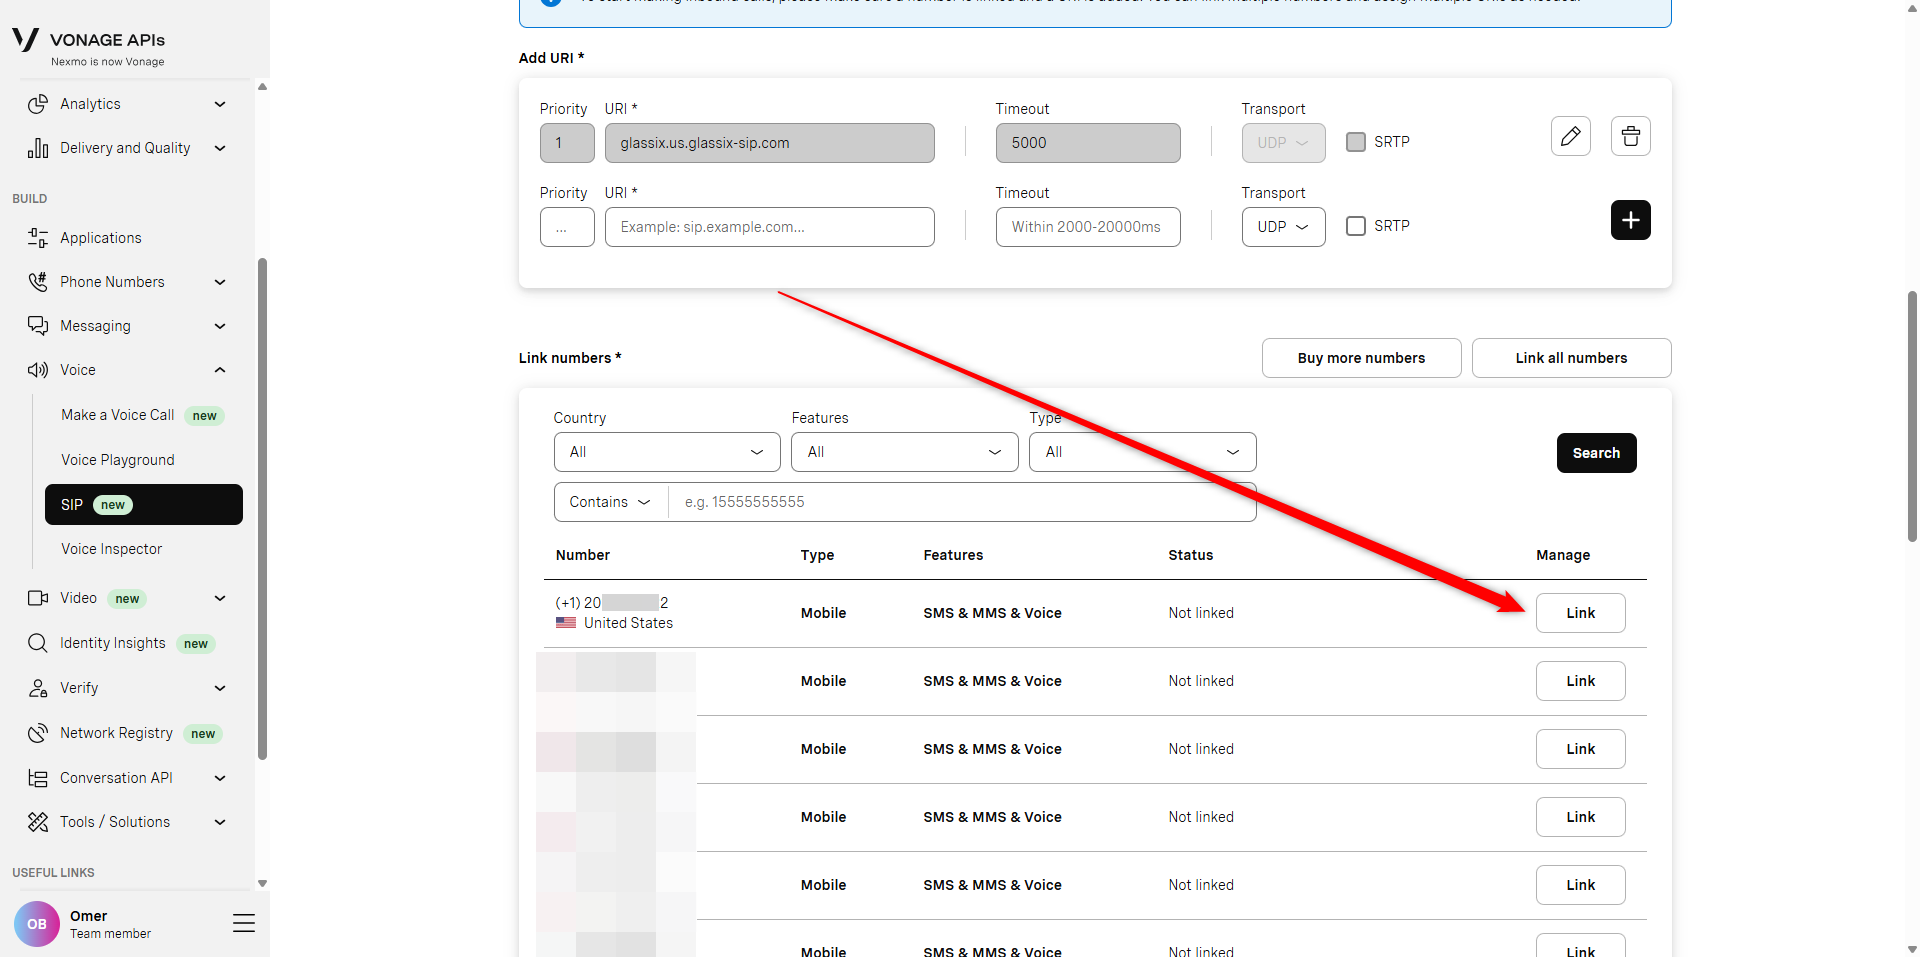
-
In the popup which appears, click Link to confirm:
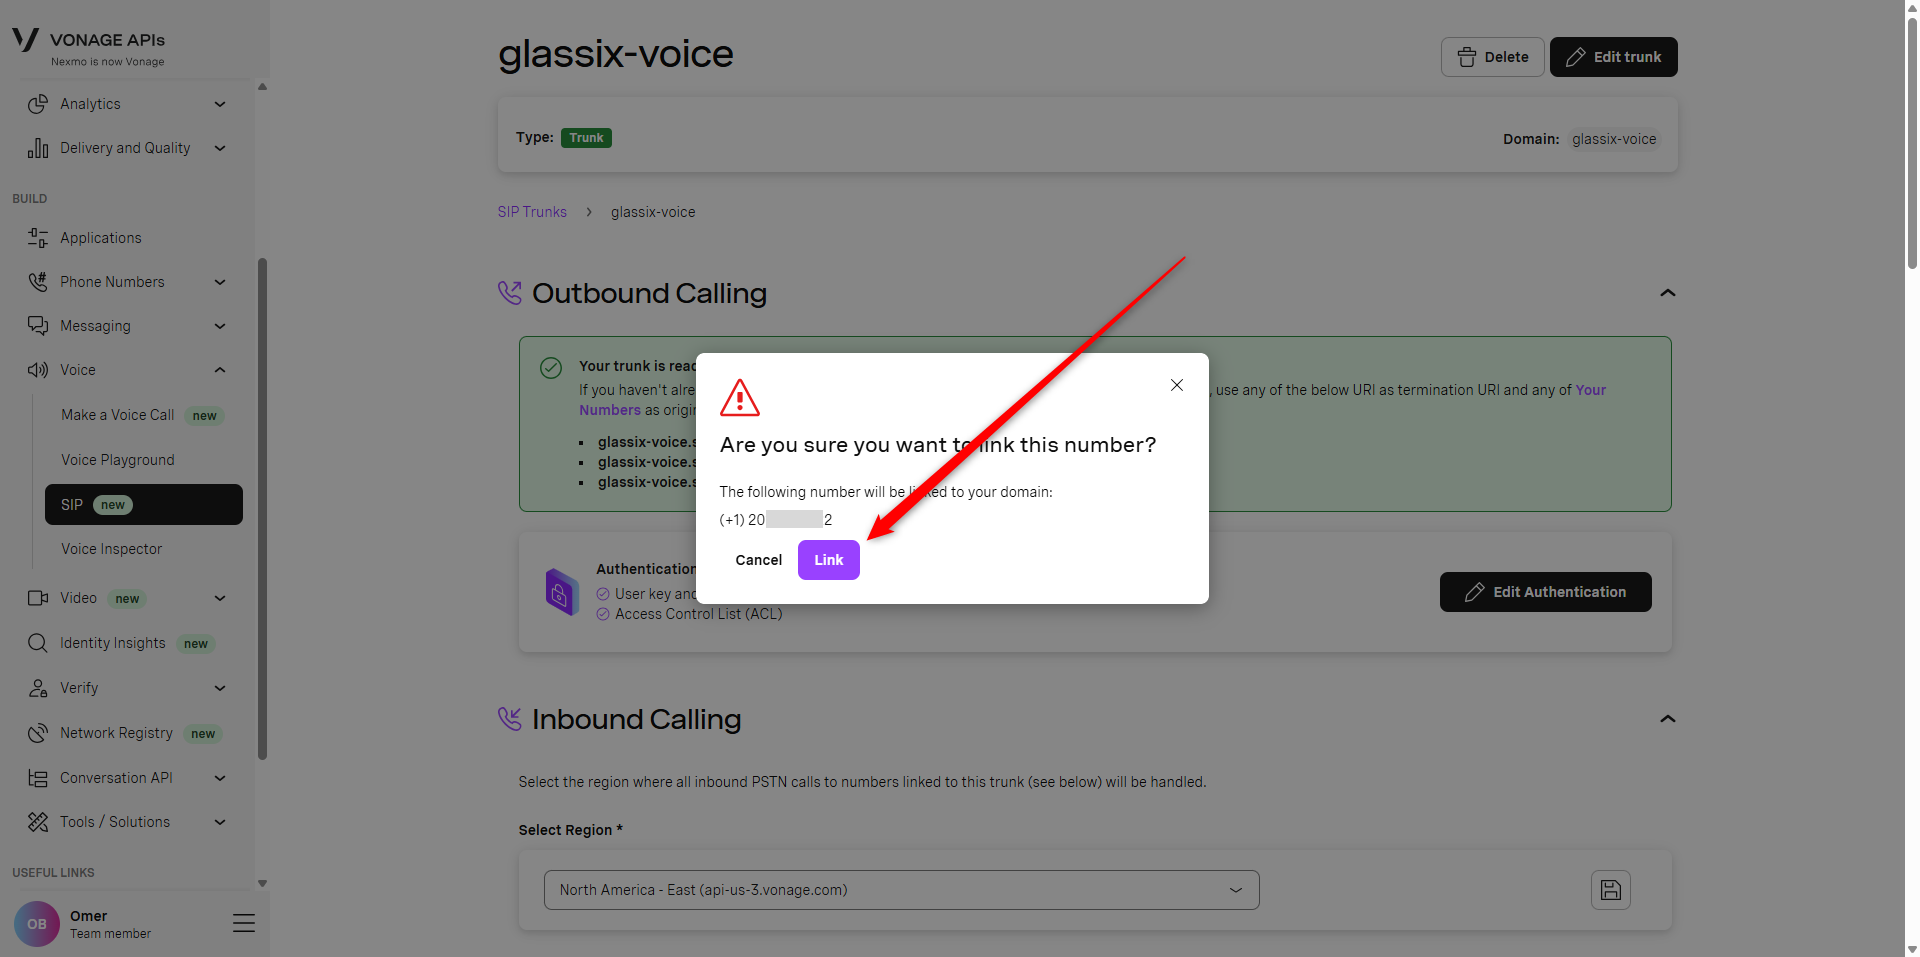
-
Congratulations! Your number is now connected to Glassix. Check out our Map a Flow guide to see how to map a flow to your phone number, then proceed with Step Five: Set Up Call Transferring (Optional) or Step Six: Testing.
Twilio: Connect Your SIP Trunk
To connect your new SIP trunk to Glassix:
-
In your Twilio Console, navigate back to Elastic SIP Trunking → Trunks:
-
Click on the SIP trunk you created earlier:
-
In the left-hand menu, select Origination:

-
Select Add new Origination URI:
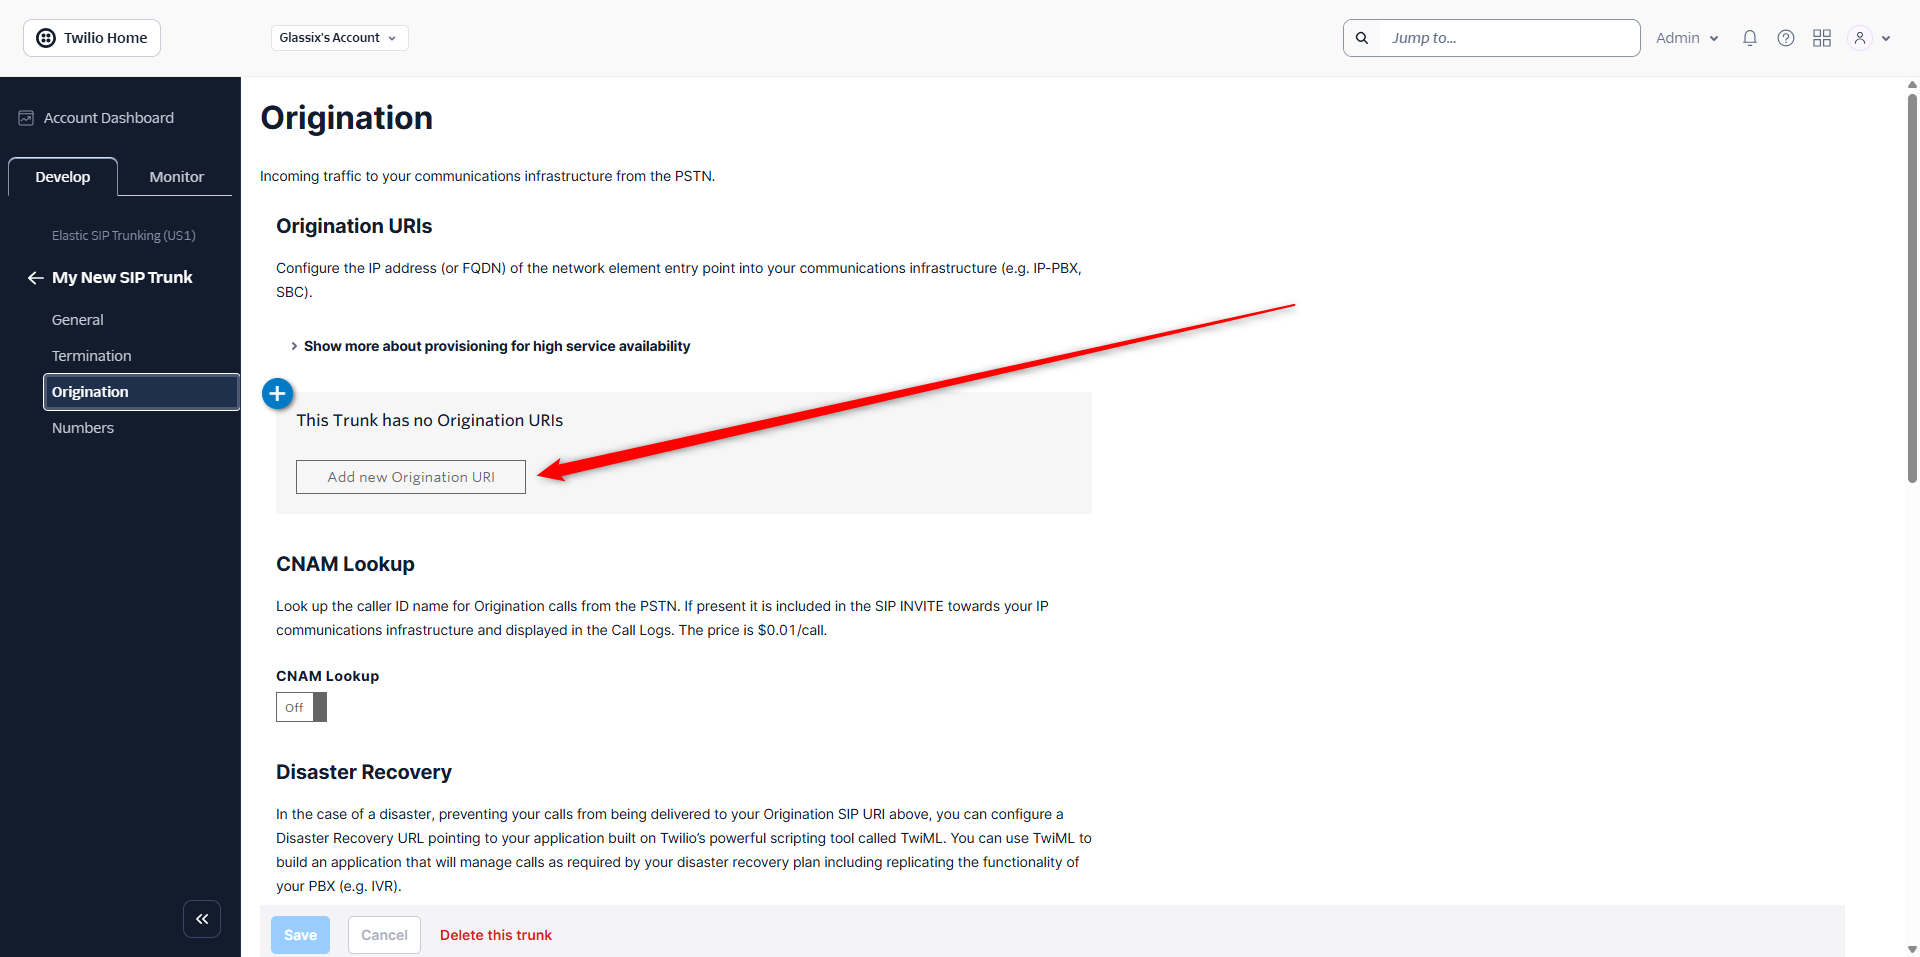
-
In the Origination SIP URI field, you will need to enter a URL with a specific construction. Use the following format to construct your URI:
sip:[phonenumber]@regional.server.addressUse the phone number you're connecting to Glassix (with country code but without '+') and the regional server address you were provided in the previous step.
For example, if you're connecting the phone number
+12018994322and you were provided with the regional server addressglassix.us.glassix-sip.com, you would enter the following into the Origination SIP URI field:See below:
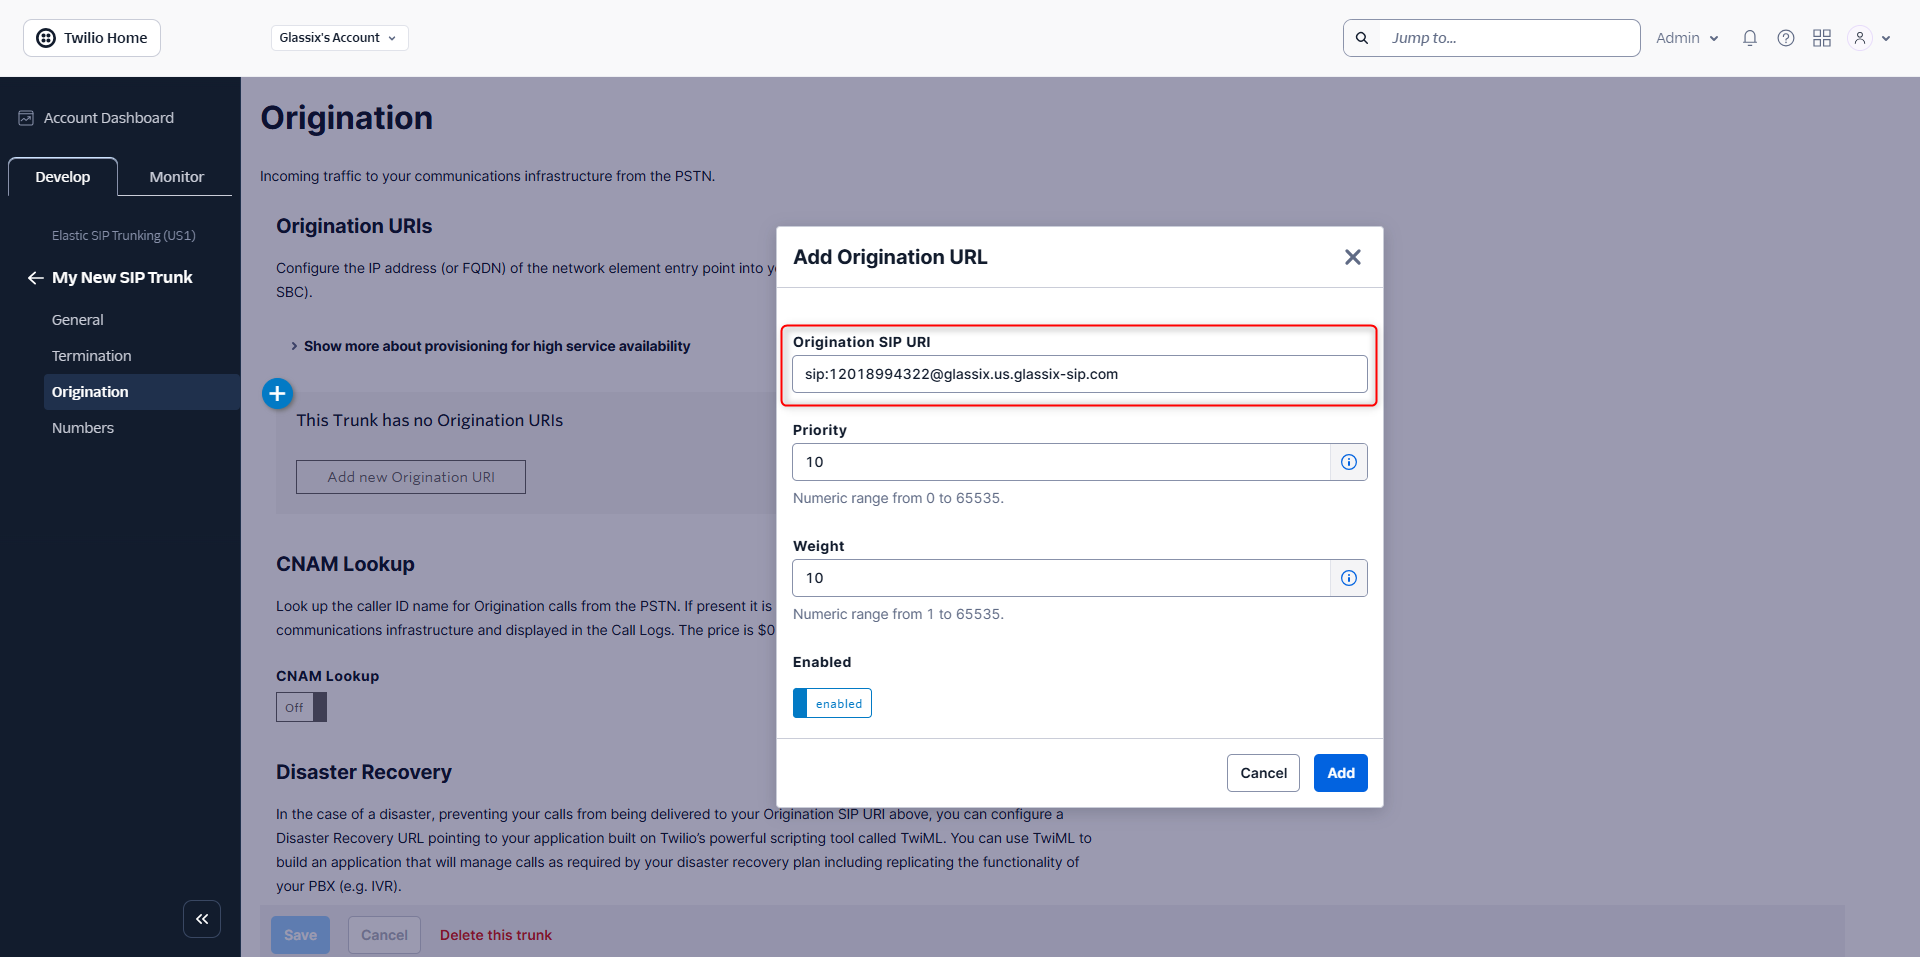
-
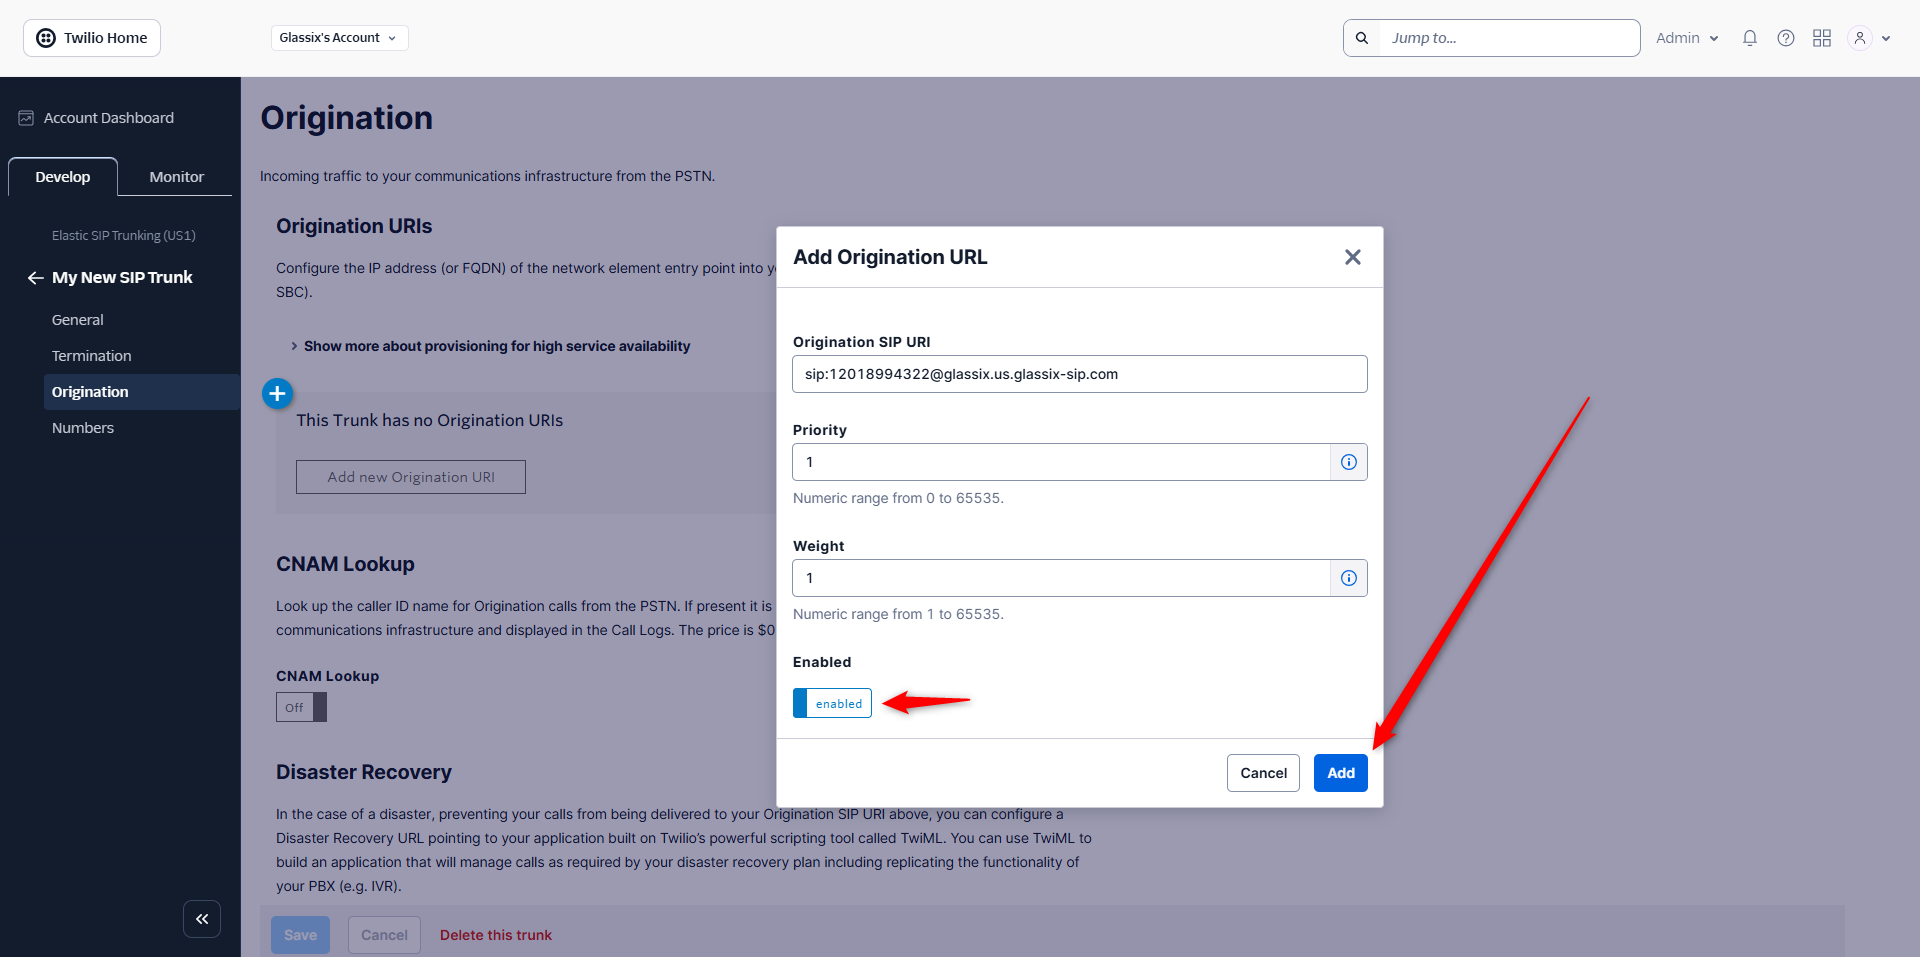
In the Priority and Weight fields, enter the number "1":
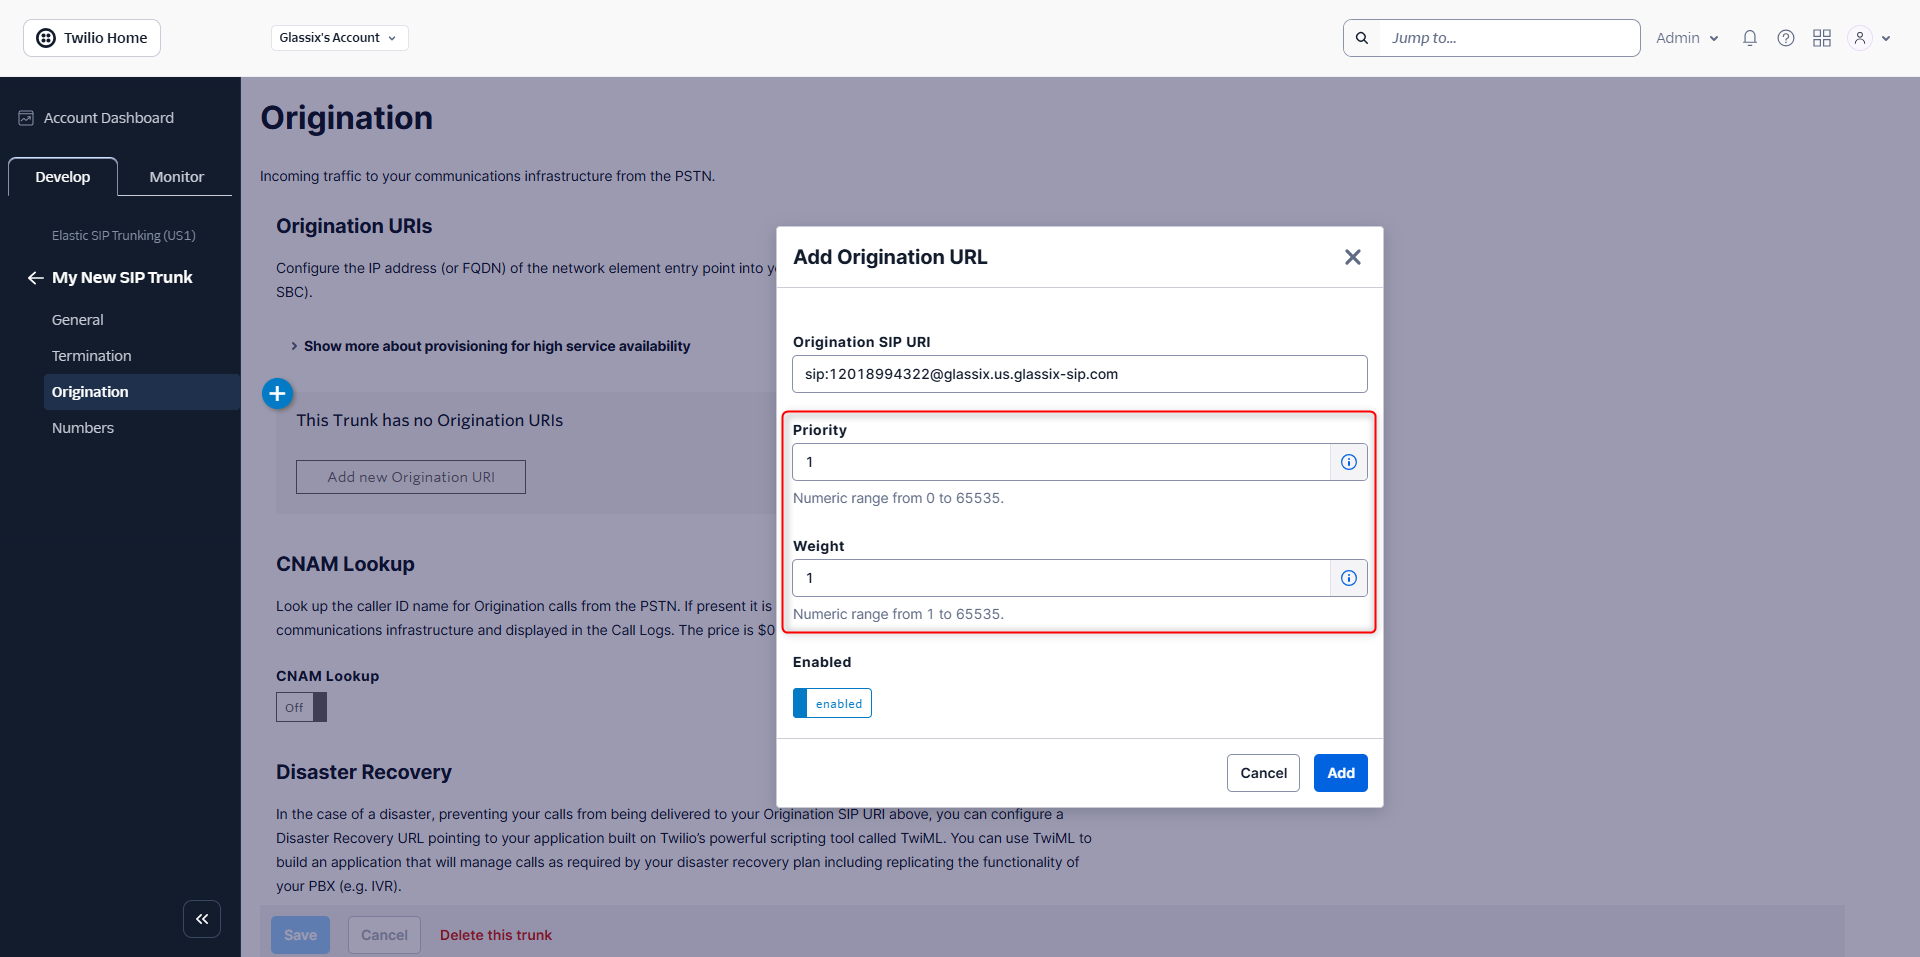
-
Make sure the URL is enabled, then click Add:
-
After adding your Origination URI, select Termination from the left-hand menu:
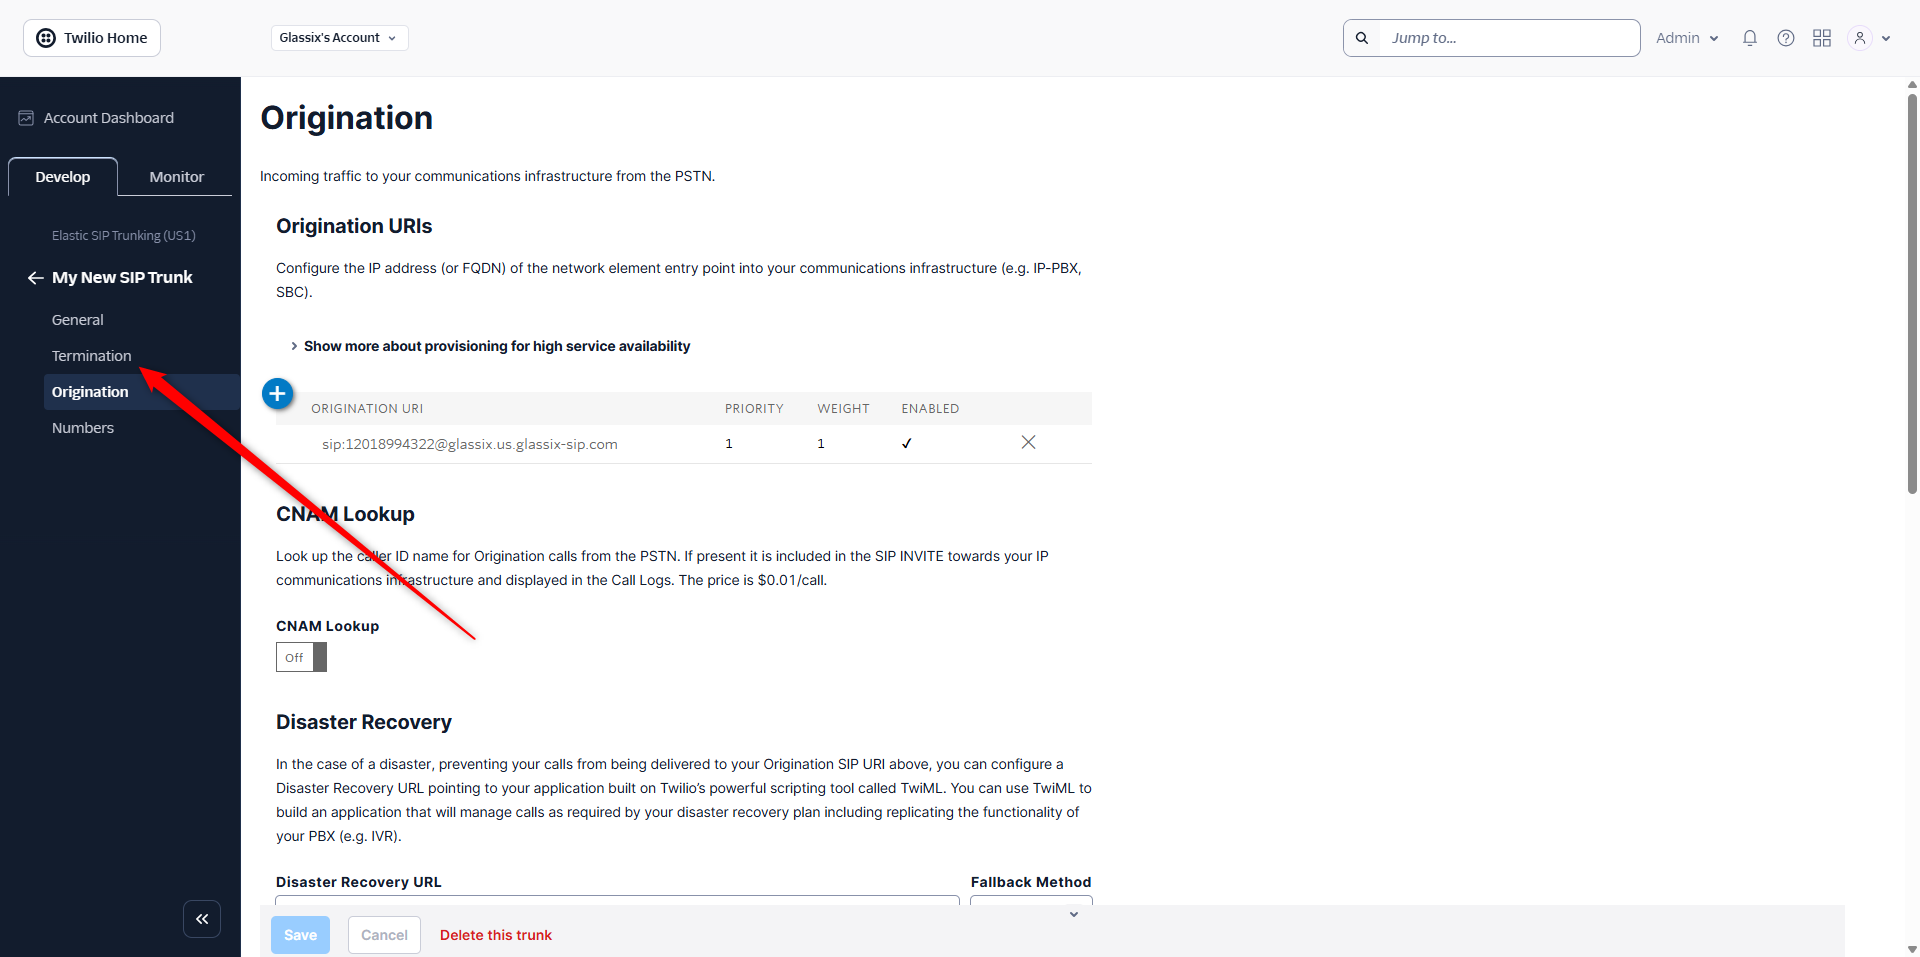
-
Scroll down to Authentication, then under Credentials List, click the (+) button:
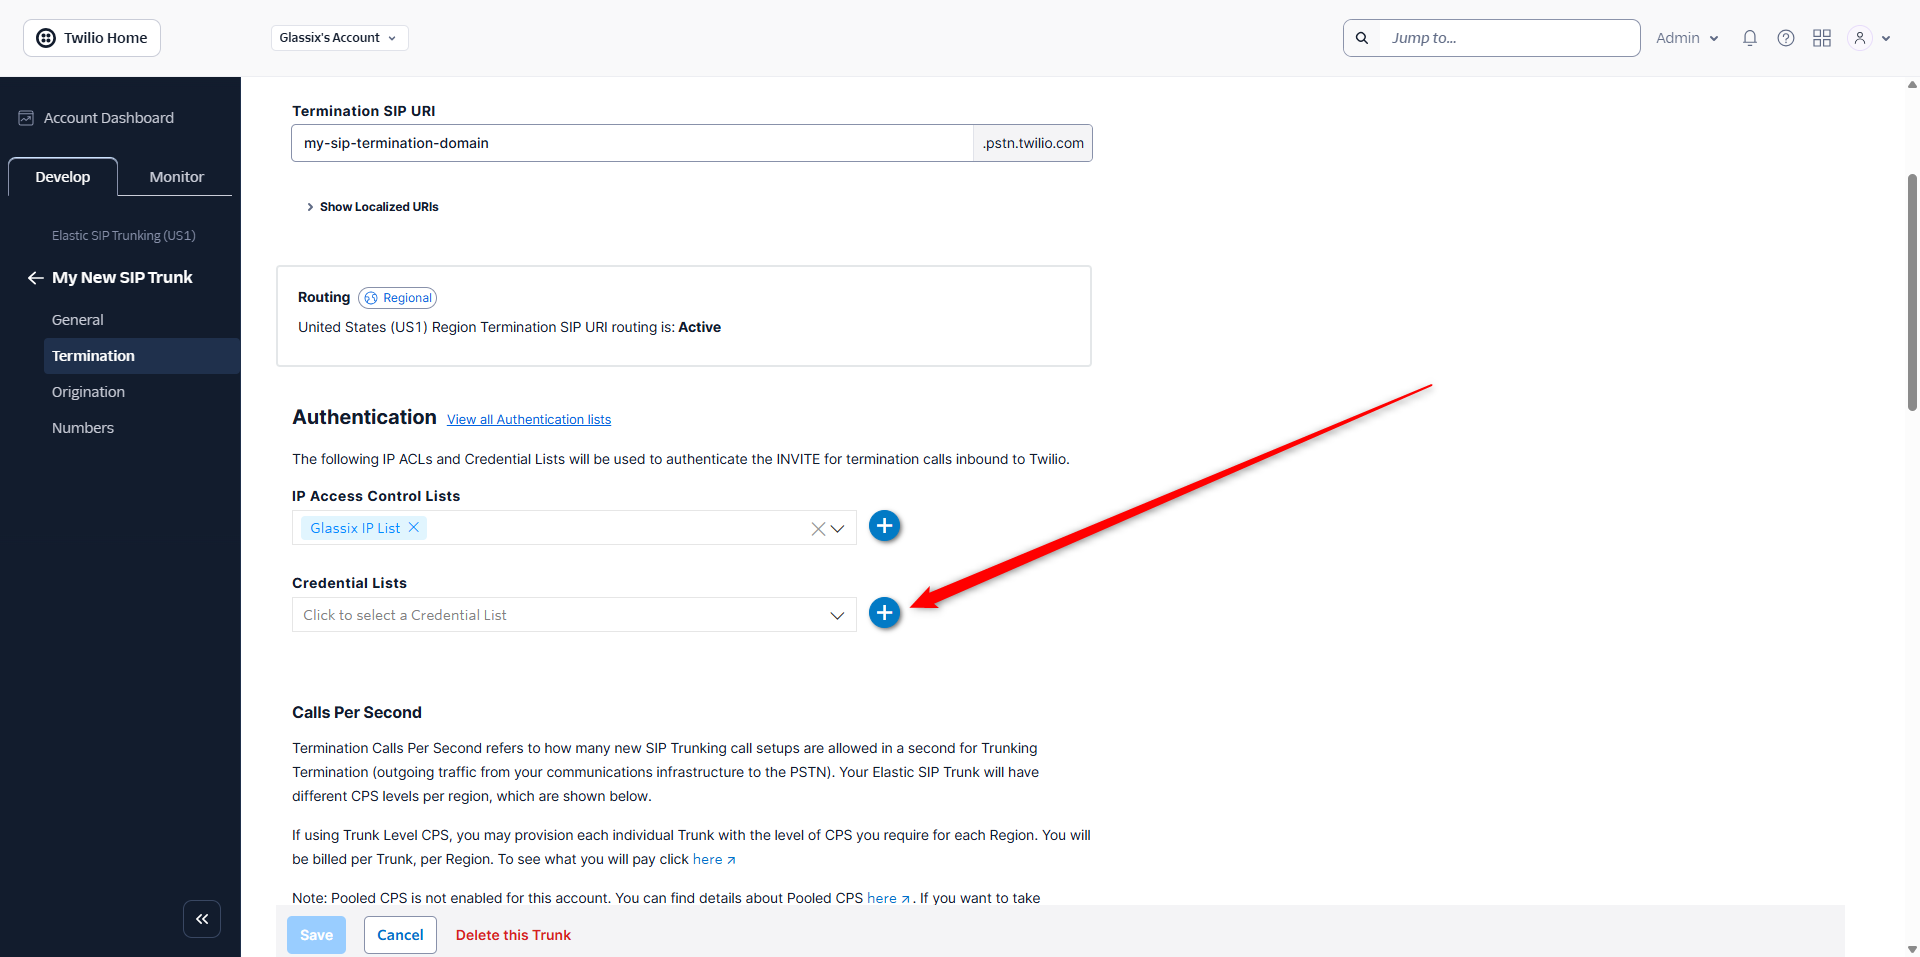
-
Give your new credentials list a name that is unique to this phone number:
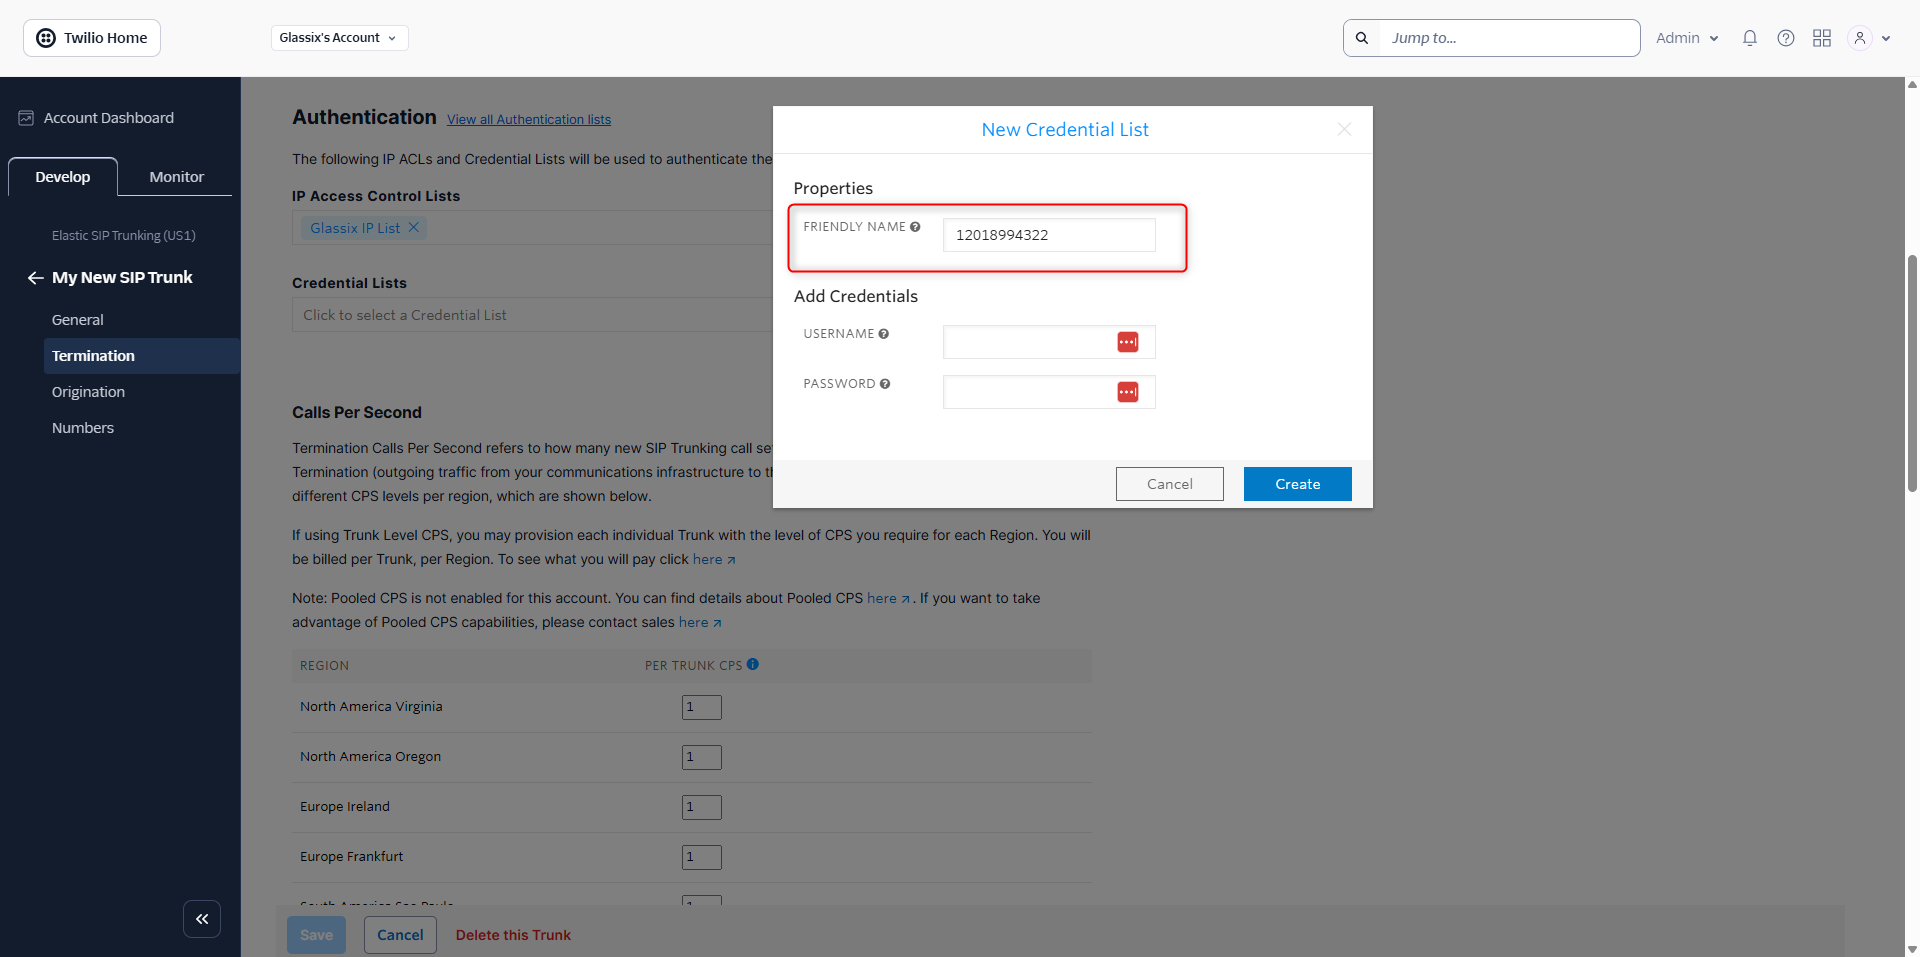
-
Enter the username and password you created and saved earlier in Glassix:

-
Confirm everything is correct, then click Create:

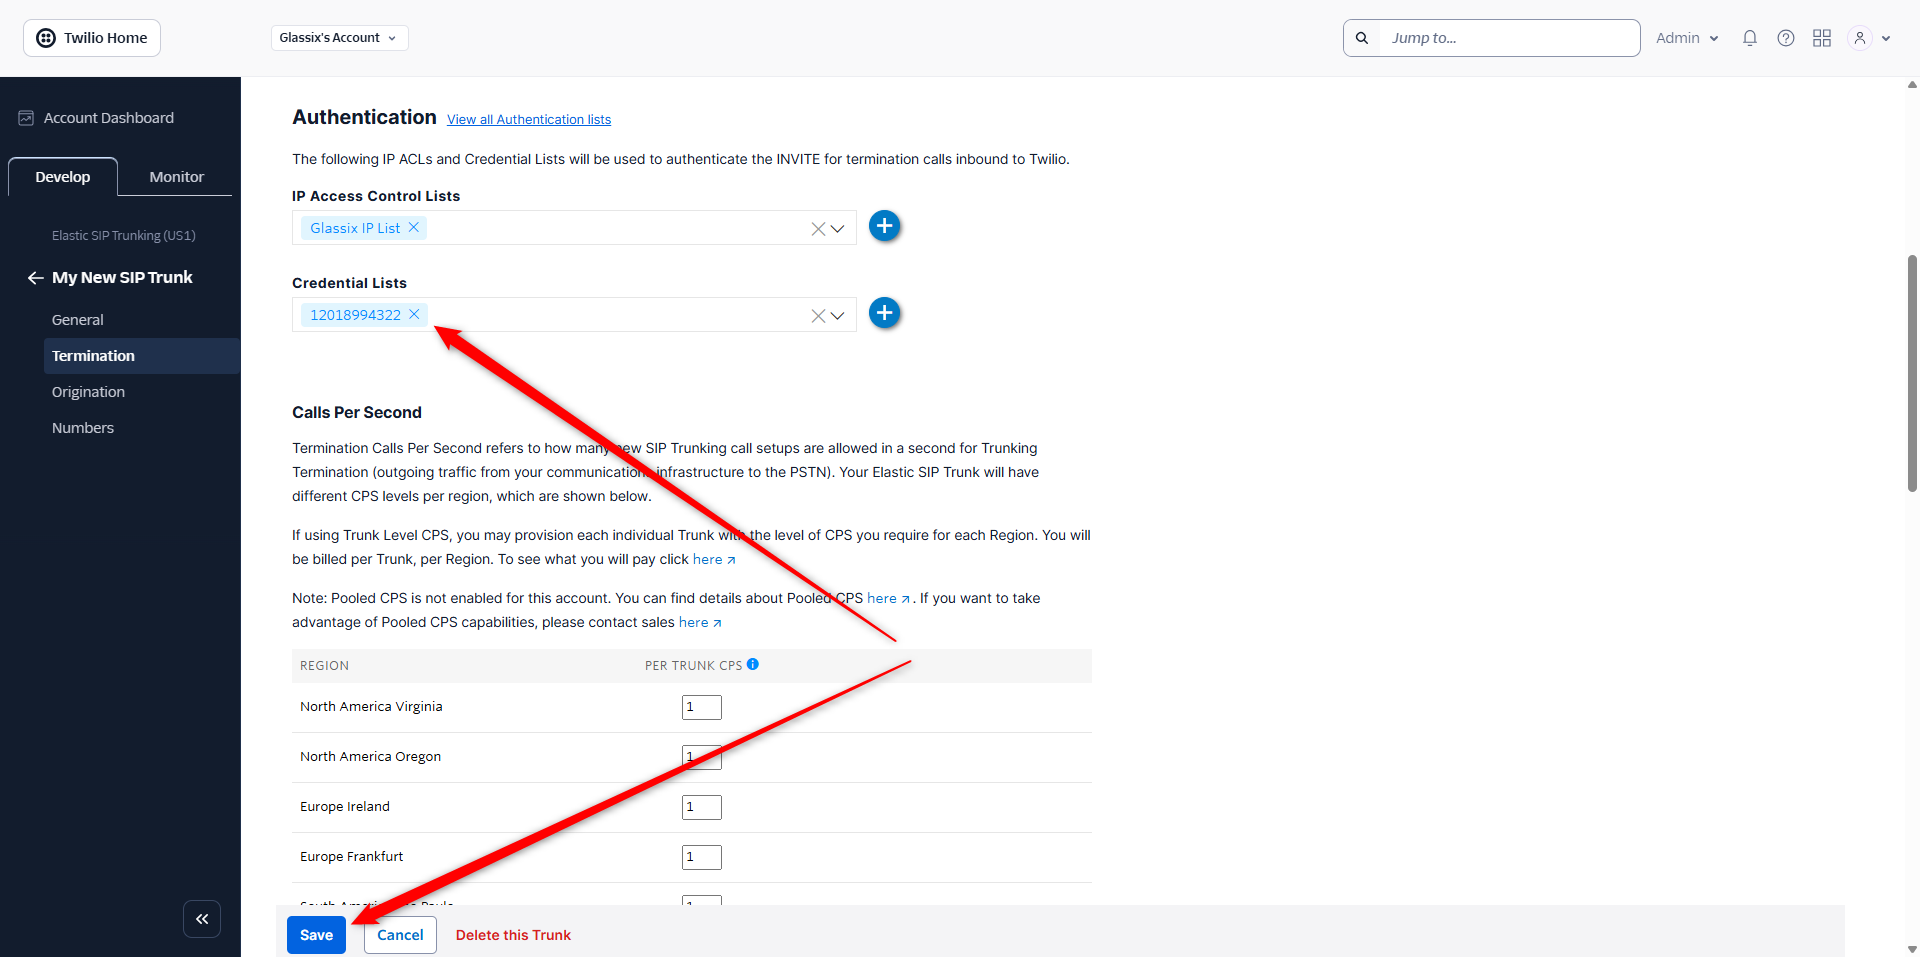
-
Make sure your new credentials list shows up under Credentials Lists, then click Save:
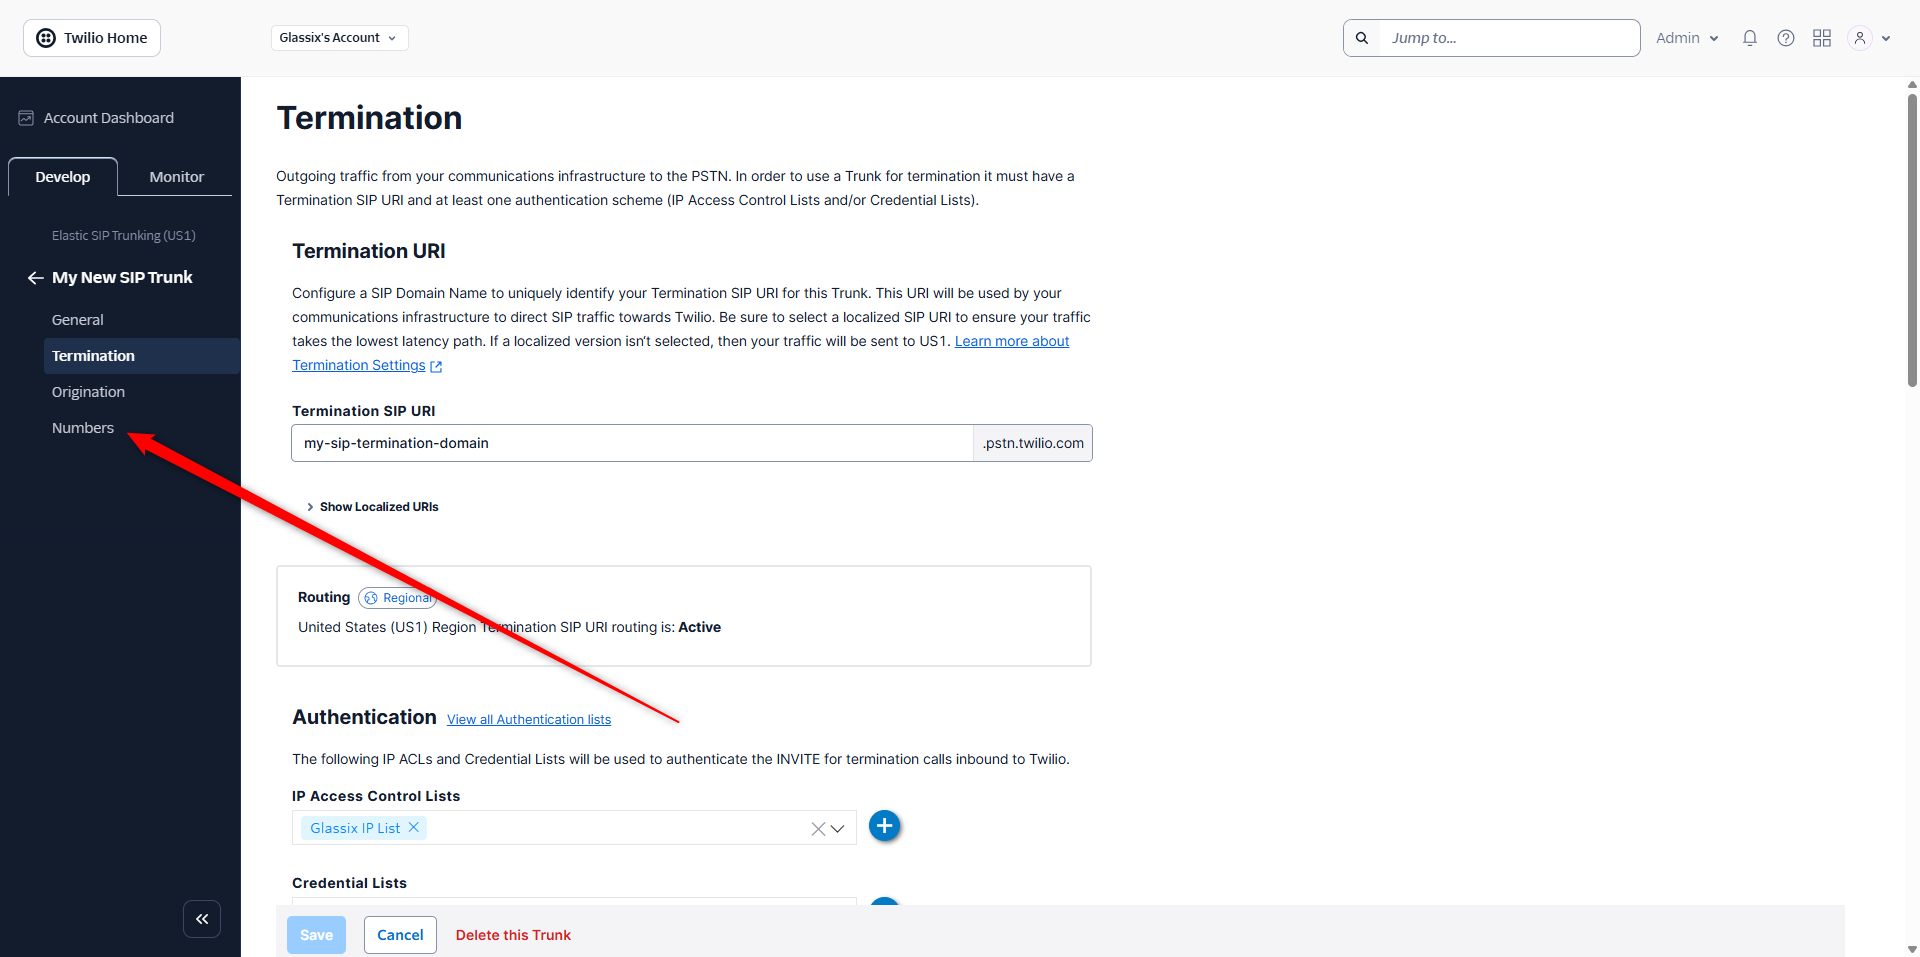
-
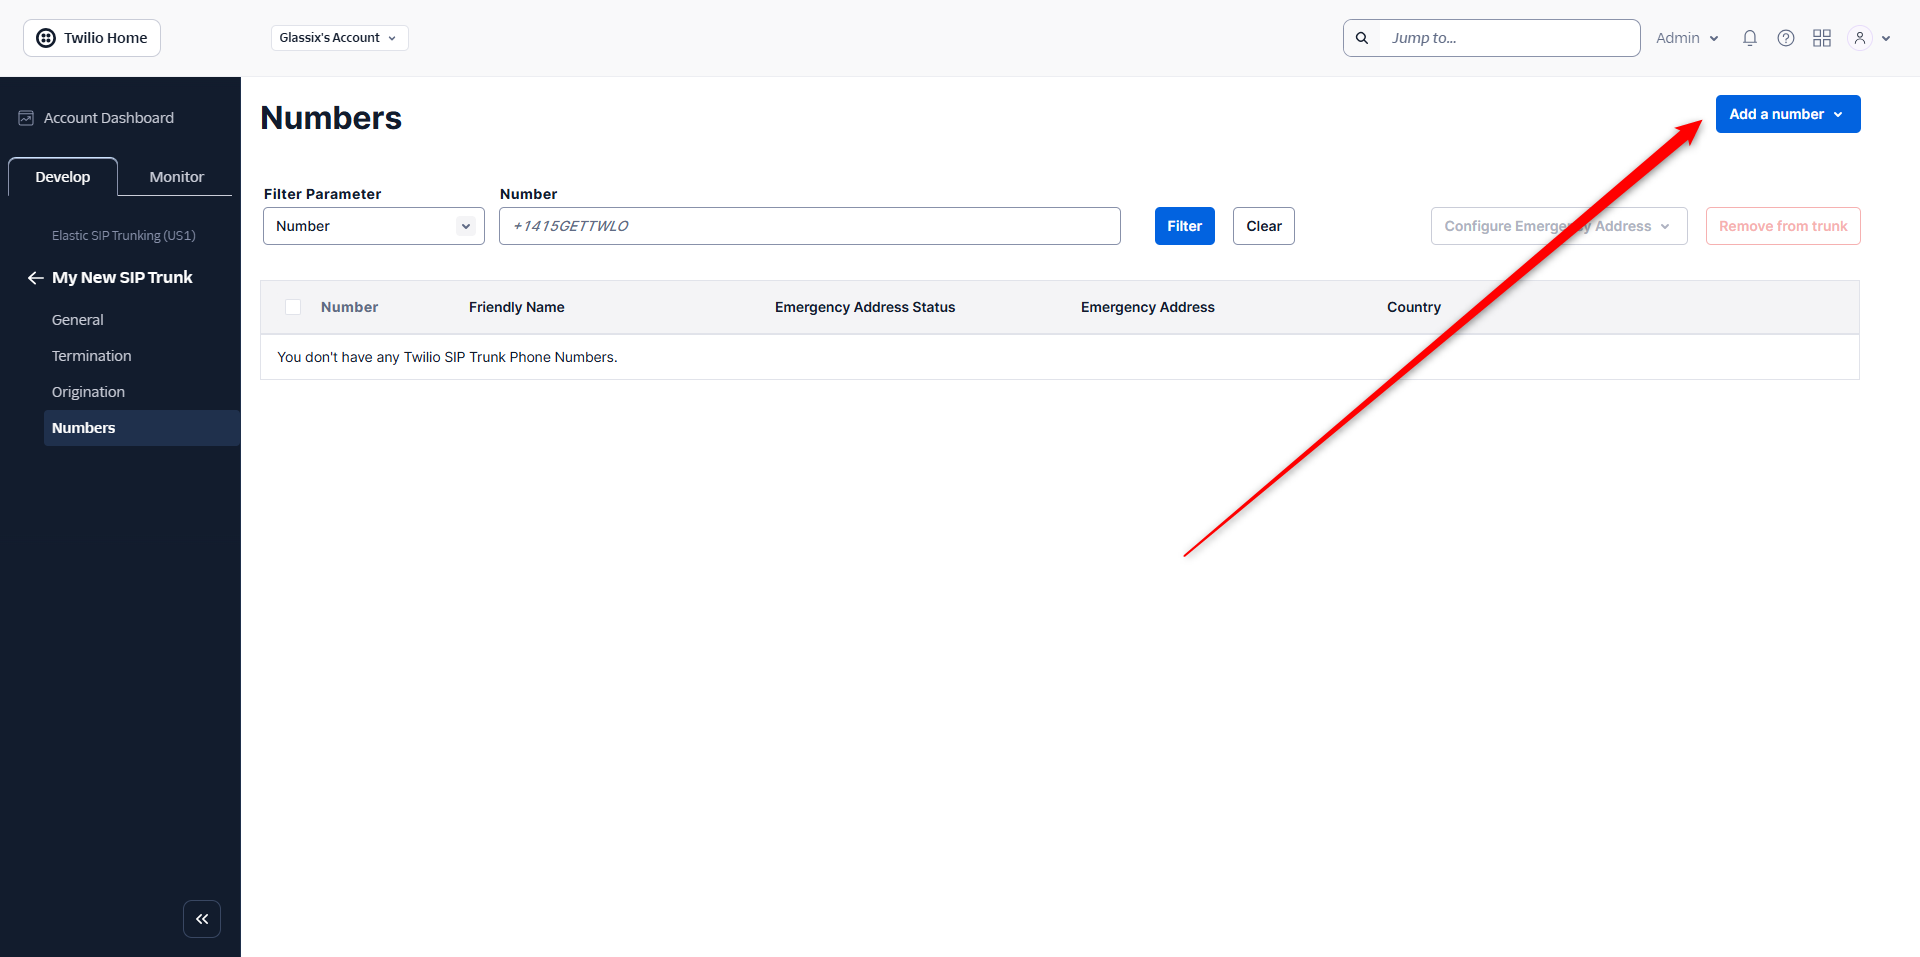
In the left-hand menu, select Numbers:
-
From the numbers screen, select Add a number in the top right:
-
Select the number you added to Glassix earlier, then choose Add Selected:
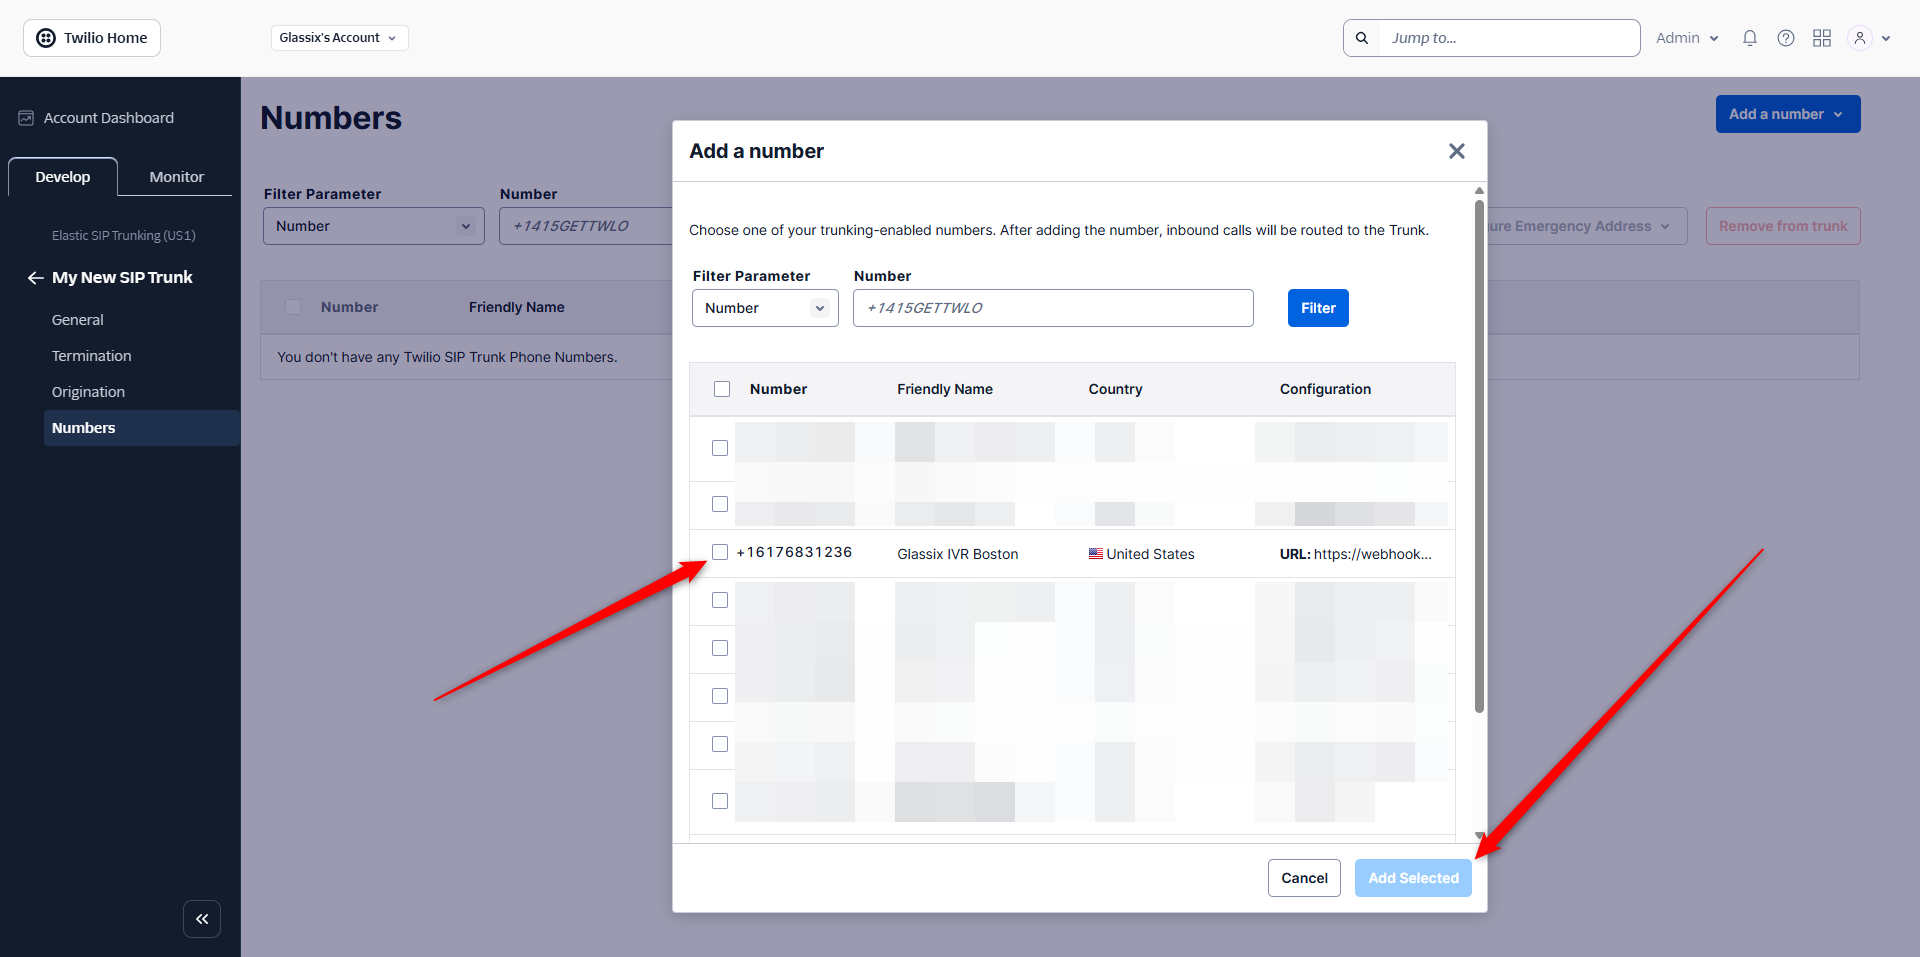
-
Congratulations! Your number is now connected to Glassix. Check out our Map a Flow guide to see how to map a flow to your phone number, then proceed with Step Five: Set Up Call Transferring (Optional) or Step Six: Testing.
Step Four: IP Whitelisting for SIP Transfers
Note:If you set up your SIP trunk with Vonage or Twilio using one of the above guides, you have already completed this step and you can proceed directly to Step Five: Set Up Call Transferring (Optional) or Step Six: Testing.
IP whitelisting information for Vonage and Twilio is provided here for reference only, you don't need to perform any additional steps.
When transferring calls to SIP addresses (internal PBX, SIP endpoints, etc.), you must whitelist Glassix IP addresses in your SIP server or firewall. This allows transferred calls from Glassix to reach your internal telephony infrastructure.
Glassix Voice IP Addresses by Region
Add these IP addresses to your provider's IP Access Control List (ACL) or whitelist based on your region:
EMEA Region
Signaling
CIDR Range: 20.217.220.6/32, 51.4.59.79/32
Ports:  5060/UDP, 5060/TCP, 5061/TLS

Media
CIDR Range: 51.58.35.8/29
Ports: 16384-32768
Where to Whitelist Glassix IPs
The location for IP whitelisting depends on your internal telephony setup:
For PBX Systems (Asterisk, FreeSWITCH, etc.)
- Access your PBX configuration
- Locate the SIP ACL or permitted hosts configuration
- Add Glassix IPs to the allowed list
- Restart SIP service if required
Example for FreeSWITCH (acl.conf.xml):
<list name="glassix" default="deny">
  <node type="allow" cidr="20.217.220.6/32"/>
  <node type="allow" cidr="51.4.59.79/32"/>
</list>
Example for Asterisk (sip.conf or pjsip.conf):
[glassix-acl]
type=acl
permit=20.217.220.6/32
permit=51.4.59.79/32
For Cloud PBX Providers (RingCentral, 8x8, etc.)
- Access your admin portal
- Navigate to security or firewall settings
- Add Glassix IPs to the SIP whitelist
- Apply changes
For Twilio (if using as SIP endpoint)
-
Navigate to Elastic SIP Trunking → Your Trunk → Termination
-
Scroll to IP Access Control Lists
-
Click Create new IP ACL
-
Add each Glassix IP address:
- Friendly Name:
Glassix EMEA(or appropriate name) - IP Address: Enter the IP address
- Subnet Mask:
32(for individual IPs) or use CIDR notation
- Friendly Name:
-
Save and associate the ACL with your trunk
For Firewall/Network Appliances
If you have a firewall in front of your SIP infrastructure:
- Create a rule to allow UDP/TCP ports 5060-5061 from Glassix IPs
- Allow RTP media ports (16384-32768 UDP) from Glassix IPs
- Apply the rule to your SIP server's network segment
- Test connectivity
Important Notes
- Add all IPs: Include all IP addresses for your region to ensure redundancy during transfers
- CIDR Notation: Use /32 for individual IPs or contact Glassix support for range notation
- Multiple Regions: If using multiple regions, whitelist IPs from all regions
- Updates: Glassix IPs are stable but may change. Subscribe to our status page for notifications
- Only for SIP Transfers: PSTN number transfers don't require IP whitelisting (they use provider authentication)
- Testing: After whitelisting, test by transferring a call from Glassix to a SIP address
Verification
To verify your IP whitelist is configured correctly:
-
Create a test voice flow that transfers to a SIP address (e.g.,
sip:[email protected]) -
Call your Glassix number and trigger the transfer
-
If the transfer fails with "403 Forbidden" or "Timeout", check:
- IPs are correctly entered in your PBX/firewall
- SIP ports (5060/5061) are open from Glassix IPs
- RTP ports are allowed for media
- Your SIP server logs for rejected connections
-
Contact Glassix support if issues persist after verification
Step Five: Set Up Call Transferring (Optional)
Tip:This step is optional, but recommended. Set up call transferring if you want your customers to have a way to reach your live, human agents either during or after speaking with your AI agents.
See Transferring Calls for steps to set up call transfers from your flows to your chosen PSTN phone number or SIP address.
Step Six: Testing
The final step in connecting a number from any provider is to test the connection and make sure everything is working.
Testing Inbound Calls
To make sure your inbound configuration is working:
-
Call the phone number you just connected to Glassix
-
Make sure that the call:
- Connects to Glassix
- Triggers your mapped voice flow
- Starts reading out the first text in your flow
If all that happens, you're done! Congratulations on your new inbound voice channel.
Otherwise, see the troubleshooting section below.
Testing Outbound Calls
Note:You only need to test outbound calls if you set up call transferring.
-
Create a test voice flow that makes an outbound call transfer
-
Trigger the flow by calling the phone number you connected to Glassix
-
Make sure that the call:
- Gets successfully transferred to your PSTN phone number or SIP address
- Shows your configured number in caller ID
- Is of acceptable audio quality
If all that happens, you're done! Congratulations on your new outbound voice channel.
Otherwise, see the troubleshooting section below.
Troubleshooting
Solutions to common problems you may encounter during testing.
| Issue | Possible Cause | Solution |
|---|---|---|
| No inbound calls received | Incorrect SIP URI or credentials | Verify your endpoint configuration matches Glassix credentials |
| Authentication failures | Wrong username/password | Double-check credentials in both systems |
| One-way audio | NAT or firewall issues | Ensure RTP ports are open (typically 10000-20000 UDP) |
| PSTN transfer fails | Invalid caller ID | Ensure you're using one of your registered phone numbers as caller ID |
| PSTN transfer fails | Trunk not bidirectional | Enable termination/outbound in your provider settings |
| SIP transfer fails | Glassix IPs not whitelisted | Add Glassix IPs to your PBX ACL (see IP Whitelisting section) |
| SIP transfer timeout | Firewall blocking | Open SIP (5060/5061) and RTP (10000-20000) ports from Glassix IPs |
| SIP transfer rejected | Authentication required | Add SIP credentials in your transfer action configuration |
Updated 21 days ago