Getting Started with the API
Overview, walkthrough and examples for using the API
Overview
This article will walk you through the basics of accessing, using, and implementing Glassix's API, and includes practical examples for everyday use cases.
Tip:If you haven't already, we recommend you familiarize yourself with the Glassix API documentation.
There are three options for accessing the API:
- Glassix API, our REST API
- GlassixJS, our JavaScript SDK
- GlassixSharp, our C# SDK
We strongly recommend using one of our SDKs whenever possible. They support all primary Glassix API endpoints and include additional features such as automated token management and thread-safe operation.
Getting Started
Before using the API, we recommend setting up one or more API-only users.
While any user with admin permissions has full access to API functionality, all actions taken through the API will appear to have been performed by the user who created the access token.
API-only users help keep admin and API actions separate for reporting, logging, and display purposes.
Tip:API users don't require a license, and creating new API users won't impact your active user count.
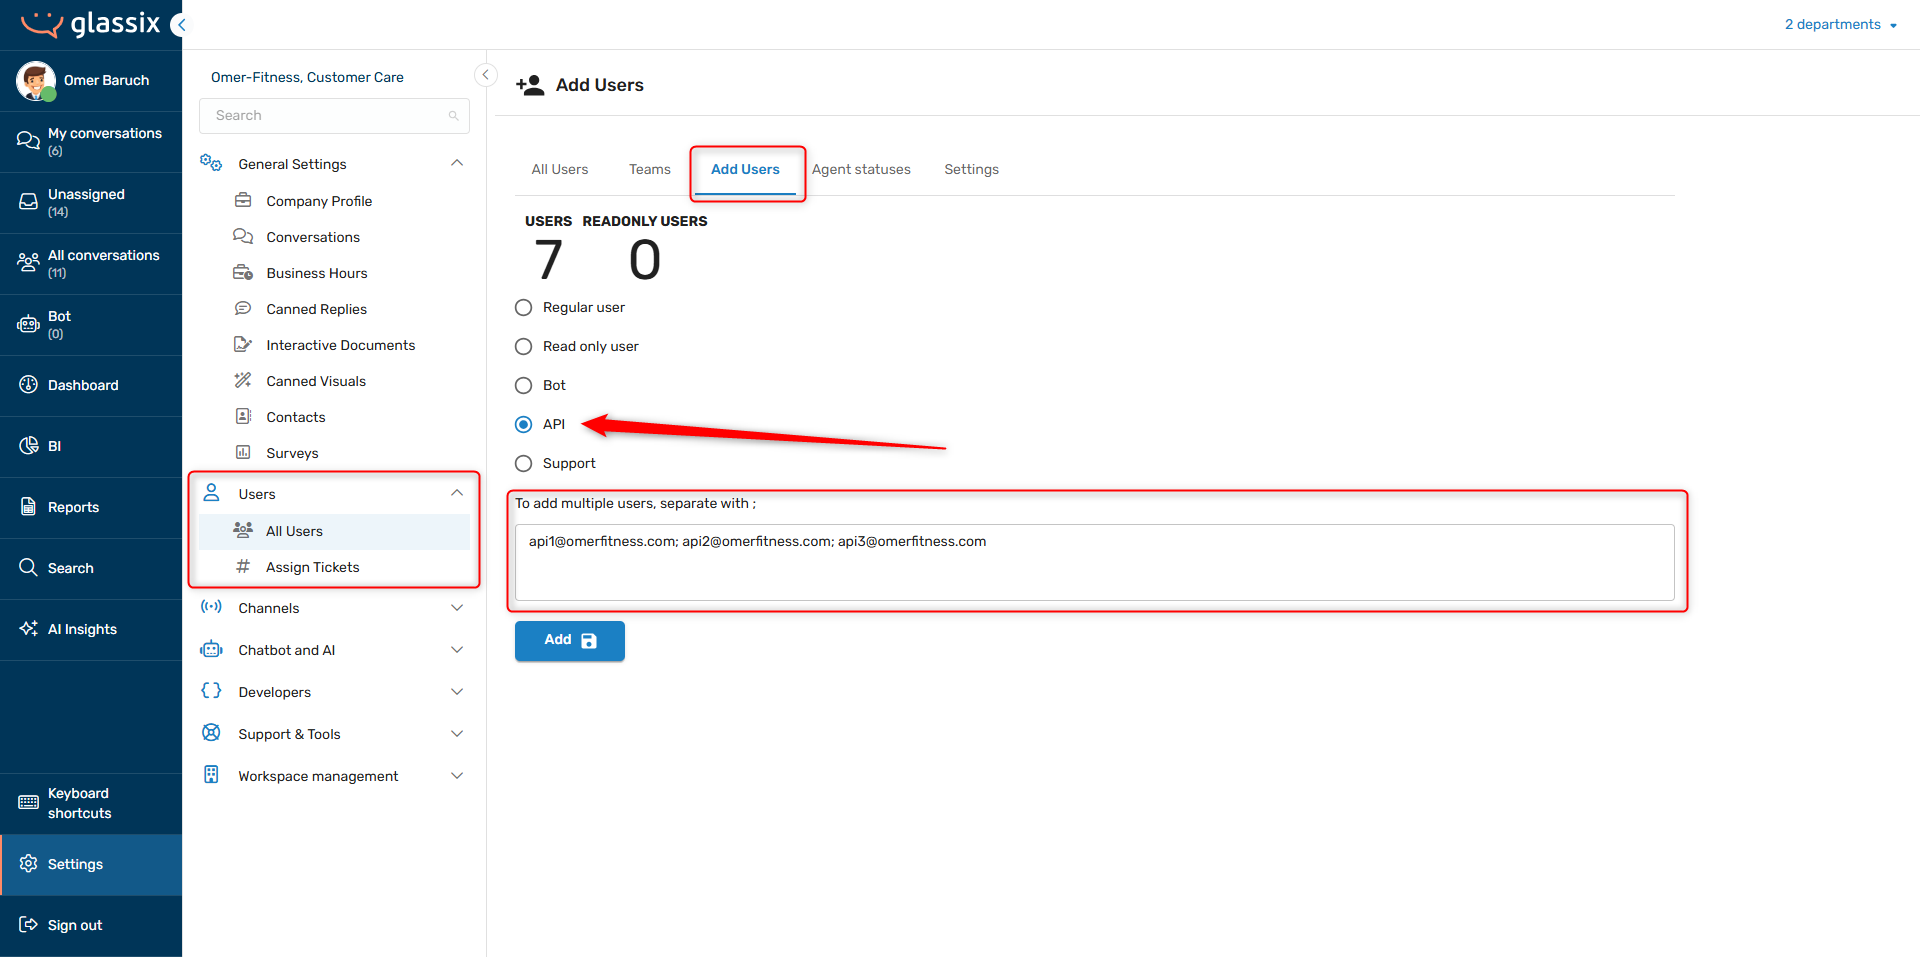
To set up a new API-only user:
-
Log in to your Glassix workspace as a Department or Workspace admin
-
Navigate to Settings → Users → All Users → Add Users or click here.
-
Select API and enter at least one email address:
-
Save your changes
Getting Started with the SDKs
In addition to creating an API user, if you're using one of our SDKs, you will need to install the package in your project environment.
If you're adding our SDKs to your external project, use the commands below to install the relevant version:
Install the NPM package:
npm i glassixImport or require the glassix module:
import glassix from 'glassix';or
const glassix = require('glassix');Install the .NET package:
dotnet add package GlassixSharpGlassixSharp requires .NET 9.0 or higher.
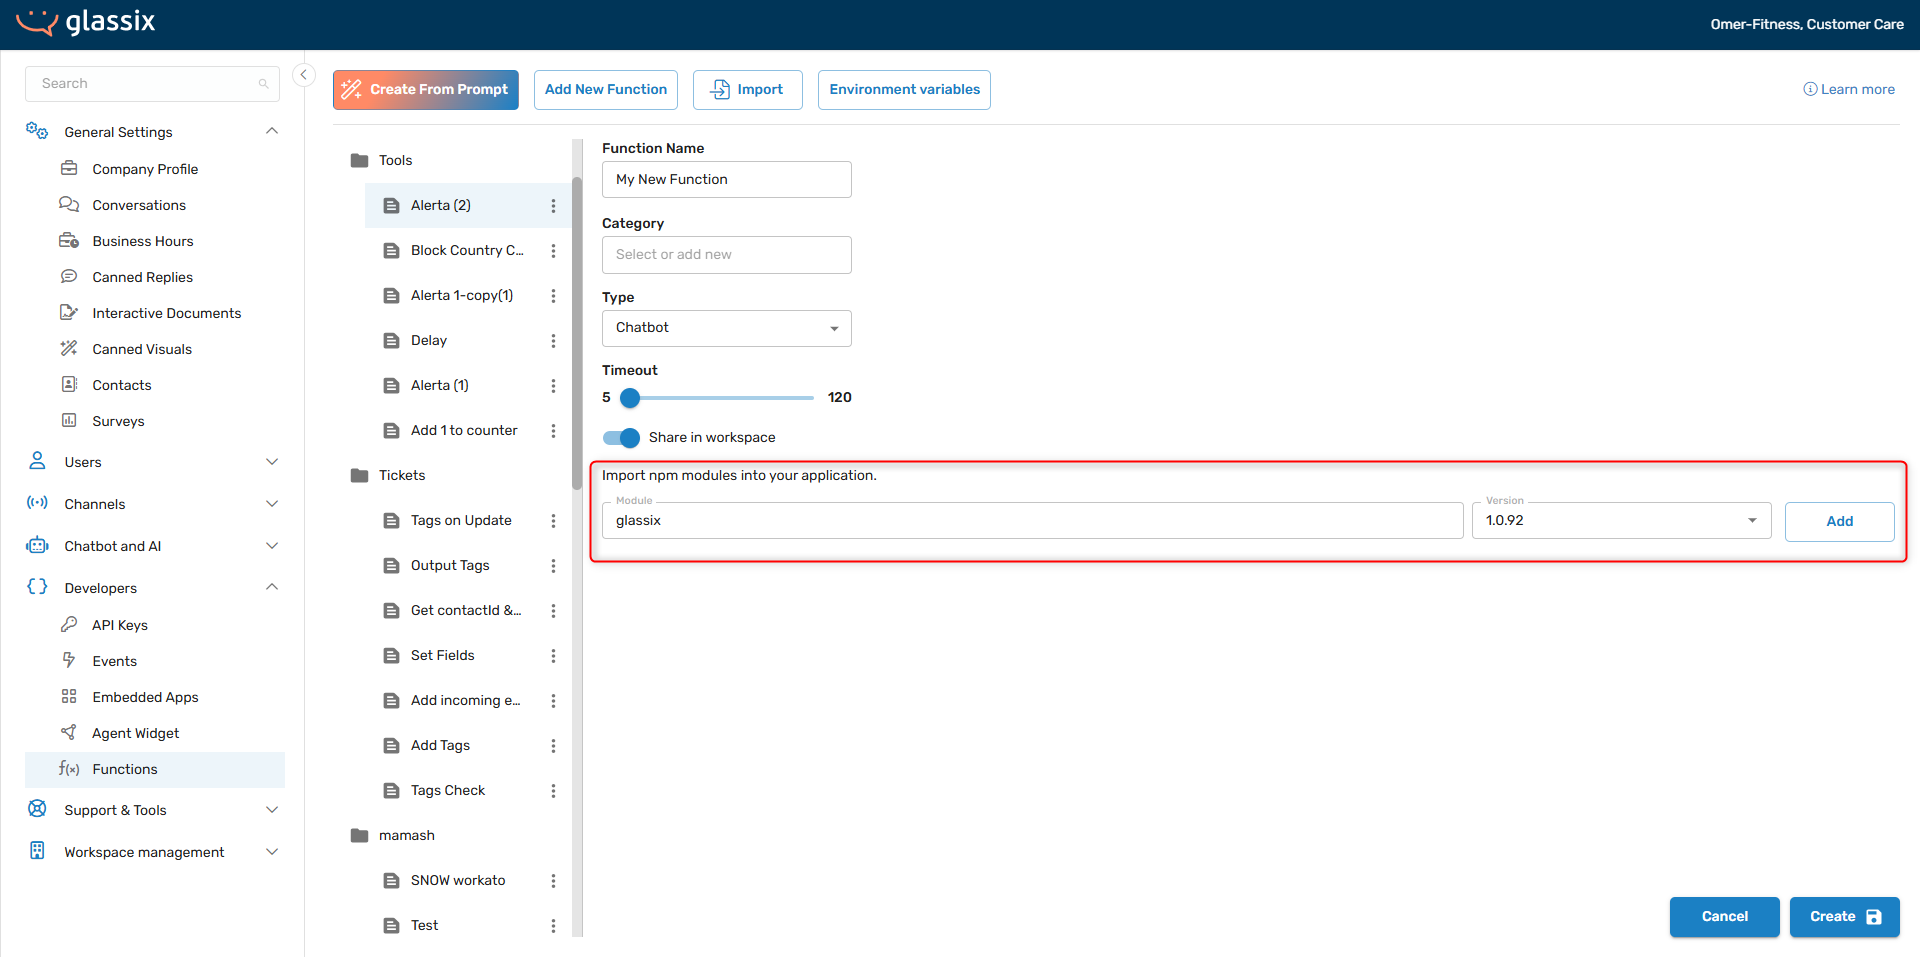
If you're using our JavaScript SDK with one of your Glassix functions, make sure to import it as a module when creating the function. This will handle both the installation and the import for you automatically:
You can also add the SDK to an existing function at any time in the function's Settings:
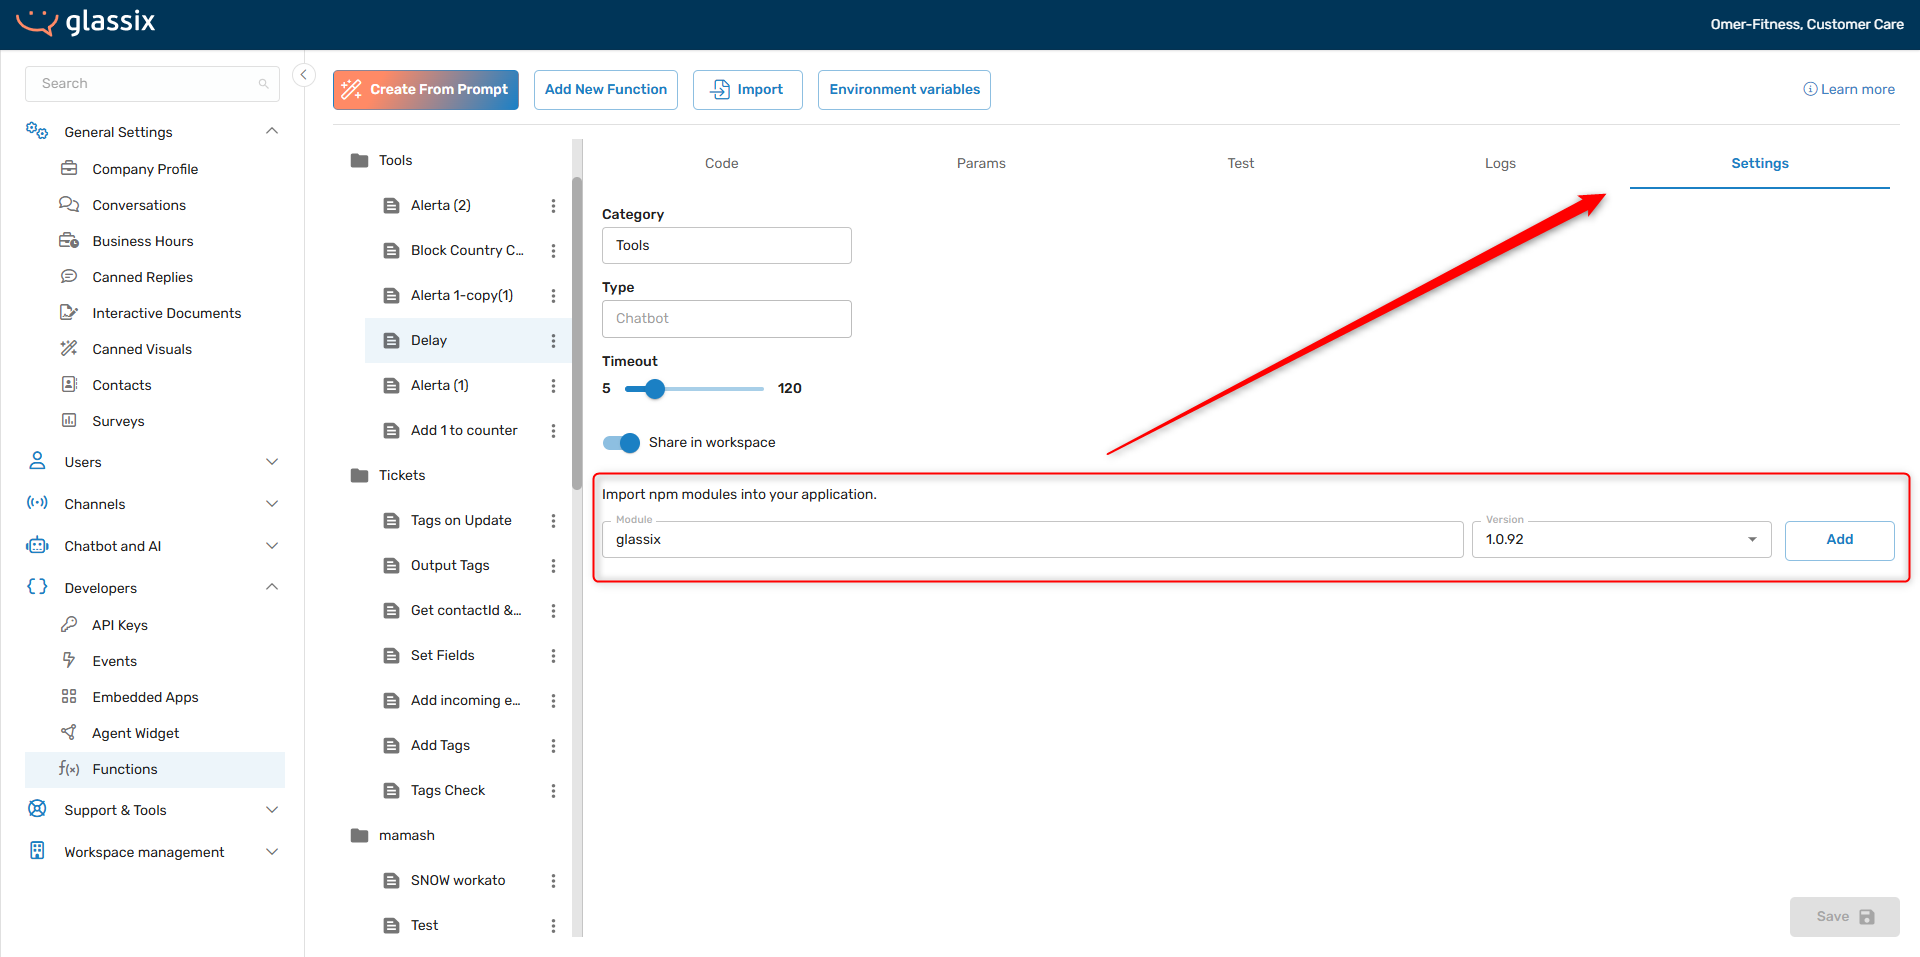
Once you save, the SDK will be automatically installed and imported for you, just as if you had added it when first creating the function.
Once you have the relevant SDK installed and imported, you can proceed to initialize a new Glassix client.
Getting Authenticated
Once you have an API user and you've installed the relevant packages, the next step is to get an access token. You will need an access token every time you want to make an API call, and there are three ways to get one:
- Request one from the REST API
- Initialize a Glassix client
- Manually generate one in the UI (for testing via the API documentation only)
We'll cover each option below.
Request an Access Token from the REST API
Tip:We recommend using our JavaScript or C# SDK, instead of our REST API, whenever possible. Our SDKs handle reauthentication, timeouts, rate limits and responses for you automatically.
The REST API allows you to generate new access tokens on demand using your API credentials.
Your application is responsible for generating a new token whenever one expires (every 3 hours) and for securely storing the current token between calls. Please keep our rate limits in mind. All API tiers allow a maximum of 30 token requests per minute.
This means that it is not advisable to request a new access token for each API call. Your application should instead securely save your access token and request a new one only when your current token expires.
Important!Your API key, secret and access token are all sensitive data. Never hardcode your API credentials directly in your source code, commit them to version control systems or share them over unsecured channels (like email).
Always store your API key and secret in environment variables or secure credential management systems to prevent unauthorized access to your account.
To request an access token from the REST API, first follow the instructions here to find your API key and API secret.
Pass these values, along with the username of your API user, to the /token/get endpoint. The username you enter here will be recorded as having performed any actions that your application takes through the API.
Examples:
curl --request POST \
     --url https://workspace.glassix.com/api/v1.2/token/get \
     --header 'accept: application/json' \
     --header 'content-type: application/json' \
     --data '
      {
        "apiKey": "90ec840e-7bb3-44f5-91e8-c694ee066e85",
        "apiSecret": "w24ErSEzhpILnpHKMDePfS0IYx74gPKkrlE4tE1x4FNkhTVPHxrkOSESL7fXs9hysjvPjxzaGaGCt335E4ESJODzs1h3kXuzUb1kPQptna6v8FZQmNObqidqy0ZAFcdN",
        "userName": "[email protected]"
      }
    '
const axios = require('axios');
const response = await axios.post(
'https://workspace.glassix.com/api/v1.2/token/get',
{
apiKey: '90ec840e-7bb3-44f5-91e8-c694ee066e85',
apiSecret: 'w24ErSEzhpILnpHKMDePfS0IYx74gPKkrlE4tE1x4FNkhTVPHxrkOSESL7fXs9hysjvPjxzaGaGCt335E4ESJODzs1h3kXuzUb1kPQptna6v8FZQmNObqidqy0ZAFcdN',
userName: '[email protected]'
},
{
headers: {
'accept': 'application/json',
'content-type': 'application/json'
}
}
);
console.log(response.data);using System;
using System.Net.Http;
using System.Text;
using System.Threading.Tasks;
var client = new HttpClient();
var request = new HttpRequestMessage(HttpMethod.Post, "https://workspace.glassix.com/api/v1.2/token/get");
request.Headers.Add("accept", "application/json");
var content = new StringContent(
@"{
""apiKey"": ""90ec840e-7bb3-44f5-91e8-c694ee066e85"",
""apiSecret"": ""w24ErSEzhpILnpHKMDePfS0IYx74gPKkrlE4tE1x4FNkhTVPHxrkOSESL7fXs9hysjvPjxzaGaGCt335E4ESJODzs1h3kXuzUb1kPQptna6v8FZQmNObqidqy0ZAFcdN"",
""userName"": ""[email protected]""
}",
Encoding.UTF8,
"application/json"
);
request.Content = content;
var response = await client.SendAsync(request);
var responseBody = await response.Content.ReadAsStringAsync();
Console.WriteLine(responseBody);import requests
url = "https://workspace.glassix.com/api/v1.2/token/get"
headers = {
"accept": "application/json",
"content-type": "application/json"
}
payload = {
"apiKey": "90ec840e-7bb3-44f5-91e8-c694ee066e85",
"apiSecret": "w24ErSEzhpILnpHKMDePfS0IYx74gPKkrlE4tE1x4FNkhTVPHxrkOSESL7fXs9hysjvPjxzaGaGCt335E4ESJODzs1h3kXuzUb1kPQptna6v8FZQmNObqidqy0ZAFcdN",
"userName": "[email protected]"
}
response = requests.post(url, json=payload, headers=headers)
print(response.json())package main
import (
"bytes"
"encoding/json"
"fmt"
"io/ioutil"
"net/http"
)
func main() {
url := "https://workspace.glassix.com/api/v1.2/token/get"
payload := map[string]string{
"apiKey": "90ec840e-7bb3-44f5-91e8-c694ee066e85",
"apiSecret": "w24ErSEzhpILnpHKMDePfS0IYx74gPKkrlE4tE1x4FNkhTVPHxrkOSESL7fXs9hysjvPjxzaGaGCt335E4ESJODzs1h3kXuzUb1kPQptna6v8FZQmNObqidqy0ZAFcdN",
"userName": "[email protected]",
}
jsonData, err := json.Marshal(payload)
if err != nil {
panic(err)
}
req, err := http.NewRequest("POST", url, bytes.NewBuffer(jsonData))
if err != nil {
panic(err)
}
req.Header.Set("accept", "application/json")
req.Header.Set("content-type", "application/json")
client := &http.Client{}
resp, err := client.Do(req)
if err != nil {
panic(err)
}
defer resp.Body.Close()
body, err := ioutil.ReadAll(resp.Body)
if err != nil {
panic(err)
}
fmt.Println(string(body))
}library(httr)
library(jsonlite)
url <- "https://workspace.glassix.com/api/v1.2/token/get"
payload <- list(
apiKey = "90ec840e-7bb3-44f5-91e8-c694ee066e85",
apiSecret = "w24ErSEzhpILnpHKMDePfS0IYx74gPKkrlE4tE1x4FNkhTVPHxrkOSESL7fXs9hysjvPjxzaGaGCt335E4ESJODzs1h3kXuzUb1kPQptna6v8FZQmNObqidqy0ZAFcdN",
userName = "[email protected]"
)
response <- POST(
url,
body = toJSON(payload, auto_unbox = TRUE),
add_headers(
"accept" = "application/json",
"content-type" = "application/json"
)
)
content(response, "text", encoding = "UTF-8")use reqwest;
use serde_json::json;
#[tokio::main]
async fn main() -> Result<(), Box<dyn std::error::Error>> {
let client = reqwest::Client::new();
let payload = json!({
"apiKey": "90ec840e-7bb3-44f5-91e8-c694ee066e85",
"apiSecret": "w24ErSEzhpILnpHKMDePfS0IYx74gPKkrlE4tE1x4FNkhTVPHxrkOSESL7fXs9hysjvPjxzaGaGCt335E4ESJODzs1h3kXuzUb1kPQptna6v8FZQmNObqidqy0ZAFcdN",
"userName": "[email protected]"
});
let response = client
.post("https://workspace.glassix.com/api/v1.2/token/get")
.header("accept", "application/json")
.header("content-type", "application/json")
.json(&payload)
.send()
.await?;
let body = response.text().await?;
println!("{}", body);
Ok(())
}
// Cargo.toml dependencies:
[dependencies]
reqwest = { version = "0.11", features = ["json"] }
tokio = { version = "1", features = ["full"] }
serde_json = "1.0"require 'net/http'
require 'json'
require 'uri'
uri = URI('https://workspace.glassix.com/api/v1.2/token/get')
http = Net::HTTP.new(uri.host, uri.port)
http.use_ssl = true
request = Net::HTTP::Post.new(uri.path)
request['accept'] = 'application/json'
request['content-type'] = 'application/json'
request.body = {
apiKey: '90ec840e-7bb3-44f5-91e8-c694ee066e85',
apiSecret: 'w24ErSEzhpILnpHKMDePfS0IYx74gPKkrlE4tE1x4FNkhTVPHxrkOSESL7fXs9hysjvPjxzaGaGCt335E4ESJODzs1h3kXuzUb1kPQptna6v8FZQmNObqidqy0ZAFcdN',
userName: '[email protected]'
}.to_json
response = http.request(request)
puts response.bodyThe access token you generate will be valid for 3 hours.
Token Management in JavaScript
When building integrations with the REST API, your application must handle token expiry gracefully. The example below shows a simple token manager that fetches a new token only when the current one has expired:
const axios = require('axios');

const tokenManager = (() => {
    let accessToken = null;
    let tokenExpiresAt = null;

    // Tokens are valid for 3 hours; refresh 5 minutes early to avoid clock skew
    const TOKEN_LIFETIME_MS = (3 * 60 - 5) * 60 * 1000;

    async function getToken() {
        if (accessToken && tokenExpiresAt && Date.now() < tokenExpiresAt) {
            return accessToken;
        }

        const response = await axios.post(
            `https://${process.env.WORKSPACE}.glassix.com/api/v1.2/token/get`,
            {
                apiKey: process.env.API_KEY,
                apiSecret: process.env.API_SECRET,
                userName: process.env.USER_NAME
            },
            {
                headers: {
                    'accept': 'application/json',
                    'content-type': 'application/json'
                }
            }
        );

        accessToken = response.data.access_token;
        tokenExpiresAt = Date.now() + TOKEN_LIFETIME_MS;
        return accessToken;
    }

    return { getToken };
})();

// Usage: call tokenManager.getToken() before every API request
async function makeApiCall(endpoint) {
    const token = await tokenManager.getToken();
    return axios.get(endpoint, {
        headers: { 'Authorization': `Bearer ${token}` }
    });
}
Info:If you are using one of our SDKs, token management is handled for you automatically, you do not need to implement this yourself.
Initialize a Glassix Client
The recommended and most convenient way to authenticate your API calls is to initialize a Glassix client using one of our SDKs.
Once you have completed the steps in Getting Started with the SDKs, create a new client to get authenticated:
// Add in your API credentials
const clientOptions = {
    // Your glassix subdomain
    workspace: process.env.WORKSPACE,
    // Find your key and secret on Settings → Developers → Api keys
    apiKey: process.env.API_KEY,
    apiSecret: process.env.API_SECRET,
    // A user with access to your department, preferably an API user
    userName: process.env.USER_NAME
};

// Create a new client with the options above
const client = new glassix(clientOptions);
// Add in your API credentials
Credentials credentials = new Credentials(
workspaceName: "your-workspace",
userName: "[email protected]",
apiKey: Guid.Parse("your-api-key"),
apiSecret: "your-api-secret"
);
// Create new clients for different API areas
TicketsClient ticketsClient = new TicketsClient(credentials);
UsersClient usersClient = new UsersClient(credentials);
ContactsClient contactsClient = new ContactsClient(credentials);
ProtocolsClient protocolsClient = new ProtocolsClient(credentials);
WebhooksClient webhooksClient = new WebhooksClient(credentials);
TenantsClient tenantsClient = new TenantsClient(credentials);
CannedRepliesClient cannedRepliesClient = new CannedRepliesClient(credentials);
Info:In our JavaScript SDK, the same client is used for all your API calls. Our C# SDK requires a separate client for each set of endpoints.
The Glassix client will automatically handle token management, rate limiting, and authentication headers.
Manually Generate an Access Token
Note:Manually generating an access token from the UI is intended only for use when making API calls directly via the Glassix API documentation (the "Try It" feature). It is not suitable for production workflows or application integrations. Use the REST API token endpoint or initialize a Glassix client instead.
To generate an access token manually:
-
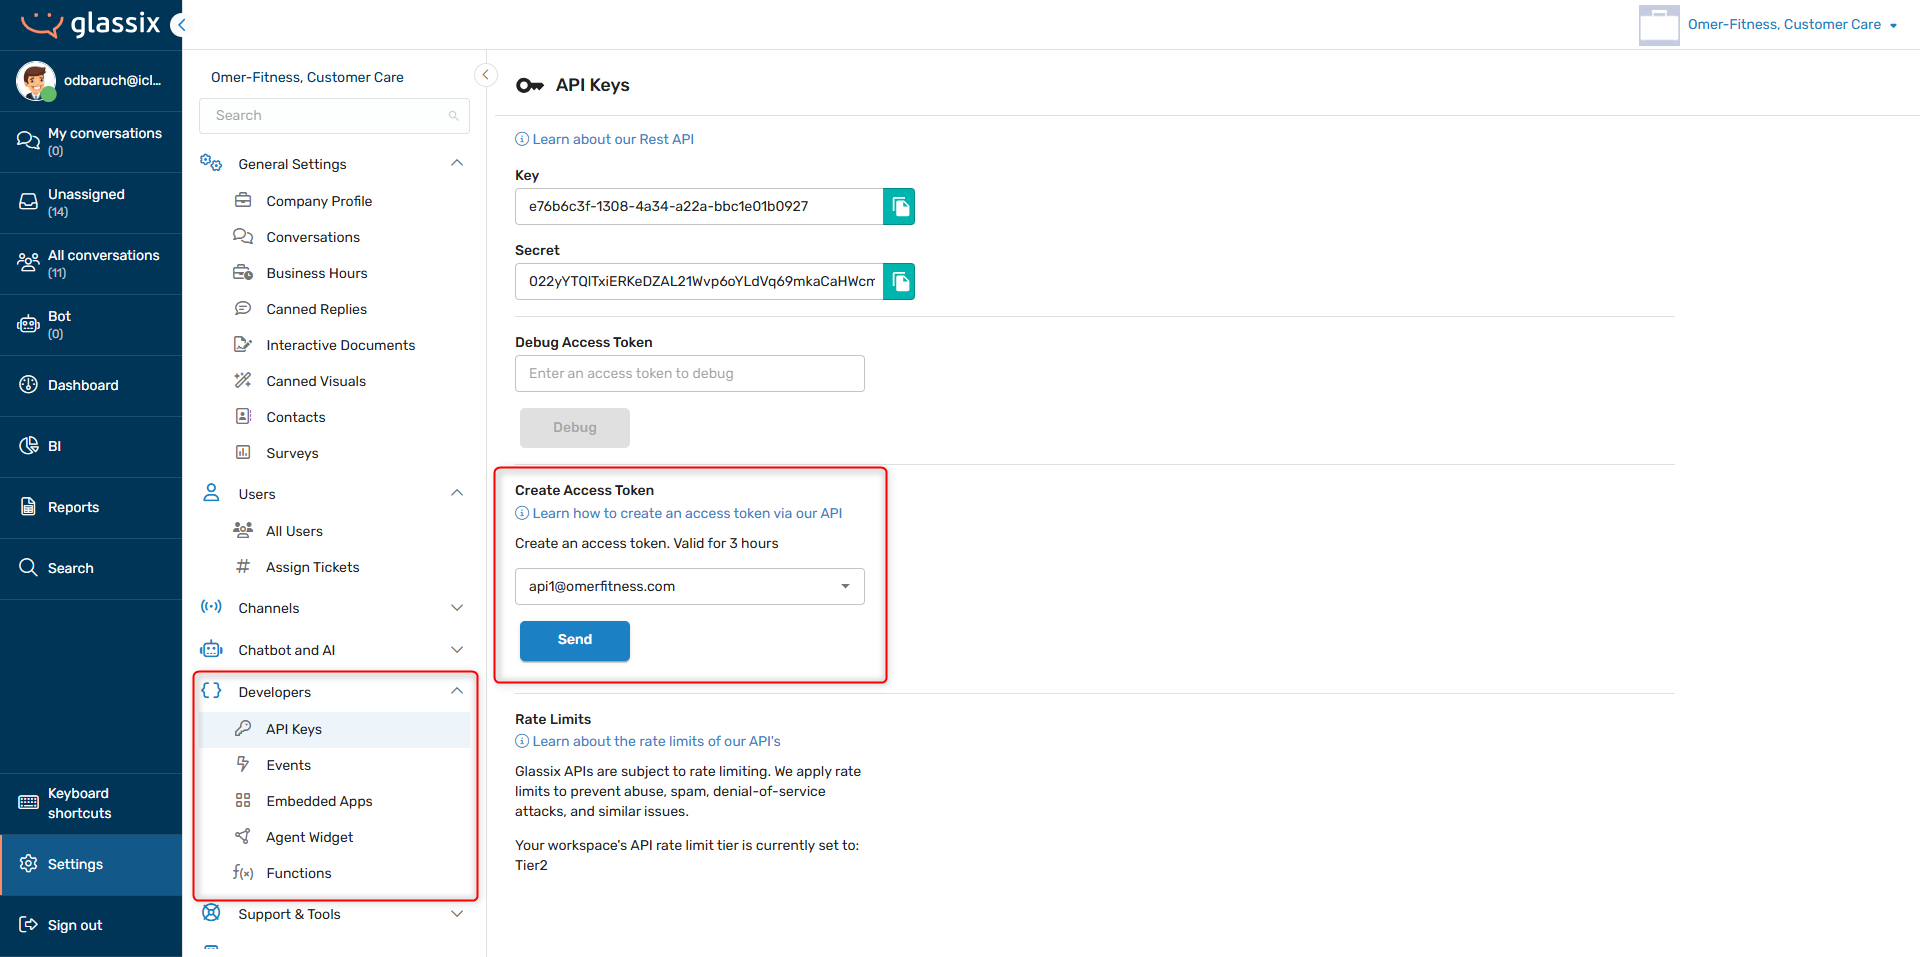
Navigate to Settings → Developers → API Keys or click here.
-
Under Create Access Token, search for or select a user from the dropdown list. This user will be recorded as having performed any actions that you take through the API:
-
Click Send and then copy the access token that is generated:
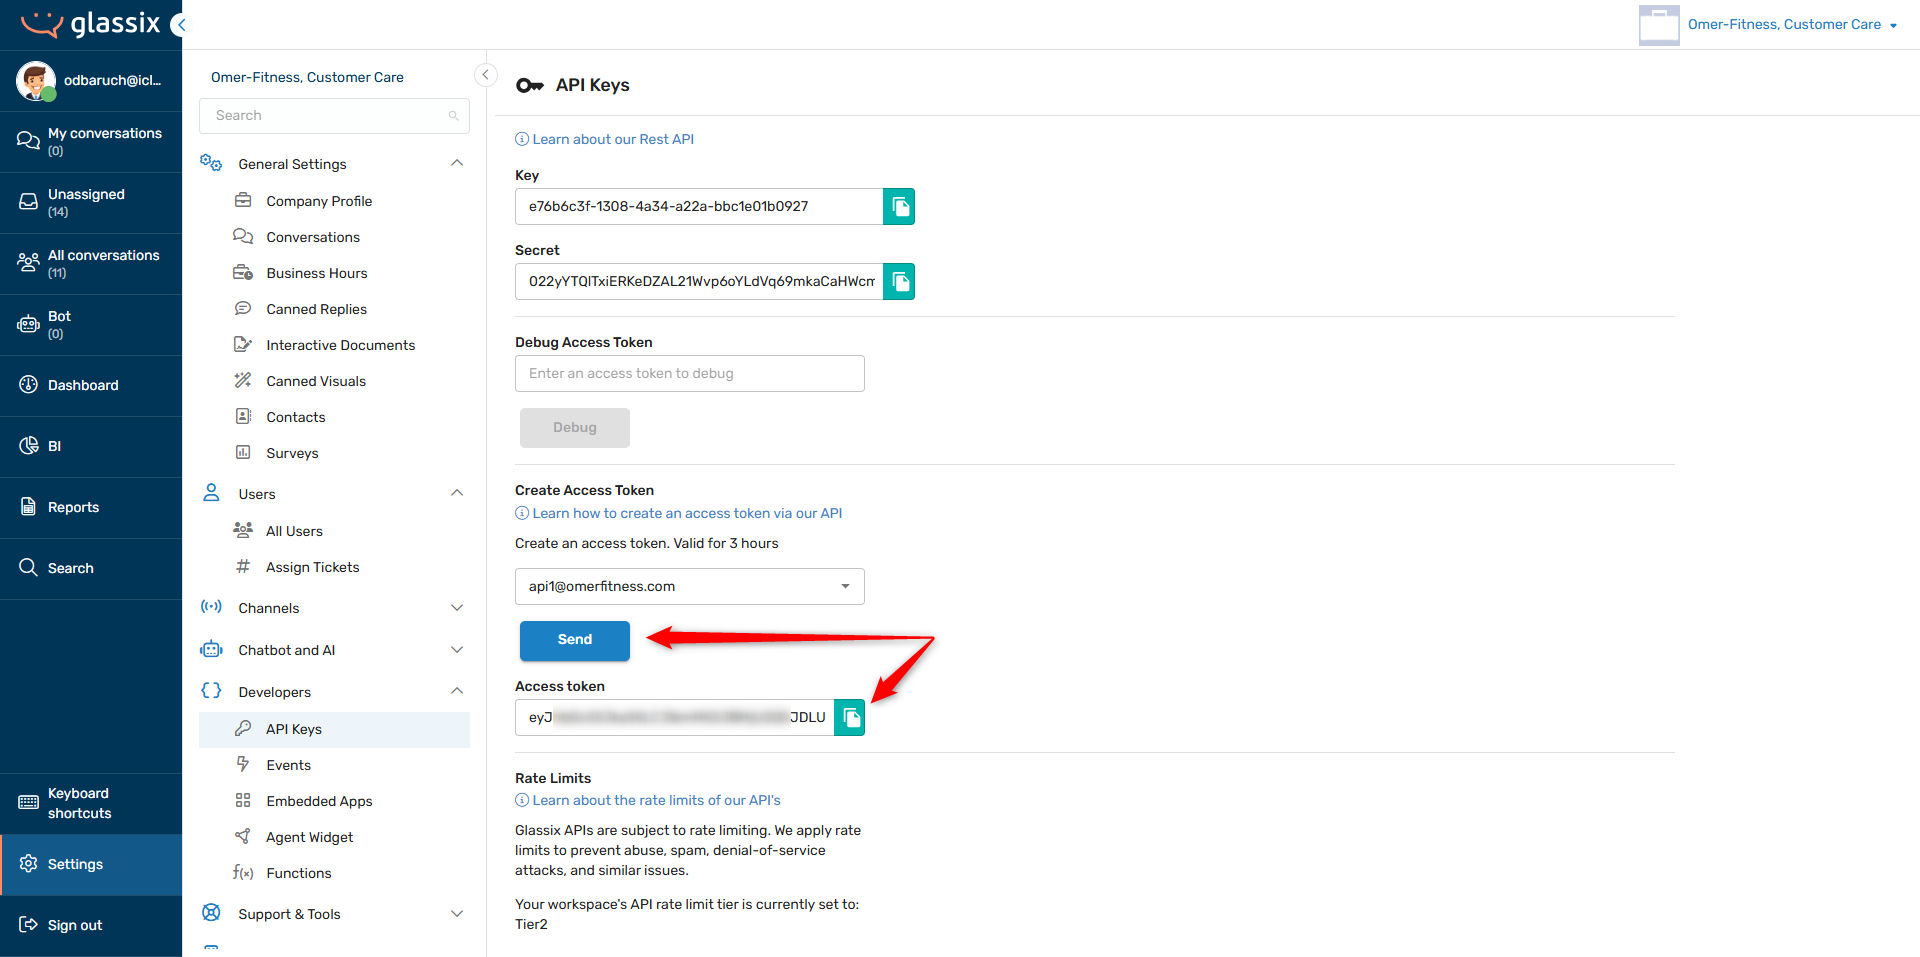
The access token you generate will be valid for 3 hours.
Making an API Call
Now that you've authenticated with the API and set up a Glassix client, you can start making API calls.
This section demonstrates a complete workflow that you can adapt to your own use cases. We'll walk through getting a ticket, closing it, and pushing the ticket data to an external system like Salesforce.
We'll cover this workflow using three different approaches:
- REST API - Using a token generated via the /token/get endpoint
- Node.js SDK - Using the glassix-js client
- C# SDK - Using the GlassixSharp clients
Info:If you want to try out individual API calls interactively, you can use the Try It feature in the Glassix API documentation. To do this, manually generate a one-time access token from the UI and enter it when prompted. This is the only scenario where manual token generation is recommended.
REST API Workflow
The REST API approach gives you direct control over all HTTP calls and is suitable for any language or environment.
Prerequisites:Before starting, make sure you have requested an access token from the REST API and have implemented token management so your token is refreshed automatically when it expires.
Step 1: Get a Ticket
First, retrieve the ticket information using the Get Ticket endpoint:
curl --request GET \
  --url https://workspace.glassix.com/api/v2/Tickets/12345 \
  --header 'Authorization: Bearer YOUR_ACCESS_TOKEN' \
  --header 'Content-Type: application/json'
const axios = require('axios');
const token = await tokenManager.getToken(); // see Token Management section
const response = await axios.get(
'https://workspace.glassix.com/api/v2/Tickets/12345',
{
headers: {
'Authorization': `Bearer ${token}`,
'Content-Type': 'application/json'
}
}
);
console.log(response.data);using System;
using System.Net.Http;
using System.Threading.Tasks;
var token = "YOUR_ACCESS_TOKEN"; // retrieve using your token management logic
using var httpClient = new HttpClient();
httpClient.DefaultRequestHeaders.Add("Authorization", $"Bearer {token}");
var response = await httpClient.GetAsync(
"https://workspace.glassix.com/api/v2/Tickets/12345"
);
var responseBody = await response.Content.ReadAsStringAsync();
Console.WriteLine(responseBody);This will return the complete ticket object, including participant information, messages, tags, and current state.
Step 2: Close the Ticket
Next, update the ticket state to "Closed" using the Set Ticket State endpoint:
curl --request PUT \
  --url https://workspace.glassix.com/api/v2/Tickets/12345/SetState \
  --header 'Authorization: Bearer YOUR_ACCESS_TOKEN' \
  --header 'Content-Type: application/json' \
  --data '{
    "nextState": "Closed"
  }'
const axios = require('axios');
const token = await tokenManager.getToken(); // see Token Management section
const response = await axios.put(
'https://workspace.glassix.com/api/v2/Tickets/12345/SetState',
{ nextState: 'Closed' },
{
headers: {
'Authorization': `Bearer ${token}`,
'Content-Type': 'application/json'
}
}
);
console.log(response.data);using System;
using System.Net.Http;
using System.Text;
using System.Threading.Tasks;
var token = "YOUR_ACCESS_TOKEN"; // retrieve using your token management logic
using var httpClient = new HttpClient();
httpClient.DefaultRequestHeaders.Add("Authorization", $"Bearer {token}");
var content = new StringContent(
@"{ ""nextState"": ""Closed"" }",
Encoding.UTF8,
"application/json"
);
var response = await httpClient.PutAsync(
"https://workspace.glassix.com/api/v2/Tickets/12345/SetState",
content
);
var responseBody = await response.Content.ReadAsStringAsync();
Console.WriteLine(responseBody);Step 3: Push Ticket Data to an External CRM
Finally, take the ticket data you retrieved in Step 1 and push it to your external CRM system:
curl --request POST \
  --url https://your-crm-endpoint.com/api/cases \
  --header 'Authorization: Bearer YOUR_CRM_TOKEN' \
  --header 'Content-Type: application/json' \
  --data '{
    "case_id": "GLASSIX-12345",
    "subject": "Customer Support Request",
    "status": "Closed",
    "customer_email": "[email protected]",
    "customer_name": "John Doe"
  }'
const axios = require('axios');
// Use the ticket data retrieved in Step 1
const crmData = {
case_id: 'GLASSIX-12345',
subject: 'Customer Support Request',
status: 'Closed',
customer_email: '[email protected]',
customer_name: 'John Doe'
};
const crmResponse = await axios.post(
'https://your-crm-endpoint.com/api/cases',
crmData,
{
headers: {
'Authorization': `Bearer ${process.env.CRM_TOKEN}`,
'Content-Type': 'application/json'
}
}
);
console.log(crmResponse.data);using System;
using System.Net.Http;
using System.Text;
using System.Text.Json;
using System.Threading.Tasks;
// Use the ticket data retrieved in Step 1
var crmData = new
{
case_id = "GLASSIX-12345",
subject = "Customer Support Request",
status = "Closed",
customer_email = "[email protected]",
customer_name = "John Doe"
};
using var httpClient = new HttpClient();
httpClient.DefaultRequestHeaders.Add(
"Authorization",
$"Bearer {Environment.GetEnvironmentVariable("CRM_TOKEN")}"
);
var json = JsonSerializer.Serialize(crmData);
var content = new StringContent(json, Encoding.UTF8, "application/json");
var response = await httpClient.PostAsync(
"https://your-crm-endpoint.com/api/cases",
content
);
var responseBody = await response.Content.ReadAsStringAsync();
Console.WriteLine(responseBody);SDK Workflow
The Node.js or C# SDK automatically handles authentication and token management, making it easier to build robust integrations.
Prerequisites:Before starting, make sure you have installed the glassix-js package and initialized a client or GlassixSharp package and initialized the necessary clients as per your requirements.
Complete Workflow Example
const glassix = require('glassix');

// Initialize the client (credentials from environment variables)
const clientOptions = {
    workspace: process.env.WORKSPACE,
    apiKey: process.env.API_KEY,
    apiSecret: process.env.API_SECRET,
    userName: process.env.USER_NAME
};

const client = new glassix(clientOptions);

async function completeTicketWorkflow(ticketId) {
    try {
        // Step 1: Get the ticket
        console.log('Retrieving ticket...');
        const ticket = await client.tickets.get(ticketId);
        console.log(`Retrieved ticket: ${ticket.field1}`);
        console.log(`Current state: ${ticket.state}`);

        // Step 2: Close the ticket
        console.log('Closing ticket...');
        const closePayload = {
            nextState: "Closed"
        };
        await client.tickets.setState(ticketId, closePayload);
        console.log('Ticket closed successfully');

        // Step 3: Push ticket data to external CRM
        console.log('Pushing data to CRM...');

        const crmData = {
            case_id: `GLASSIX-${ticket.id}`,
            subject: ticket.field1,
            status: 'Closed',
            customer_email: ticket.participants[0]?.identifier,
            customer_name: ticket.participants[0]?.name,
            tags: ticket.tags,
            created_at: ticket.createdAt,
            closed_at: new Date().toISOString()
        };

        const crmResponse = await fetch('https://your-crm-endpoint.com/api/cases', {
            method: 'POST',
            headers: {
                'Authorization': `Bearer ${process.env.CRM_TOKEN}`,
                'Content-Type': 'application/json'
            },
            body: JSON.stringify(crmData)
        });

        if (crmResponse.ok) {
            console.log('Successfully pushed to CRM');
        } else {
            throw new Error(`CRM push failed: ${crmResponse.statusText}`);
        }

        console.log('Workflow completed successfully!');

    } catch (error) {
        console.error('Error in workflow:', error.message);
    }
}

// Run the workflow
completeTicketWorkflow(12345);
using GlassixSharp;
using System;
using System.Net.Http;
using System.Text;
using System.Text.Json;
using System.Threading.Tasks;
class Program
{
static async Task Main(string[] args)
{
// Initialize credentials (from environment variables)
var credentials = new Credentials(
workspaceName: Environment.GetEnvironmentVariable("WORKSPACE"),
userName: Environment.GetEnvironmentVariable("USER_NAME"),
apiKey: Guid.Parse(Environment.GetEnvironmentVariable("API_KEY")),
apiSecret: Environment.GetEnvironmentVariable("API_SECRET")
);
var ticketsClient = new TicketsClient(credentials);
await CompleteTicketWorkflow(ticketsClient, 12345);
}
static async Task CompleteTicketWorkflow(TicketsClient ticketsClient, int ticketId)
{
try
{
// Step 1: Get the ticket
Console.WriteLine("Retrieving ticket...");
var (getSuccess, ticket, getError) = await ticketsClient.GetTicketAsync(ticketId);
if (!getSuccess)
{
Console.WriteLine($"Error retrieving ticket: {getError}");
return;
}
Console.WriteLine($"Retrieved ticket: {ticket.field1}");
Console.WriteLine($"Current state: {ticket.state}");
// Step 2: Close the ticket
Console.WriteLine("Closing ticket...");
var (closeSuccess, closeResponse, closeError) = await ticketsClient.SetTicketStateAsync(
ticketId,
nextState: Ticket.State.Closed
);
if (!closeSuccess)
{
Console.WriteLine($"Error closing ticket: {closeError}");
return;
}
Console.WriteLine("Ticket closed successfully");
// Step 3: Push ticket data to external CRM
Console.WriteLine("Pushing data to CRM...");
var crmData = new
{
case_id = $"GLASSIX-{ticket.id}",
subject = ticket.field1,
status = "Closed",
customer_email = ticket.participants?[0]?.identifier,
customer_name = ticket.participants?[0]?.name,
tags = ticket.tags,
created_at = ticket.createdAt,
closed_at = DateTime.UtcNow
};
using (var httpClient = new HttpClient())
{
httpClient.DefaultRequestHeaders.Add(
"Authorization",
$"Bearer {Environment.GetEnvironmentVariable("CRM_TOKEN")}"
);
var json = JsonSerializer.Serialize(crmData);
var content = new StringContent(json, Encoding.UTF8, "application/json");
var response = await httpClient.PostAsync(
"https://your-crm-endpoint.com/api/cases",
content
);
if (response.IsSuccessStatusCode)
{
Console.WriteLine("Successfully pushed to CRM");
}
else
{
Console.WriteLine($"CRM push failed: {response.StatusCode}");
return;
}
}
Console.WriteLine("Workflow completed successfully!");
}
catch (Exception ex)
{
Console.WriteLine($"Error in workflow: {ex.Message}`);
}
}
}Next Steps
Now that you understand the basics of working with the Glassix API, you can:
- Explore the complete API Reference to see all available endpoints
- Review the SDK documentation on GitHub for glassix-js and GlassixSharp
- Build on these examples to create custom integrations for your specific use cases
- Use AI tools to help adapt and expand these code samples for your needs
- Set up API calls inside Glassix with Functions
Updated 5 months ago