Transfer Calls
Transfer calls from Glassix to your telephone number
Overview
After your AI agent handles a call, you can transfer the caller to your internal team, another phone number, or any SIP destination. There are two types of transfers:
- PSTN Transfers - Transfer to regular phone numbers (mobile, landline, etc.)
- SIP Transfers - Transfer to SIP addresses (internal PBX extensions, SIP endpoints, etc.)
Transfers to PSTN Phone Numbers
Transfer calls to any real phone number through your telephony provider.
Prerequisites
- At least one phone number configured with credential-based authentication
- The number must be verified and active with your provider
- Your provider must allow outbound/termination calling on the trunk
- Caller ID requirement: You must specify one of your registered phone numbers as the caller ID
How PSTN Transfers Work
- A user calls your Glassix number (e.g., +1-555-0100)
- Glassix AI agent handles the call
- Based on your voice flow logic, our AI Agent decides to transfer
- Glassix sends a SIP INVITE to your provider to dial the destination number
- You must specify which registered number to use as caller ID (e.g., +1-555-0100 or +1-555-0200)
- Your provider validates the caller ID is one of your authorized numbers
- The provider completes the call to the destination
- Both parties are connected
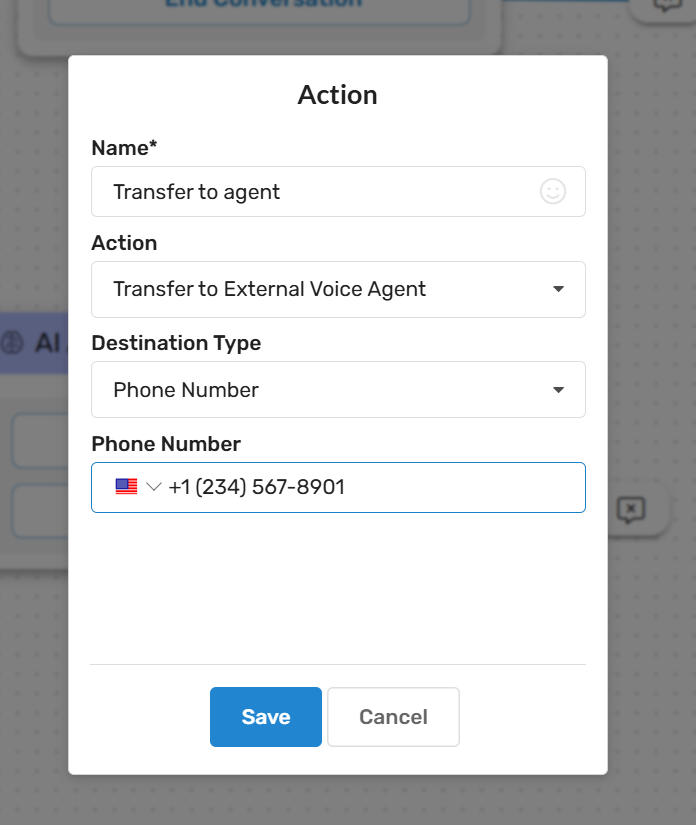
Configuring PSTN Transfers in Voice Flows
-
Navigate to Settings → Chatbot and AI → Chatbot Flows Editor → Your Flow.
-
Add an AI Agent Card.
-
Add a Transfer to External Voice Agent action:
-
Configure:
- Transfer Type: Phone Number (PSTN)
- Destination Number:
+15551234567(E.164 format recommended) - Caller ID: Select from your registered numbers (required)
-
Add fallback actions if transfer fails
Important Notes for PSTN Transfers
- Caller ID is mandatory: You cannot transfer without specifying a valid, registered caller ID
- Use E.164 format: Always use international format (e.g., +15551234567)
- Verify number ownership: The caller ID must be a number you own and have configured in Glassix.
- Provider restrictions: Some providers require explicit authorization for caller ID numbers
- Costs apply: PSTN transfers incur per-minute charges from your provider
Transfer to SIP Addresses
Transfer calls directly to SIP endpoints (PBX extensions, conference bridges, voicemail systems, etc.).
Prerequisites
- A SIP endpoint or PBX that can receive calls
- Glassix IP addresses whitelisted on your SIP server (see IP Whitelisting section above)
- Your SIP server must be reachable from the internet (or use VPN/private connection)
- Optionally: SIP authentication credentials if your server requires them
How SIP Transfers Work
- A user calls your Glassix number
- Glassix AI agent handles the call
- Based on your voice flow, Glassix transfers to a SIP address
- Glassix sends a SIP INVITE directly to your SIP URI (e.g.,
sip:[email protected]) - Your SIP server validates the source IP (must be whitelisted)
- Your SIP server routes the call to the destination extension/endpoint
- Both parties are connected
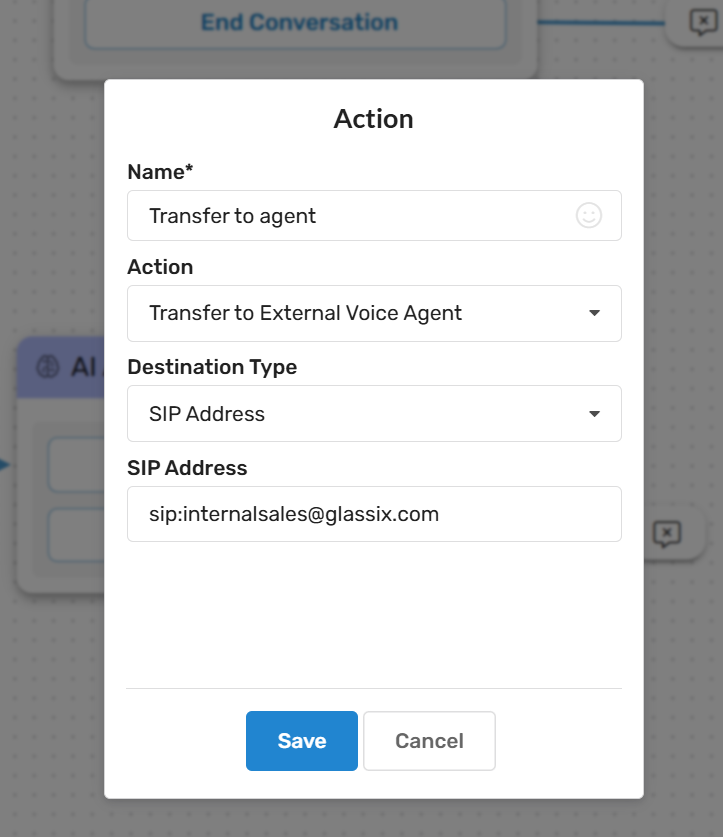
Configuring SIP Transfers in Voice Flows
-
Navigate to Settings → Chatbot and AI → Chatbot Flows Editor → Your Flow.
-
Add an AI Agent Card.
-
Add a Transfer to External Voice Agent action:
-
Configure:
- Transfer Type: SIP Address
- Destination SIP URI:
sip:[email protected]orsip:[email protected]
-
Add fallback actions if transfer fails
Important Notes for SIP Transfers
- IP whitelisting is mandatory: Your SIP server will reject calls from non-whitelisted IPs
- Direct connection: Calls go directly to your SIP infrastructure, not through your provider
- No provider costs: SIP-to-SIP transfers don't incur provider charges
- Firewall configuration: Ensure SIP (5060/5061) and RTP (16384-32768 UDP) ports are accessible
- Domain/IP: You can use domain names or IP addresses in SIP URIs
Provider Requirements for PSTN Transfers
Twilio:
- Enable Termination on your SIP trunk
- Add authorized caller ID numbers in trunk settings
- Ensure sufficient account balance
Vonage:
- Link phone numbers to your application
- Enable outbound permissions
- Configure caller ID policies
Other Providers:
- Verify trunk has bidirectional calling enabled
- Confirm caller ID validation rules
- Check for number porting or ownership verification requirements